Creating a bootstrapper with dotNetInstaller
Introduction
In previous post I described how to create a Microsoft Installer package with the WIX framework and how to create managed custom actions for an installer created with WIX.
We are distributing our products to clients having different environments. Most often there is no dedicated full-time network administrator or DBA available on client side. Thus our product installer has to account for this fact.
Currently we define our prerequisites for a successful installation to be either a Windows 2003 Server with IIS 6 or a Windows 2008 Server with IIS7. Both 32 Bit or 64 Bit versions of the OS are supported. We do NOT install a database but expect that either a Oracle Database Server or a MS SQL Server is available at the client side inside which our database will be hosted.
Since our application is based on the .NET framework our installer needs to be able to install .NET if required. A standard Microsoft Installer Package (MSI) cannot do this thus we need a bootstrapper application.
Unfortunately the WIX framework does not yet contain such a bootstrapper application. It was planned to release one with WIX 3.5 but it has been postponed to version 4.0
There are different ways how to create a bootstrapper for an MSI package. One is described here, its provided by the ClickOnce deployment features in Visual Studio. Another approach is to use dotNetInstaller, an open source project. This is the approach we chose for our product. What is dotNetInstaller? On its website it is descibed as
dotNetInstaller is a widely used, general-purpose setup bootstrapper for Microsoft Windows 95, 98, 2000, XP, 2003, Vista, 2008 and Windows 7.
dotNetInstaller enables the developer to define the application prerequisites and install the correct version(s) of these components in a predictable order based on the processor architecture, user operating system type and language, allow the user to download these components from the web, install these components directly from a single packaged setup, local media or both. …
Again documentation about dotNetInstaller is sparse like in many other open source projects. Luckily there are some samples contained in the package.
Creating a configuration file
To create a new bootstrapper we can use the GUI editor InstallerEditor.exe. But for maximum control and better understanding I prefer to manually edit the necessary xml configuration file. The basic layout of the schema is as follows
<?xml version="1.0" encoding="utf-8"?>
<configurations lcid_type="UserExe" ...>
    <schema version="1.9.5931.0" generator="dotNetInstaller InstallerEditor" />
    <configuration dialog_caption="ACME Product Installer" ...>
        <component command="..." ...>
            ...
        </component>
    </configuration>
</configurations>
.csharpcode, .csharpcode pre
{
font-size: small;
color: black;
font-family: consolas, “Courier New”, courier, monospace;
background-color: #ffffff;
/*white-space: pre;*/
}
.csharpcode pre { margin: 0em; }
.csharpcode .rem { color: #008000; }
.csharpcode .kwrd { color: #0000ff; }
.csharpcode .str { color: #006080; }
.csharpcode .op { color: #0000c0; }
.csharpcode .preproc { color: #cc6633; }
.csharpcode .asp { background-color: #ffff00; }
.csharpcode .html { color: #800000; }
.csharpcode .attr { color: #ff0000; }
.csharpcode .alt
{
background-color: #f4f4f4;
width: 100%;
margin: 0em;
}
.csharpcode .lnum { color: #606060; }
To require installation of .NET framework 3.5.1 if not already present on the target system we can add the following check to the component node
<installedcheck path="SOFTWAREMicrosoftNET Framework SetupNDPv3.5"
        fieldname="Version"
        fieldvalue="3.5.30729.01"
        fieldtype="REG_SZ"
        comparison="version_ge"
        rootkey="HKEY_LOCAL_MACHINE"
        wowoption="NONE"
        type="check_registry_value"
        description="Installed Check" />
.csharpcode, .csharpcode pre
{
font-size: small;
color: black;
font-family: consolas, “Courier New”, courier, monospace;
background-color: #ffffff;
/*white-space: pre;*/
}
.csharpcode pre { margin: 0em; }
.csharpcode .rem { color: #008000; }
.csharpcode .kwrd { color: #0000ff; }
.csharpcode .str { color: #006080; }
.csharpcode .op { color: #0000c0; }
.csharpcode .preproc { color: #cc6633; }
.csharpcode .asp { background-color: #ffff00; }
.csharpcode .html { color: #800000; }
.csharpcode .attr { color: #ff0000; }
.csharpcode .alt
{
background-color: #f4f4f4;
width: 100%;
margin: 0em;
}
.csharpcode .lnum { color: #606060; }
this basically tells the bootstrapper to scan the registry for a Version key in the registry with a value greater than or equal to “3.5.30729.01”. The key is expected to be found at this location
HKLMSOFTWAREMicrosoftNET Framework SetupNDPv3.5
If we do not find this key we assume that .NET framework 3.5.1 is not installed and we want to download it from the internet. We put the following
<downloaddialog dialog_caption=".NET Runtime 3.5 SP1 - Download Components"
                dialog_message="Press 'Start' to download the .NET Runtime 3.5 SP1"
                dialog_message_downloading="Downloading installer ..."
                dialog_message_copying="Copying ..."
                dialog_message_connecting="Connecting ..."
                dialog_message_sendingrequest="Sending request ..."
                autostartdownload="False"
                buttonstart_caption="Start"
                buttoncancel_caption="Cancel">

    <download componentname=".NET Runtime 3.5 SP1"
              sourceurl="http://go.microsoft.com/fwlink/?linkid=118076"
              sourcepath="#APPPATHdotnetfx35.exe"
              destinationpath="#TEMPPATHdotNetRuntime_Download_#PID"
              destinationfilename="dotnetfx35.exe"
              alwaysdownload="False"
              clear_cache="False" />

</downloaddialog>
.csharpcode, .csharpcode pre
{
font-size: small;
color: black;
font-family: consolas, “Courier New”, courier, monospace;
background-color: #ffffff;
/*white-space: pre;*/
}
.csharpcode pre { margin: 0em; }
.csharpcode .rem { color: #008000; }
.csharpcode .kwrd { color: #0000ff; }
.csharpcode .str { color: #006080; }
.csharpcode .op { color: #0000c0; }
.csharpcode .preproc { color: #cc6633; }
.csharpcode .asp { background-color: #ffff00; }
.csharpcode .html { color: #800000; }
.csharpcode .attr { color: #ff0000; }
.csharpcode .alt
{
background-color: #f4f4f4;
width: 100%;
margin: 0em;
}
.csharpcode .lnum { color: #606060; }
The important part here is the attribute sourceurl of the
Creating the bootstrapper
Once we have prepared our configuration file we can create the bootstrapper. To do this we use the linker provided by dotNetInstaller. A typical command looks like this (note that the following command has to be on one single line and has been reformatted here for readability)
pathToDotNetInstallerInstallerLinker.exe
        /Output:Setup.exe
        /Icon:ACME.ico
        /Splash:splash.bmp
        /Banner:banner.bmp
        /Template:dotNetInstaller.exe
        /Configuration:Configuration.xml
        /Embed+
.csharpcode, .csharpcode pre
{
font-size: small;
color: black;
font-family: consolas, “Courier New”, courier, monospace;
background-color: #ffffff;
/*white-space: pre;*/
}
.csharpcode pre { margin: 0em; }
.csharpcode .rem { color: #008000; }
.csharpcode .kwrd { color: #0000ff; }
.csharpcode .str { color: #006080; }
.csharpcode .op { color: #0000c0; }
.csharpcode .preproc { color: #cc6633; }
.csharpcode .asp { background-color: #ffff00; }
.csharpcode .html { color: #800000; }
.csharpcode .attr { color: #ff0000; }
.csharpcode .alt
{
background-color: #f4f4f4;
width: 100%;
margin: 0em;
}
.csharpcode .lnum { color: #606060; }
this command as a result creates an exe called Setup.exe whose icon is ACME.ico. During creation the linker uses the information found in the Configuration.xml file. The MSI package is embedded in the Setup.exe since we use the /Embed+ command line switch. During startup of the Setup.exe the splash.bmp will be shown in a splash screen. When the first dialog is displayed it will contain the banner.bmp as a banner.
Running the bootstrapper
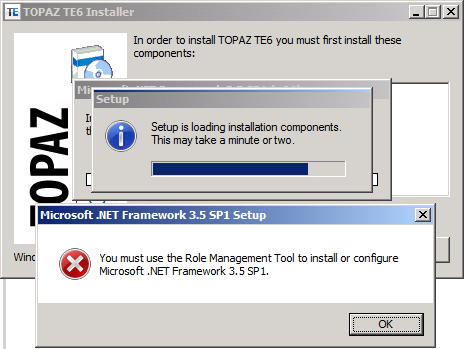
When the bootstrapper detects that the .NET framework isn’t installed on the target system the user is asked to first download and install .NET.

Windows 2008 Server
Windows 2008 Server does not allow for an explicit installation of the .NET framework (3.5.1 SP1 in our case). During installation of the framework an error dialog appears telling the user to install the .NET framework by adding a role to the server. The setup is then aborted.