RabbitMQ for Windows: Hello World Review
Posts In This Series
- RabbitMQ for Windows: Introduction
- RabbitMQ for Windows: Building Your First Application
- RabbitMQ for Windows: Hello World Review
- RabbitMQ for Windows: Exchange Types
- RabbitMQ for Windows: Direct Exchanges
- RabbitMQ for Windows: Fanout Exchanges
- RabbitMQ for Windows: Topic Exchanges
- RabbitMQ for Windows: Headers Exchanges
This is the third installment to the series: RabbitMQ for Windows. In the last installment, we discussed some basic messaging concepts and created our first RabbitMQ application. In this installment, we’ll be taking a closer look at our Hello World application to help round out our understanding of the basic concepts involved.
Hello World Review
In the previous installment, we walked through creating a Hello World example. Let’s review the Producer and Consumer code again:
Producer
class Program
{
  static void Main(string[] args)
  {
    var connectionFactory = new ConnectionFactory();
    IConnection connection = connectionFactory.CreateConnection();
    IModel channel = connection.CreateModel();
    channel.QueueDeclare("hello-world-queue", false, false, false, null);
    byte[] message = Encoding.UTF8.GetBytes("Hello, World!");
    channel.BasicPublish(string.Empty, "hello-world-queue", null, message);
    Console.WriteLine("Press any key to exit");
    Console.ReadKey();
    channel.Close();
    connection.Close();
  }
}
Consumer
class Program
{
  static void Main(string[] args)
  {
    var connectionFactory = new ConnectionFactory();
    IConnection connection = connectionFactory.CreateConnection();
    IModel channel = connection.CreateModel();
    channel.QueueDeclare("hello-world-queue", false, false, false, null);
    BasicGetResult result = channel.BasicGet("hello-world-queue", true);
    if (result != null)
    {
      string message = Encoding.UTF8.GetString(result.Body);
      Console.WriteLine(message);
    }
    Console.WriteLine("Press any key to exit");
    Console.ReadKey();
    channel.Close();
    connection.Close();
  }
}
In both the Producer and Consumer projects, we started our Main() method by establishing a Connection to the RabbitMQ server. We then created a Channel to establish a line of communication with the server and declared a Queue to send and receive our messages. In our Producer, we called BasicPublish() to place a message on the queue. In our Consumer, we called BasicGet() to retrieve a message from the queue and print the message to the console. In both the Producer and Consumer projects, we ended the Main() method by closing the channel and connection to the server.
Establishing the Connection
Let’s first discuss how our example connects to the RabbitMQ server. In our example, we’re establishing a connection using the default connection settings.
var connectionFactory = new ConnectionFactory();
This assumes we have a RabbitMQ server running on our local development machine. To connect to this instance, the ConnectionFactory uses a default host name of “localhost” and a default port of 5672. A user name and password must also be provided to connect to the server. When not specified, the ConnectionFactory uses a default user name and password of “guest”. The “guest” user was pre-configured with full administrator rights when we first installed our instance of RabbitMQ. The final parameter of interest is the Virtual Host. RabbitMQ utilizes virtual hosts (i.e. virtual instances of RabbitMQ) to allow multiple projects or teams to manage and secure their own set of queues from within a single RabbitMQ installation.
When we first installed RabbitMQ, a default virtual host named “/” was created. The ConnectionFactory uses this virtual host when one is not specified.
Specified explicitly, we might have configured these default values as follows:
var connectionFactory = new ConnectionFactory
                          {
                            HostName = "localhost",
                            Port = 5672,
                            UserName = "guest",
                            Password = "guest",
                            VirtualHost = "/"
                          };
IConnection connection = connectionFactory.CreateConnection();
RabbitMQ also supports the AMQP URI Specification which allows these parameters to be specified as a single URI. Using the URI option, we need to percent-encode the virtual host as “%2f”. The following is how me might have established our connection using the amqp URI:
var connectionFactory = new ConnectionFactory {Uri = "amqp://guest:guest@localhost:5672/%2f"};
IConnection connection = connectionFactory.CreateConnection();
Creating a Channel
After establishing a connection with the server, the next step we take in both the Producer and Consumer projects is to create a Channel.
IModel channel = connection.CreateModel();
A channel is a light-weight connection used by RabbitMQ to enable multiple communication sessions through a single TCP/IP connection. Operating systems have a limit to the number of TCP/IP connections that can be opened simultaneously, and creating these connections can be relatively expensive. Through the use of channels, we are free to create as many virtual connections with the server as we want without incurring this overhead or being limited by the number of available TCP/IP connections.
Channels are intended to be used for sequencing communication with the server such as declaring queues or the sending and receiving of messages. A single channels should not be used by multiple threads simultaneously. For this reason, it is recommended that channels simply not be shared across threads.
Declaring the Queue
After opening a channel within our connection, the next step we take is to declare a Queue.
channel.QueueDeclare("hello-world-queue", false, false, false, null);
A queue can be thought of as a sort of “mailbox”. Messages put in the mailbox sit there until a recipient retrieves the mail.
In our example, we named our queue “hello-world-queue”. The queue name (along with the RabbitMQ host name and port number) serves as a sort of “mailbox address”. When we publish the encoded string “Hello, World!”, it is placed in the queue named “hello-world-queue’ and awaits until a consumer retrieves and acknowledges the message.
Before discussing the parameters used in our call to QueueDeclare, it will be helpful to take a short detour and discuss how our message actually gets routed from the Producer to the Consumer.
Message Routing
When looking at our example, it appears as though the Producer sends our message directly to the “hello-world-queue”. What actually occurs, however, is that the message is routed to the “hello-world-queue” through an Exchange.
When using RabbitMQ, messages aren’t actually published to a queue, but rather are published to an exchange which then routes messages to queues. An exchange can be thought as a “post office”. Just as we don’t generally put mail directly in a recipient’s mailbox, in RabbitMQ we don’t publish messages directly to a queue.
To receive messages, a queue must first have an exchange binding established. Part of establishing the binding includes specifying which messages should be routed to the queue. In most cases, this is achieved by specifying a routing key which serves as a filter for which messages are delivered to which queues.
The following diagram depicts how messages are published in RabbitMQ:
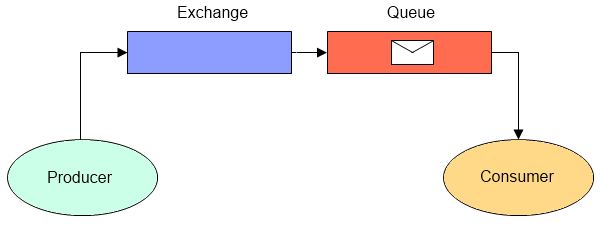
The reason our code looks like it sends messages directly to the queue is due to the fact that we’re taking advantage of a convenience provided by the RabbitMQ server. Whenever a queue is declared, it is automatically bound to a default exchange with a routing key equal to the queue name. Messages published to the default exchange with a routing key equal to the value of a declared queue name are routed to the associated queue.
In addition to being implicitly bound to all queues, the default exchange also cannot be unbound, deleted, or explicitly declared through code. The only operation that is allowed is the publishing of messages.
Queue Parameters
Returning to our discussion of queue declaration, the parameters used in our call to QueueDeclare() creates our queue as a non-durable, non-exclusive, non-auto-deleted queue.
The durability flag pertains to what happens to our queue if the server is restarted. Queues marked as durable will be recreated upon a server restart, while non-durable queues will not be.
The exclusive flag pertains to whether a queue can be declared by more than one channel. Since messages are actually published to exchanges, not queues, there may be cases where you only want a single client instance to be capable of declaring a queue bound to a particular exchange (for example, when using queues to facilitate an RPC call).
Lastly, the auto-delete flag pertains to whether the queue is automatically deleted once all consumers are removed. This flag can be a little misleading since we might suppose setting this to true would cause our “hello-world-queue” to be automatically deleted after our application exists. In fact, it wouldn’t be.
There are two different approaches to receiving messages: pulling and pushing. With the pull API, messages are retrieved on demand through a call to BasicGet(). This is the method used in our example. With the pull API, available messages are delivered to a local queue when a Consumer is bound to the channel. When setting the auto-delete flag to true, a queue will be deleted once it detects that all consumers have been removed. While we named the project which receives messages from our queue “Consumer”, the pull API doesn’t actually declare a consumer to retrieve messages. Therefore, the server is never alerted to the fact that the queue is no longer being used.
Publishing the Message
The last noteworthy point in our Producer project is the parameters to our call to BasicPublish().
channel.BasicPublish(string.Empty, "hello-world-queue", null, message);
The first parameter is the name of the exchange to publish the message to. An empty string is the designation for the default exchange discussed earlier in the section on message routing. The second parameter is the routing key. As previously discussed, all queues are bound to the default exchange using a routing key equal to the value of the bound queue name. The third parameter is an instance of IBasicProperties. This class is used to associate a number of properties with the message, such as the message encoding, content-type, and durability. We’ll take a look at some of the uses of this class further in our series. Lastly, the fourth parameter is the byte array representing the message body.
Getting the Message
The last noteworthy point in our Consumer project is the parameters to our call to BasicGet().
BasicGetResult result = channel.BasicGet("hello-world-queue", true);
The first parameter is the queue to pull a message from which should be self-explanatory. The second parameter is a flag which controls the auto-acknowledgement of the message.
When a message is retrieved from a queue with an auto-acknowledge flag set to false, the server holds the message in an unacknowledged state until an acknowledgement or rejection of the message is received on the open channel (note that messages must be accepted or rejected on the same channel they were received on). This is useful when a consumer needs to ensure the message is processed successfully before it’s fully removed from the server. If the channel is closed without receiving an acknowledgment, the message will be requeued and delivered to the next consumer (using pull or get). In the event that a consumer determines it can’t process the message, it can reject the message with a flag indicating whether to requeue the message or not.
Conclusion
That’s it for our Hello World example review. Next time, we’ll take a look at the four basic exchange types.