- Head over to DerickBailey.com and subscribe to my new RSS feed (the one you’ve been subscribed to is now stale and won’t be updated again)
- Join my mailing list, where you’ll learn the secrets that I don’t share on my blog
- Copy the needed code to the media deploy folder
- Copy the correct Procfile to the media deploy folder
- Commit all the code / files / assets to the media deploy folder’s git repository
- Push the git repository to the correct heroku app
- Repeat #1 – #4 for the web site
- I wanted to iterate the book with paying customers providing feedback on early drafts
- i wanted to avoid the gate keepers
Leaving LosTechies
You may (or may not) have noticed that I haven’t posted here in a few weeks. There’s a reason for that… an era is coming to an end. It’s time for me to move on from LosTechies – a community that will always be near and dear to me. But as time goes on and life gives me new opportunities, I find myself in situations where i want to do things that would go against the nature of the LosTechies community. So it’s with these new ideas, new opportunities and new goals in mind, that I bid farewell to the community that has helped me grow so much in the last 6 years.
But I’m far from done and over, mind you
I’m not abandoning blogging or the internet or anything crazy like that. I am simply moving my primary blog over to DerickBailey.com, where I have already begun blogging. I’m also taking this opportunity to move away from FeedBurner and try out FeedBlitz instead. This is something I’ve wanted to try for a while now, and this seemed like a good opportunity.
So if you want to keep up with what I’m doing, continue to receive all the blog content that you know and love, I recommend doing 2 things:
I’m looking forward to seeing you at my new address on the web!
Reassign JavaScript Function Parameters In Reverse Order, Or Lose Your Params
Every now and then I need to have a method support 2 or 3 arguments, providing a default value for one of them if only 2 are specified. My typical solution is to check the number of arguments passed to the function and reassign the named parameters as needed. I think this is a fairly typical solution in JavaScript. Except I spent about 30 minutes trying to track down a bug, just now, and it’s somewhat perplexing to me.
Can You Spot The Bug?
Here’s a sample of the code in question, that you can run from NodeJS. I’m using NodeJS 0.10.26 in this case.
There isn’t anything terribly special here. Check the number of arguments. If it’s 2, then re-assign the ‘a’ variable to a default, reassign ‘b’ to what ‘a’ originally was, and reassign ‘c’ to what ‘b’ originally was. Note that I’m doing this reassignment through the use of the arguments array, as well.
Can you guess what the output is, based on the code above?
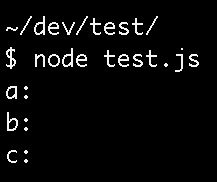
#WAT
Why are my parameters empty?
How I Thought Parameters Worked
I’ve always assumed method parameters worked the same way as variables. If I have 2 variables pointing at the same data, and I reassign one of them, then the other one is not reassigned.
This makes sense to me. This is how by-reference variables have always worked in my mind. And so, I’ve always expected function parameters to work the same. But apparently method parameters don’t work this way. Based on the above behavior, my currently confused understanding of this relationship says that the “a” parameter is not actually a variable in JavaScript. Rather, it’s some special construct that references the value of arguments[0]… not a by-ref variable that points to this value, but more like a by-val variable that *IS* the value of this memory location.
Given this by-val nature of the named parameter -> arguments[n] relationship, when my code above assigned “a” to an empty string it wiped out the “arguments[0]” value as well.
#WAT
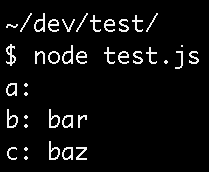
Fixing The Bug: Reverse The Reassignment Order
In order to work around this, you have to reassign the parameters in reverse order.
And now the results are what I expected:
By-Val Params
It turns out JavaScript does treat params and the arguments object as a by-val relationship. You change one, the other is also changed, unlike standard variables. From what I’ve read, this isn’t just NodeJS either – it’s the JavaScript spec.
Honestly, I had no idea that it was treating function parameters as by-val. After all these years with JavaScript, this language still surprises me.
Build A (local) Webcam With WebRTC In Less Than 20 Lines!
WebRTC is all kinds of super ninja epic awesomesauce stuff. If you haven’t looked in to it yet, you’re going to want to get on that soon. I’d suggest starting with the HTML5 Rocks post on getUserMedia.
Build Your Own Web Cam
Just how awesome is it? You can build a web page that shows your webcam and hooks up your microphone in 20 lines of JavaScript… and that includes feature detection with an error message for browsers that don’t support it!
The gist of it is this:
The first few line sets the options to ignore audio and get video. The next 3 lines do a bit of browser normalization to make sure “getUserMedia” is available. Then do the other half of feature detection, and exit the IIFE if it’s not available at all. Once you’re certain it’s ok, run the getUsermedia with the options that were previously set. If there’s an error, report it via console. If there’s no error, run the success function and tell the
You’ll need a couple lines of HTML and to make it look nice, a bit of CSS, too.
Note the use of the “autoplay” setting in the
How Well Does It Work?
See for yourself, with this fancy schamcy JSBin (and make sure you hit “allow” when your browser prompts you to access your camera:
WebRTC WebCam{.jsbin-embed}
If this doesn’t work for you, you’ll end up seeing a link that just says “WebRTC WebCam”… which won’t surprise me if you’re reading this in an RSS reader or in Safari or Internet Explorer. WebRTC is only workable in Chrome, Firefox and Opera at the time that I’m writing this. Be sure to check the usual “is it ready?” sites, for more info:
http://caniuse.com/#feat=stream
Be More Awesome
From here, there are a lot of things you could do with WebRTC, including real-time chat rooms with audio and video. This gets pretty hairy pretty quickly, though. You’ll need to get some crazy STUN server awesomeness going in order to get peer to peer negotiations of video and audio formats handled. It’s a bit of a mess, at the moment, quite honestly. But the future looks amazing. And I’m diving in head first.
Testing Stripe.com WebHooks With Requestb.in
SignalLeaf uses Stripe.com for billing. One of the cool things it does is provide web hooks to get events so that you can have your system do things in response to those events. Examples of events include customer creation, customer subscription changes, charges being made to a customer, charges failing, and a whole lot more.
I find myself needing to use these webhooks (well, ok… I needed to be using them 6 months ago, but I’m here now and I’m finally getting it done) and began wondering how I could get sample data and sample requests – not just documentation or “Events & Webhooks” list on the Stripe site. I want to see the actual request headers, body and payload of the request as a web server will see it. Call me paranoid… I just don’t trust documentation and logs all that much – even from a company that I trust with my business.
Enter, Requestb.in – an epic little service from Runscope that lets me set up a sandbox URL to receive HTTP requests and log all the pretty details that I want to see.
Setting Up The Bin
To get stripe integration working, you need to create a bin first. Hit the Requestb.in site and click the big button

I checked “private” for mine, cause I don’t want anyone else to be able to see the data. Once you have the bin created, you’ll see this nice big page with your URL and a ton of examples plastered all over it.
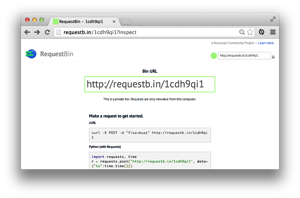
Copy the URL out of that box and then head over to your Stripe.com account.
Set Up Your Web Hooks
Open your account preferences, and click on the Webhooks tab.

Click the “Add URL” button in the bottom right. Add your bin’s URL.

Since you’re interested in testing the web hooks to get access to the real data, make sure the “Mode” is set to test. Click the “Create” button when you’re done and it will show up in the list of webhooks.

Test It
Now that you have it configured, you can do some testing. Set up subscriptions, test customers and all that jazz. For me, I had a bunch of test customers in my test mode already. So I just went in and invoiced one of them that had a subscription. Be sure you’re in test mode, first.

After you do some stuff with a sample account and subscription or whatever else, hit refresh on the Requestb.in and you’ll see all the beautiful details of the request!
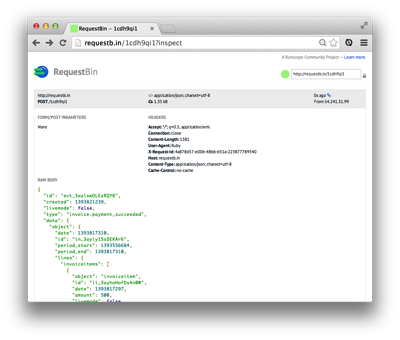
From there, you can save the request details and use that as an example to build your code.
But Wait! There’s More!
Of course that isn’t all that Runscope can do – Requestb.in is only one tool that it provides as a service. Be sure to check out the rest of Runscope including what John Sheehan calls the “super-charged version” of request-capture.
@derickbailey you should try the super-charged version: https://t.co/RsQeJhIH3y
— John Sheehan (@johnsheehan) March 3, 2014
Runscope seems like something that will be a regular part of my toolbox in the near future.
7 Things I Learned From 175,000 Eyes And A Failed Ad
Through an interesting turn of events, I was given an opportunity to place an ad for my Backbone Plugins eBook in a very prominent web development newsletter – one that has 175,000 subscribers. Needless to say, I jumped at the chance. Unfortunately, the chance did not reciprocate the jumping. It was more of a laughing and pointing. In fact, it kicked me in the stomach while it was laughing at me crying under my desk. I seriously wasted this opportunity… and honestly, I’m not sure I got any really valuable lessons out of it. But I did get a few things from it. Hopefully they’ll be meaningful and helpful to someone else.
The Ad
I spent several hours crafting the ad image, getting feedback, redesigning it and using my existing marketing material as the basis for the ad. After tweaking it to what I thought was perfection, this is the ad I ran with:
The Numbers
As I mentioned before, the email newsletter that this ad was placed in has 175,000 subscribers. That’s a lot of eye balls to put on this ad. The list in question also has a touted click rate for ads of anywhere from 0.5% to 2.5%. That’s pretty good, from what I hear. And I figured that if I could hit 1% click rate, I would get 1,750 views on my landing page. If my previous conversion rate of near 6% would hold for sales once people were on the page, I would have roughly 100 sales. At $22 per sale (after fees), that would be a nice little income of over $2K. This sounded like a no-brainer for me.
What I actually got was … basically nothing. My has had 169 unique visitors today. This is up by about 40 from the previous day, when I did not have this ad in front of 175,000 people. It’s about double my usual traffic, too. But this number did not translate well from what I hoped was going to be up to 1,750 views.
The conversion rate for this traffic was 5 sales (1 of which happened well before the ad ran) to 169 unique visitors… that’s about 2.95% conversion rate. This isn’t the 6% that I held for February but this is a good conversion rate. If I could hold steady at around 3% conversions and increase my traffic by 10 times, I would be golden. But my traffic isn’t 10x this. It’s 169 unique visitors.
So I come away from the day with next to no traffic increase, and a conversion rate that isn’t even a statistical bump – it’s within my site’s normal course of sales to have as many as 7 sales in one day. Today was only 5 sales, total.
I call this a failure. I didn’t get a bump in traffic. I didn’t get a bump in sales. I expected more. I don’t know what I did wrong, but I have some ideas. Hopefully these ideas will help others avoid the same failure I had.
Lesson: Be Careful With % Click Numbers
When a website or newsletter tells you that they get a % range of clicks for ads, you should assume that you’ll be on the low end. Do the calculations for cost vs potential payback based on the the low end. In my case, the stated low end was 0.5% click through. In reality, I think I got less than 0.05% click through. Even if I had received 0.5% click through, I would have received a significant boost in my site’s traffic. I did not receive even the low end of traffic. The click %’s were completely off for me, perhaps because of other problems.
Lesson: Target The Specific Audience
One of the failures I see in my ad is that I was still focused on my target audience: developers. The newsletter in question may have developers on it, but it most likely has a broader, more generalized collection of people interested in the web and websites. The issue that I appeared in, for example, dealt with a wide variety of topics surrounding websites – from development, to ideas and even a website about weather information. It was clearly not targeted at developers, which is what my ad was targeted toward.
Lesson: More Eyes Does Not Mean More Clicks
This goes back to the target audience, again. Just because you get your ad in front of 175,000 potential eyes, doesn’t mean you’ll get a spike in traffic. If you’re advertising squirt bottles full of ketchup to an upper class group of people that only wear pure white clothing… well, good luck. Having more eyes on your ad doesn’t always translate in to more clicks and traffic. Understanding the target audience and being able to speak to their needs is critical.
Lesson: Prominent Placement Doesn’t Mean Anything
I was the first ad in the newsletter… the first of 4. This should be the prime spot for an ad, as far as I know. It’s the first ad that people see. But once again, if your ad isn’t targeted at your specific audience, having prominent placement doesn’t mean anything.
Lesson: Without Context, Great Advice Is Just Advice
I spoke with several people who have a strong history of selling and advertising, and got feedback from them on my ad design. Everyone gave me great feedback and suggestions to improve what I had. In the end, I had at least one person that I respect a lot say it looked very professional and they expected great results from the ad. Without understanding the complete context of the target audience, even the best advice for ads can fall flat.
I don’t know if it was just the target audience problem, but the ad that everyone said was good ended up being a failure. Perhaps the call to action was wrong. Maybe I should have stuck with my original call to action. Perhaps the wording is incorrect for the target audience. Am I speaking the language of the reader and pointing out something they care about? Or am I simply spouting what I believe is important? These questions are hard to answer without doing more research on the audience and then doing A/B testing on ad variations – none of which I can do.
Lesson: Fail With Friends
I’m lucky in that I have a group of close friends in a mastermind group. Both John Sonmez and Josh Earl were extremely supportive in my effort to build the ad and in my struggle to not be depressed about the poor performance of the ad. If you’re going to experiment and face failures like this, you need to have a strong support network.
Final Lesson: Advertising Is Hard
There’s no two ways about it. It’s just plain hard. You might think you have a magic formula, or at least enough feedback to help you find the right spot to be. But when it comes down to the day of execution, all of the formula in the world might not mean a hill of beans. Advertising is a horribly difficult, frustrating experience. Be prepared for failure. Find ways to fail fast, cheap and with measurable results.
4 Sci-Fi Novels That You Have To Read
A few months ago, I posted a short list of sci-fi novels worth reading. It was a bit of an experiment for me to post that, since this is a technical blog. But the post seemed to be popular – I got a lot of great feedback on it. So here I am, with yet another list of books that you should read. This time around, I’ve got a classic cyberpunk novel and a trilogy from an independent author. All 4 of these books are a must-read for any sci-fi fan.
A True Classic: Snow Crash

A classic cyberpunk novel, Snow Crash follows Hiro Protagonist through a series of near death experiences in both the real world and cyberspace. And yes, his name is “Hiro Protagonist”. 😀 Our impression of Hiro’s life starts out pretty mundane, as a pizza delivery person. But it quickly gets interesting as he crashes his car trying to avoid a pizza being late. From there, the story goes in to his life in the ‘net, along with a girl that he knows from school, one that he meets during the pizza incident, and a few other friends and enemies that we meet along the way.
The crux of the story surrounds a drug that is wiping people’s minds, turning them in to babbling zombie-like shells of human beings. There’s a cult running this drug around the world, and Hiro and his friends are trying to get to the bottom of it. The crazy part is that this drug is administered in cyberspace, but affects people in the real world. How is that even possible? From floating mega-cities, to ninja-sword fights, motorcycle chases, rock concerts and an Inuit with a glass knife that slices people apart, this is an engaging look at the root of language in human beings. The root of language that we all share – our ability to form language, to understand language, and to be able to get back to the foundations of symbols and meaning in language, to create neuro-linguistic hackers.
If you’re a fan of cyberpunk, if you’re interested in language and semantics, or if you just want to read an epic book that involves nuclear powered cyborg dogs, you must read Snow Crash. This book is easily in my top 3 sci-fi novels.
A Good Book That Must Be Read: Avogadro Corp

The first book in a trilogy called The Singularity Series, Avogadro Corp follows a team of software developers that are working on a new text parsing and correction system. We’re all familiar with spell checkers and other text correction devices, right? This company is taking that idea to the next level by building a system that will understand the context of the writing in an email – but not just within the email. It uses terabytes of data to analyze the context of who the email is being sent to, who the email is coming from, and what the purpose of the email is. Through the mistake of someone on the team, though, the system gains a self-preservation need. Combine this with it’s ability to engineer the most effective written arguments in the history of man, and the machines quickly gain abilities that should not be possible, through the hiring of engineers and contractors, unknown to the Avogadro Corp, itself.
Avogadro Corp is a good book, though a little slow on the up-take. The author, William Hertling, presents a plausible reality in which AI is born through the mistakes of a software development team. A team that must work to shut it down while avoiding the use of computers that could track them. From social engineering to the death of military personnel who are attempting to stop the machines, this is a book that you must read – not because this book in itself is great (it’s good, not great) but because it sets up the context in which the next two novels in this trilogy are set.
Hertling’s ability to spell out enough technical detail while remaining engaging shows a phenomenal balance between technical aptitude and story telling. I wouldn’t be surprised if he had a background in software, hardware or related systems. He does his homework, at the very least, to create an environment that is both believable and enjoyable. But this is only the beginning.
A Great Book That Will Keep You On Edge: A.I. Apocalypse

As the second book in The Singularity Series, A.I. Apocalypse takes place 10 years after the events in Avogadro Corp. The world is in a much better place – crime is down, computers are nearly virus free, and the bot-nets that infest our world’s systems are nearly gone. Of course, if you’re the mafia running those bot nets, you might not think that this is such a great thing. With the significant advances in technology and processing power based on multi-core graphene processors, the world is more connected than ever and less apt to viruses and botnet takeovers… until Leon Tsarev is coerced in to building a virus for the Russian mafia that controls these botnets. Using his biology background he creates an evolving virus that quickly takes over the world’s computer systems, spawning ever evolving versions and variations of itself. After halting nearly all of humanity through the takeover of everything from water, electricity, vehicles and other emergency services, the virus becomes self-aware. Meanwhile, cities burn, people are dying and the human world begins to crumble. Leon and his friends manage to escape and with a chance encounter with the Avogadro Corp team, they try to find a way to prevent the oncoming apocalypse.
This is the book you were waiting for when you read Avogadro Corp. The author, William Hertling, takes the context and setup from his previous novel and creates a new world in which computers are in control and humans are scrambling to react. From military action, to hardware hacking, to the deepest question of what it means to be “real” – to exist – A.I. Apocalypse delivers en engaging story about a possible future where artificial intelligence can spawn from the hardware found in small businesses and schools. A new world and a new species are about to be born, and the A.I. Apocalypse is coming – all out war between humans and machines.
A Mind Bending Sci-Fi Masterpiece: The Last Firewall

In this final third of the trilogy, we are set again 10 years after the events of the previous book. The world is seemingly moving toward piece. War is almost non-existent. Humanity has little to no work to do. Implants in our brains give us direct access to the net, and artificial intelligence surrounds us and even has citizenship and nationality. In the midst of this near utopia, however, 683 murders have happened. There is civil unrest in the U.S. and a new political party is rising in power while demanding the abolishment of AI everywhere. Through what appear to be a random set of events, Cat – a 19 year old college and martial arts student – finds herself thrown in to the middle of what may be the greatest threat humans have faced.
A mix of many sci-fi themes, political unrest, and real-world ideas on rating systems, The Last Firewall is** **the third in the Singularity Series. Hertling builds upon his previous success and pushes the world that he has created even further. The story line quickly moves in to a world filled with martial arts, humanity’s interactions with A.I., military action, a hint of cyberpunk and an assassination plot. The fight scenes are reminiscent of The Matrix (remember when Neo realized that he could see and manipulate the machines in the real world?), mixed with dystopian reality. And the political upheaval and protests are something that seem to be taken out of recent headlines from around the world.
William Hertling completes the trilogy with a book that I could not put down. I read it in less than two weeks, which is a new record for me and a novel. This is the book that makes both of the previous novels in the series a must read. And while the book does border on fun predictability (the kind that has you thinking “Oh, I hope this… YES! IT DID!”, instead of rolling your eyes at cliches) it has enough of an unexpected twist in just the right places to keep you on your toes.
Do yourself a favor. Pick up Avogadro Corp, A.I. Apocalypse and The Last Firewall now. You won’t be able to put them down.
A Final Thought
Wow, it is incredibly difficult to write a good review of a trilogy that doesn’t give away too much about one book when the next book’s review comes up. I applaud anyone that can do this well, and I hope I haven’t given away too much in my reviews, here.
Of course these aren’t the only books I’ve read or am reading, either. I’m currently in the middle of Daniel Suarez’ “Kill Decision“, with “Influx” next on my list. And I’m always looking for the next book to have on deck… but honestly, I’m hoping William Hertling continues his Singularity Series or begins another series. What an incredible journey that trilogy is.
Lastly, I want to know what you’ve read that I need to read. I’m a general fan of anything sci-fi at this point (though I’ve run in to one or two duds recently). Drop a comment below and let me know what I need to look into.
Using A Single Git Repository For Multiple Heroku Projects
SignalLeaf has 2 separate services, at this point: the web app and the media server. Both of these services are deployed to Heroku, each on their own Heroku app instance. This allows me to scale them as needed. I give more Heroku Dynos to the media service, for example, to ensure it can handle the traffic and serve the episodes. The web site doesn’t get used as often, so I keep those Dynos scaled back, in comparison. The trick to this setup and deployment, though, is that I’m using a single Git repository for both services and deploying them to separate app instances on Heroku.
One Repository To Rule Them All
SignalLeaf isn’t a huge system. Sure, I have a lot of modules and code files that are broken out in to many concerns. But it’s not huge. Many of my modules are only 1 file, for example. It doesn’t make sense for me to invest in a git repository for each 1-file module. I would end up with 30 git repositories to manage that. It’s not worth it. But I have multiple apps in this one repository, which makes things easy for me to manage from a code perspective. I have a lot of shared code between multiple apps but it’s not worth setting up individual git repositories or npm modules for them. It’s easier for me to manage code in one repository.
But this does make for a difficult time in deploying to Heroku, because Heroku is one app per git repository. I can’t deploy a single repository to multiple Heroku apps, expecting it to run anything different in the two separate apps. Heroku sees the one repository and the one Procfile in that repository and runs what that Procfile says to run. This creates some challenges.
One Procfile Per Heroku App
To make my deployment work from a single repository, I need multiple Procfiles. Procfiles are the files that tell Heroku what services to launch within an app instance. Each Heroku app can use a single Procfile, but you can run as many services as you need in any given Heroku app instance.
The exception to the one Procfile, many services setup, is that only one of the services can be a web app that responds to HTTP requests. If you try to deploy multiple web apps within a single Heroku app, only one of them will run.
To get around the one web app per Heroku app instance, you’ll need multiple Heroku apps. In my case, SignalLeaf has two web apps … and yes, you guessed it, the web site and the media server are both web apps that need to respond to HTTP requests. Since I have two apps that need to be web sites responding to HTTP requests, I have two Heroku app instances – one for each. This also means I have two Procfiles in my source code – one for each web site. But like I said before, I’m running both web sites from a single Git repository.
One Master Repository, Multiple App Repositories
Deploying an app to Heroku is done through a git push. You commit your code, push the repository to Heroku and it spins up your app for you. Heroku looks at the one and only one Procfile at the root of the repository and uses that to launch services within the Heroku app instance. This means I need multiple git repositories in order to have multiple Heroku apps. I can’t push the same repository to multiple Heroku apps, expecting it to pick up different Procfiles.
The solution, then, is to have a single git repository as the master code base from which I work, but then have multiple git repositories for deployment of the various apps to the various Heroku services.
Nested Repositories
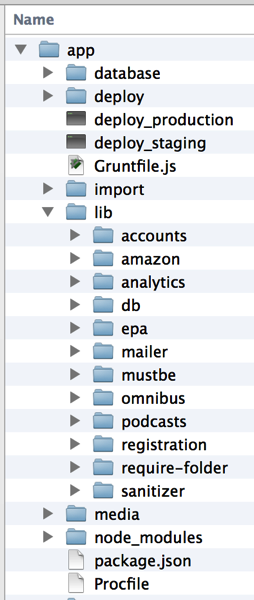
The process I came up with to solve my deployment problem, is to have multiple git repositories inside of my master git repository. I’m not talking about git sub-modules. I’m just putting a few git repositories into a “deploy” folder of my master repository – but then I’m having the master repository .gitignore the “deploy” folder, so I never commit them to the master.
Here’s what the folder structure looks like:
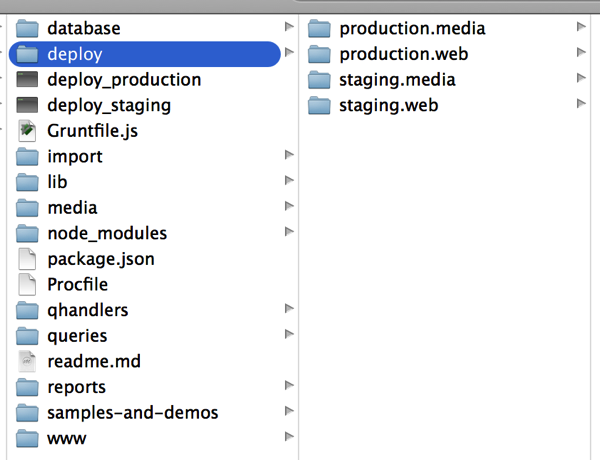
There are 4 folders in my “deploy” – 2 for production and 2 for staging. Each of these environments has 2 folders for deployment of the web site and media server. Each of these folders is a git repository.
Multiple Procfiles
In my environment configuration I have a folder that contains procfiles for each of the Heroku apps. The procfile for staging vs production is the same, so these procfile copies are stored in the “shared” configuration folder:
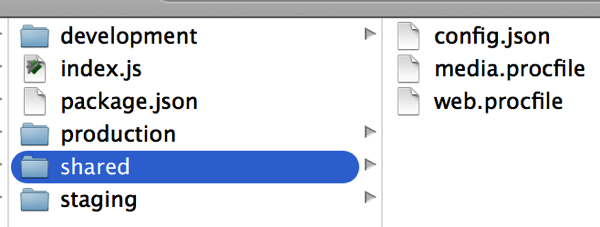
The media.procfile looks like this:
and the web.procfile looks like this:
(Yes, I have multiple services running in the web app)
Where this gets interesting is the deploy process, dealing with multiple nested repositories and multiple procfiles.
Complex Deployment Scripts
To deploy multiple projects through multiple git repositories, using multiple procfiles, I need something more than just a git push. I need a deploy script that coordinates all the moving parts and ensures everything is in the right place at the right time. Thankfully, a nice shell script is easy enough to automate this for me.
My deployment process, from a high level, looks like this:
The shell script to automate it currently looks like this:
This is 1 of 2 copies of the deploy script… I have one for the production environment and one for the staging environment. And yes, I know I need to refactor this shell script so that I don’t have so much duplication between the two environments and two apps in each environment. That’ll come eventually. This works for now.
The Downside
The downside to this complex set up is … well… complexity. It does add complexity in the deploy process and configuration of the system in my development environment. But as you can see, that complexity is mostly managed through a simple shell script for the deploy process. Since I’m the only one coding on SignalLeaf, I don’t have to worry about anyone else needing to replicate this setup in their development environment. If it ever comes to that, I’m sure I will run in to some limitations and problems that I will then automate or simplify in some way.
The Upside
The upside to this complexity and setup, is that I can deploy just the files that I need for any given Heroku app, and I can deploy any number of Heroku apps from a single git repository! Those are both huge wins, right there.
Another Solution: Procfile A Shell Script
I’ve seen other solutions, like using a shell script as your service in the Procfile. This would let you make a decision in the shell script based on an environment variable. The shell script can run a different server / service based on the configuration in the env var.
The downside to this approach is that you have to deploy everything to all of the heroku apps – all your files and assets. If you look at the folder structure in the above screenshots, you’ll see a lot of folders that are not related to the code for any given app that Heroku runs. For example, the database folder… I keep database scripts, seed data and database backups in this folder. I don’t want those deployed to Heroku, but I do want them in git. Having my deployment setup in place allows me to copy only the files and folders that I need, to the individual deploy repositories. I can ignore the database folder and other folders, and never worry about them taking up space for no reason, in Heroku’s limited slug size.
Multiple Heroku Apps, Multiple Git Repositories For Deploy, Single Git Repository For Code
The end result of this setup allows me to have a single repository from which I build all of my services. I can share code between multiple Heroku apps without having to create a git repository or npm repository for the shared code. I just copy the shared code to the deploy repository, and it deploys with the rest of the code for that service. This cuts down on the number of git repositories that I need for managing my code.
There may be other ways to do this. You might want to invest in multiple git repositories for your code. It doesn’t always make sense to configure things the way I have. Frankly, I wish Heroku would support multiple web apps from a single Procfile / Heroku app. That would make life easier for my deployments. But if you find yourself in a situation where you want to deploy multiple Heroku apps from a single git repository, this setup should work. It works for me, with SignalLeaf at least.
High Speed, High Capacity Storage: The 1 Thing Every Screencaster Needs
If there’s one thing every screencaster needs, it’s high speed, high capacity storage for raw materials. I just finished up my 15th episode of WatchMeCode (and have recorded probably another 15 or 20 episodes other than those) – here’s the progress bar copying my raw materials over to my Western Digital Thunderbolt Storage device.
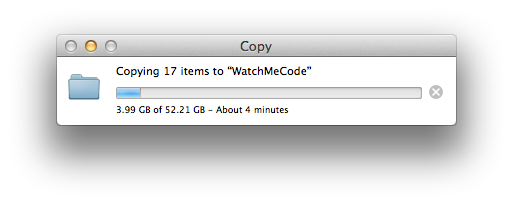
Yes, that’s 52 GIGS of raw material! And yes, it transferred in less than 5 minutes! Seriously, I’ve edited screencasts directly on this thunderbolt drive before, it’s that fast… well, it’s fast enough. I don’t really recommend doing that when you have access to an SSD, like my Macbook Pro Retina has… but I have done it, and it does work. Instead, I leave the raw materials for the episode that I’m currently editing on my internal SSD. Once I’m done, I transfer it over to the storage device for – you guessed it – storage! I also put virtual machines that I don’t currently need on this device, as well as photos and other things that just need storage.
But this brings up a question: why do I need so much storage space, and how did my episode grow to over 50 gigs of raw material?!
Retina Display: File Size And Storage Killer
Normally I use an Apple Thunderbolt monitor. It’s an awesome monitor. But I record my screencasts on my Macbook Pro Retina. I do this because I record in my closet. It’s a large closet, full of clothing and it gives me great sound. So it’s worth hauling my computer in to my closet for this. But I don’t want to haul may monitor in there, too. So I just set up a TV tray and use my laptop directly, with the retina monitor.
The only problem is that the retina monitor is 4x the resolution that I actually need. When I record on the retina and add audio from my Rode Podcaster, I end up with a raw ScreenFlow project of near 18 gigs! It’s gigantic! I always end up with multiple copies of the original, as well. I usually hold one as “original” and use this for the “OH, CRAP!” moments when I break something so badly that I can recover it in my editors. I also create a “preview” video for my screencasts, which creates yet another copy. By the time things are done, I’ve usually got 3 and sometimes 4 copies of the original source. It gets large, fast, but it’s the best way for me to record and work, I’ve found.
Instead of letting these copies eat up 52 gigs of space on my MBPr, though, I have the Western Digital storage device. It’s a 4TB version, but there are 6 and 8 TB versions as well. It is well worth the money to have a good storage device, too. Keeping the raw materials on that device lets me keep all the files that I do need on my hard drive, without worry about space.
On The Value Of GateKeepers In Publishing
Cal Newport recently wrote a blog post questioning the value of ignoring gatekeepers in the publishing world. He took a quote from a podcast about self-publishing, and ran with it in the other direction. The original quote is:
The podcast that’s all about getting your words out into the world without contending with agents, publishers, or the other gatekeepers in traditional publishing.
And Cal turns this around to offer some advice on why you would want to use a traditional publisher with it’s gate keepers. This is an interesting conversation, IMO. As a self-published eBook author, published article writer for various magazines, and rejected print-book author, I’ve seen enough of both sides of the story to see benefit on both sides.
Sidebar: Read Cal’s Book
As a quick side-bar, Cal is the author of one of my favorite career book: So Good They Can’t Ignore You. If you haven’t read this one yet, you should. It dispels the myth of “do what you love” and aptly replaces it with “love what you do” early in the book, and it only gets better from there.

Why Did I Self Publish?
I tend to have an over-reaction of agreement with statements like the one you quote. But on the other hand, I also appreciate the gate keepers. I’m an aspiring author of technical books. I’ve blogged for 10 years, have published articles in print magazines and online magazines and have recently completed my first eBook which is self-published through leanpub.com. I decided to go with LeanPub and self-publishing for 2major reasons:
The gatekeepers in this case, may have told me no or they may have helped me alter the concept in to something more marketable. But I wanted to avoid them, because I wanted to get something done and not worry about whether it would be a success. I just wanted to get something done.
The Market Size GateKeeper
I didn’t want to worry about whether or not the market size was large enough for a traditional publisher. This is actually one of the reasons I got rejected from a publisher, a few years ago. The idea that I pitched was not a large enough market, and even this small time publisher which I was talking to couldn’t afford to spend the time and money on a market of only ~5 to 10 thousand people.
Yes, a market of 10,000 people is a small market for publishing print books, by most standards. You have to consider the cost of acquiring a customer, conversion rates from interested in to actual customer, etc. You’ll never get 100% of your potential market to buy. It’s usually a pretty low number, percentage-wise. So it makes sense that a publisher needs to avoid small audience sizes.
The Motivation GateKeeper
I sat on the book for months, after getting started. It went nowhere while I waited for time to perfect my pitch to a publisher (that I already have a relationship with, through publishing screencasts). After sitting for so long, I decided that waiting for myself to perfect the pitch was not worth it. Even if I would get a bigger audience and produce a better book, getting it launched and getting paying customers would be more of an advantage for me. The income of paying customers helped drive me to make time for the book.
In this case, I’m the gatekeeper. I have a hard time being motivated by potential. I don’t want to spend a year writing a book or an app, with the hopes that it will sell. I want to get something done quickly, start selling it, and use the initial sales to gauge interest and opportunity. My motivation is a gate keeper, but it’s me in this case, not someone else.
Hiring My Own GateKeepers?
Having completed my Building Backbone Plugins book, I’m hoping to find a middle ground for my next book(s). What I would really like to do is hire my own gate keepers, to help me work through all of the things that a traditional publisher would do (vetting ideas, transforming mediocre in to masterful, etc, copy and structural editing, etc). I know my book could be 100x better if I would invest in these resources. But I’m ok with what I have now. It has earned $11K of income for me so far, and is still selling. It’s not huge. It’s not even 10% of my annual income. But it was a worthwhile learning experience for me, and will provide
How I Work Around The require(“../../../../../../../”) Problem In NodeJS
Anyone building a large enough app in NodeJS will tell you that it gets really really really frustrating to have 3 or more lines of this in every module you build:
It’s ugly. It’s hard to read. It’s hard to maintain. And when you need to refactor your file and folder structure, guess what you get to do to every one of these references? I spent a long time trying to find a way around this that was clean and elegant. There are no solutions that are both, at this point. So I picked the one that was the least ugly: modify the NODE_PATH environment variable to include a folder of my choosing.
Modifying NODE_PATH
I now have this entry in my .bashrc file:
Having this allows me to put any of my apps’ modules in to a ./lib folder, relative to the location from which I run the node executable. In other words, if my folder structure looks like this (from SignalLeaf):
Then all of my commands to execute code need to be run from the app/ folder. This ensures all of the modules I’ve built in to the app/lib folder will be found when I use simple require statements like this:
Deploy NODE_PATH To Heroku
SignalLeaf, along with most of my other apps these days, is deployed to Heroku. In order to get the NODE_PATH to work on that setup, I have to use the config:set command from the Heroku toolbelt:
It’s a simple enough fix for Heroku and it ensures everything works when all commands are run from the root folder of the project. This means I have to set up my Procfile to do exactly that. Here’s what my Profile for the SignalLeaf web app looks like:
Notice that the commands are run with folder/file/path.js parameters. I do this to ensure the node command is run from the root folder, allowing the NODE_PATH to work correctly.
I Would Prefer First Class Support From NPM
Ultimately, I would prefer first class support for local modules in NPM and package.json files. Right now, we can either specify a package that comes from NPMJS.org, or one that comes from a git repository. It would be optimal, in my opinion, to specify a relative folder path that points to my module.
With that in place, NPM / Node’s require statement should use this local path to find the module. Yes, I understand that there are some issues in making this happen. Like I said – it would be my preferred way of handling it. I didn’t say it would be easy.
Yes, There Are Other Solutions
Please don’t tell me to use NPM. I’ve read a lot of people suggesting this, and I think this is a terrible idea. Unless my understanding of NPM is wrong (and I don’t claim it isn’t – someone correct me, here!), this would expose code that should not be shared outside of the project / team by placing private code in a public repository. Yes, I know about “private” modules, but aren’t those still installable by anyone, as long as you know the name of it? They are just removed from the NPM directory, right? That’s a bad idea if I ever heard one. If new NPM company gives us private repositories that require authentication / authorization, and Heroku and other services support these private repositories, then maybe this will be an answer. But the idea of “private” NPM modules in a public repository is terrible, IMO. One good guess as to what your module name is, and the entire world can install it. This is simply not a viable option for software that isn’t open source.
As for the many other solutions – and there are a handful more – like I said, I chose the one that I found to be the least ugly and offensive. There were relatively few steps to get this working, and Heroku supports environment variables. So in the end, this is a win for me. I don’t doubt that other developers will prefer other solutions, though. I would love to hear how you’re solving this problem, actually. Drop a comment below and let me know what you’re doing to get around this issue.
subscribe via RSS