How To Get Started With Selenium Core And ASP.NET MVC
About a year and a half ago, my team and I tried to get some WaitiN UI tests up and running. We got some basic tests working on our local machines after a while, but we were never able to get them to run correctly in our CruiseControl.NET CI server. We spent near 2 months trying to get it to work with nothing but pain and heartache. Eventually we gave up on WatiN and left UI test automation out of our process.
Recently, my interested in UI test automation has resurfaced. I wanted to find an easier way to get up and running, though, and see if anyone else out in the world had some suggestions on what to use and why. The twitter-verse was kind enough to offer more opinions than available frameworks, as I expected. In the end, some opinions of Selenium combined with previous demo I had seen and some discussion with Scott Bellware helped convinced me to give Selenium a shot. After 30 minutes of Googling for “how to get started with selenium” and finding nothing useful, I pulled up their built in test suite and just started hacking away at it. It only took about 10 minutes to get my first test up and running, from there.
At this point, I’m still a complete n00b in terms of UI test automation with Selenium, but I at least understand how to get a test suite setup and running. With that in mind, I wanted to share my own quick-start tutorial to try and help others get up and running with Selenium Core as quickly as possible.
Step 1: Download Selenium Core
Ok, that’s probably a Step 0… but I’ll go head and include it anyways. Head on over to SeleniumHQ and download the latest Selenium Core. At this time, I’m using v1.0.1. Once you have that package downloaded, you can unzip the contents into a folder that is accessible to your web server. You’ll end up with a folder structure that contains everything you need to get started, and have all of the built in selenium tests available for you to run.
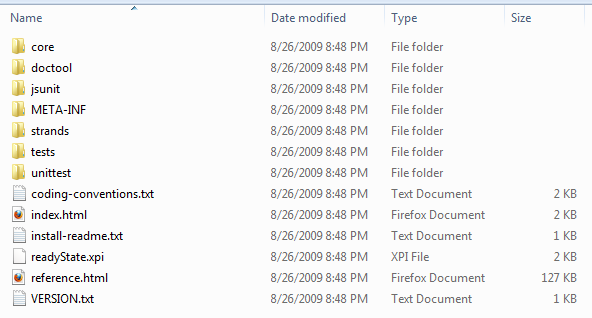
You can open the index.html file in a browser and see all of the tests run. This isn’t terribly interesting to me, though, since it only shows the tests running and not how to work with them or write them.
Step 2: Setup an ASP.NET MVC Application
For this example, we are just using the default project structure for a sample ASP.NET MVC web application. I called my project “MyFirstMVCSeleniumTest”.
I’m not going to touch any of the forms and database related stuff, though, so you don’t need to worry about putting an actual database behind the site, if you don’t want to. I’m also not going to both with a unit test suite at this point. After all, this is not a production-ready example test. I’m only intending this as a very quick “how to get started with selenium” tutorial.
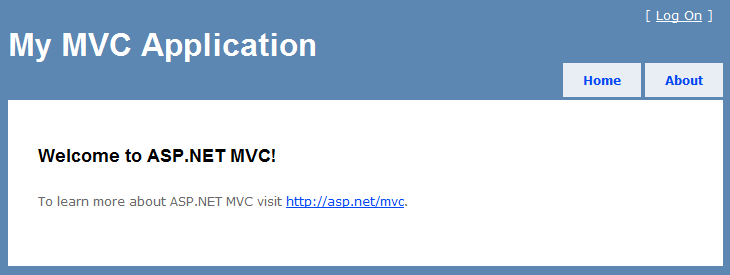
Once you’ve got the MVC project setup, you should be able to hit the home page of the app and see this:
</p>
Step 3: Setup A Test Suite Web Application
For this step, we’re going to add another Web Application to our solution in Visual Studio. My test suite was called “MyFirstMVCSeleniumTest.UITestSuite”.
I like to set up a separate project so that I don’t have to ship my UI test suite with the application if I don’t want to. It also helps me to easily see where my test suite is vs. the actual application. It really doesn’t matter if you add an MVC or WebForms web app for this step – we’re not going to use either of those UI technologies. In fact, once you have the web application for your test suite created, you can delete all of the default files and folders that were created – we don’t need them.
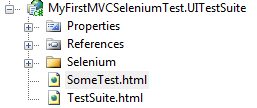
The end result of having both projects in your visual studio solution should look something like this:
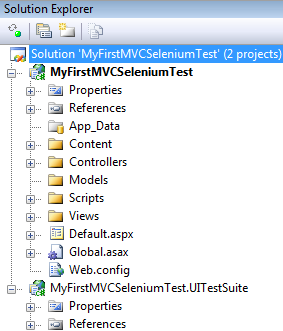
Notice that the UITestSuite project is empty – no App_Data, no web.config, no nothing… we don’t need any of that because we’re dealing with plain HTML files, not an ASP.NET codebase. The reason I used an ASP.NET application here, was to make management of the files easier in Visual Studio.
Step 4: Add Selenium To Your UI Test Suite Project
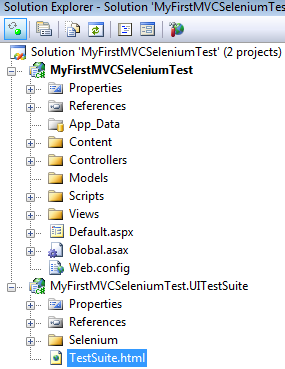
Remember those 7 folders and 6 files that you unpacked at the root level of the selenium distribution, as shown above? The good news is you don’t need most of that. All you need for this basic test suite is the “core” folder. Copy the “core” folder from the location that you unzipped it, into your UITestSuite. For clarity on what this folder actually is, I renamed it to “Selenium”.
The result looks like this:

Step 5: Setup A Test Suite
This was probably the most difficult part of figuring out how to use selenium, for me. I think it took all of 5 minutes to realize that I need to have a “test suite” and a “test” as separate HTML files, so that selenium knows what to run.
To start with, create a plain old HTML file called “TestSuite.html” in the root of your UITestSuite project. This will contain the location of the actual tests, so that selenium knows what tests to run. The contents of this file are about as simple as you can get: an html table with a link to a test file.
Here’s the screenshot of the project:
and here’s the contents of the TestSuite html file:
1: <html>
2: <head>
3: <title>Test Suite</title>
4: </head>
5: <body>
6: <table id="suiteTable" cellpadding="1" cellspacing="1" border="1" class="selenium">
7: <tbody>
8: <tr>
9: <td><b>Test Suite</b></td>
10: </tr>
11: <tr>
12: <td><a href="./SomeTest.html">My First MVC/Selenium Example Test!</a></td>
13: </tr>
14: </tbody>
15: </table>
16: </body>
17: </html>
</div> </div>
Step 6: Add A Test
You can see in the html from the test suite that I have included a file called “SomeTest.html”. This is a test that selenium will execute for us. We can include multiple tests in a test suite – we just need to add new table rows pointing to the other test files. For now, though, let’s just start with the one test.
A test in selenium is not a simple, single command. Rather, it is a series of simple commands that are formatted in three columns of a table. These columns contain the commands and up to two optional parameters. You can read all about the ‘seleniumese’ over at the documentation site.
To start with, we’ll create a simple test that does a few things with our ASP.NET MVC website:
- Open the website
- verify that we’re on the ASP.NET MVC site by looking for the “Welcome to ASP.NET MVC!” text
- verify that we have an “About” link
- click on the “About” link and wait for the about page to load
- Verify that we are on the About page by looking for the “About” text
- Verify that we are on the About page by looking for the “About Us” title in the browser window
The HTML that we need to put into our SomeTest file, is this:
1: <html>
2: <head>
3: <title>My First MVC/Selenium Example Test!</title>
4: </head>
5: <body>
6: <table cellpadding="1" cellspacing="1" border="1">
7: <tbody>
8: <tr>
9: <td rowspan="1" colspan="3">This Is My First MVC/Selenium Example Test!<br></td>
10: </tr>
11: <tr>
12: <td>open</td>
13: <td>http://localhost/MyFirstMVCSeleniumTest</td>
14: <td></td>
15: </tr>
16: <tr>
17: <td>verifyTextPresent</td>
18: <td>Welcome to ASP.NET MVC!</td>
19: <td></td>
20: </tr>
21: <tr>
22: <td>verifyElementPresent</td>
23: <td>link=About</td>
24: <td></td>
25: </tr>
26: <tr>
27: <td>clickAndWait</td>
28: <td>link=About</td>
29: <td></td>
30: </tr>
31: <tr>
32: <td>verifyTextPresent</td>
33: <td>About</td>
34: <td></td>
35: </tr>
36: <tr>
37: <td>assertTitle</td>
38: <td>About Us</td>
39: <td></td>
40: </tr>
41: </tbody>
42: </table>
43: </body>
44: </html>
</div> </div>
You should be able to correlate the commands and parameters from this file – represented as table rows and columsn – to the list of steps that I outlined above.
Now I know that this isn’t the most exciting test in the world. I wasn’t going for exciting. In fact, I wasn’t even going for ‘valuable’ in this test. I only wanted to show how simple it is to get a test like this up and running.
Step 7: Run The Test
</p> </p>Running a selenium test suite is as easy as hitting a web page.
First, Make sure you have built the ASP.NET MVC app and that you can open it in your browser. Then we’ll point your browser to the location of the test suite. To tell selenium to run, we want to hit the “Selenium/TestRunner.html” file that is included in the “core” folder that we renamed to “Selenium”. The TestRunner file expects to find a “test” parameter attatched to the end of it, to tell it what test suite to run (if you don’t provide this, it will default to something like Test.html).
Assuming that we are using localhost IIS for our test suite, the URL would look like this:
![]()
Notice the “../” in the test parameter – this is because the “TestSuite.html” file lives one folder above the TestRunner.html file.
By pulling up this URL, you should see the following screen:
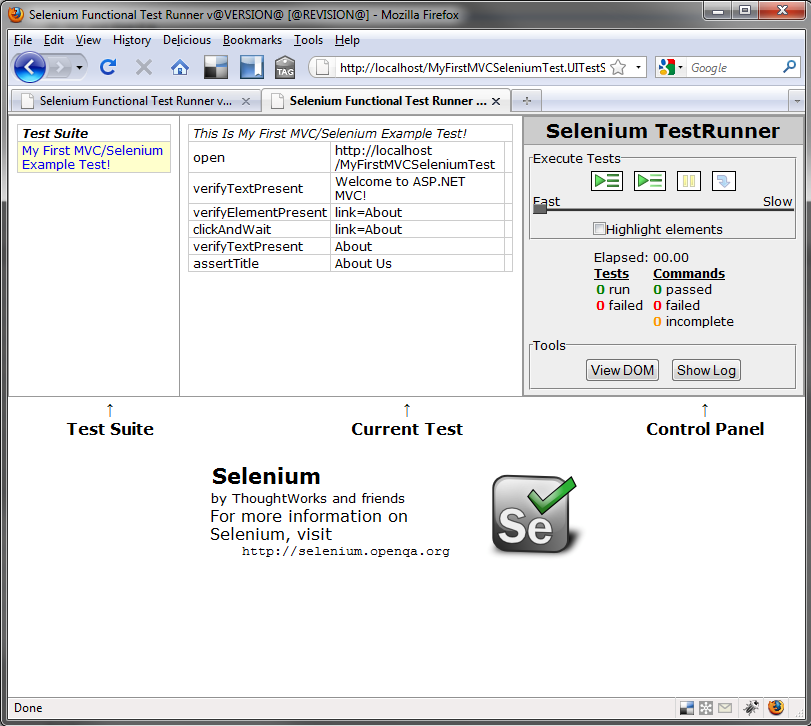
To run the test, click the “Play all” ( ![]() )button in the Selenium TestRunner section of the windows. You’ll see the bottom half of this page switch over to your MVC app, the page will change from the home page to the About us page, and the tests in the middle top of the screen should all turn green!
)button in the Selenium TestRunner section of the windows. You’ll see the bottom half of this page switch over to your MVC app, the page will change from the home page to the About us page, and the tests in the middle top of the screen should all turn green!
If you would like to “see” all of this happen, you can move the slider in the Selenium TestRunner from Fast over to Slow. You can also check the “Highlight elements” box, which will turn the element yellow when it is being worked on. This will let you see what’s really going on, in much more detail.
Step 8: Verify The Results
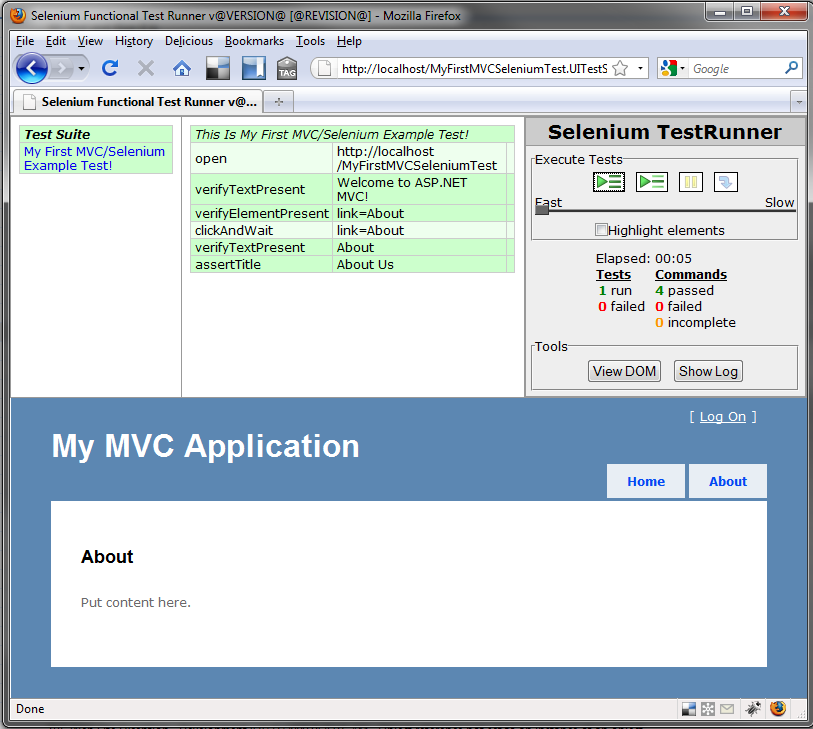
</p>After running the test suite, we can see some results and metrics shown in the Selenium TestRunner section of the screen.
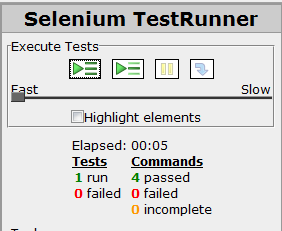
It took a total of 5 seconds to run this test suite, i had 1 test run and there were 4 commands that executed and passed.
Did you notice that the number of “commands” is not the same as the number of steps in our test? This is because some of the steps in the test are actions that do things, not commands that check for things. In our list of 6 steps, step #1 and #4 are actions – open the website, click the about link – and the other 4 steps are the commands that assert or verify state. You can see this distinction in the center column of the test suite, as light green items for the actions and green items for the commands:

Download The Sample Code
If you’re interested in downloading the complete solution that I created, here, you can grab it from my GitHub account:
Download My First MVC Selenium Test
I did this in Visual Studio 2008 with Service Pack 1 and the ASP.NET MVC Framework v1.0.
Conclusion
Congratulations, you now have a working Selenium Core test suite for your ASP.NET MVC application! There are lot of lessons to learn beyond just these basics, though. We have to consider filling out forms, submitting them, working with ajax callbacks, integrating the test suite into a continuous integration server, and many many other aspects of our testing strategy.
As a final note – I have no misunderstandings about the limitations of HTML based testing, like this. The more we tie ourselves to the specific HTML of a page, the more brittle our tests become. I don’t want anyone to think that the examples I have shown here are in any way production-ready. This was only a “get started fast” tutorial, created by a guy who is just now learning how to use Selenium. Please remember that good tests take a lot of effort to plan and maintain over time. There is no shortcut for the planning and maintenance of the tests. It seems, though, that selenium is a great way to simplify the writing of the tests.