How To Have Bundler Load A Gem From The Vendor Folder Into A Rails 3 App
I have a rails 3 app that needs some specific functionality that is built into a gem. Unfortunately, the current gem that is published on RubyGems.org only works with rails 2. I was able to get the gem to work by commenting out some code that I don’t need, though. I wanted to do a custom gem build and have this gem installed into my rails app’s vendor folder, so Bundler could load it from there (note: the gem is MIT licensed, so there’s nothing stopping me from doing this, legally). But I only want this one gem to load from the vendor folder. The rest of the gems in the app should load from wherever bundler normally loads gems.
Installing The Gem Into The Vendor Folder
In order for Bundler to use the gem from the vendor folder, all of the files form the gem must be in that folder – more specifically, unpacked into a sub-folder for the gem. There are a number of ways that this can be done:
- bundle package
- copy & paste
- git clone
- gem unpack
Running bundle package wasn’t an option for me, as I didn’t have the gem installed currently. Plus, I only wanted to run this one gem from the vendor folder, not every gem that the app needs. There may be a way to make bundle package work for my needs, but I couldn’t figure out how.
If you have access to the source code, you could just copy & paste the files from the source into a folder. This includes copying the files out of a ruby installation or rvm gemset; it doesn’t really matter where the code came from, as long as it’s the actual code for the gem, in the correct folder structure.
If the gem’s source is hosted in a git repository, you can specify the location of the repository in the Gemfile with the :git option for the gem. Alternatively, you can clone the repository into the vendor folder, which is essentially the same thing as a copy & paste. This wasn’t an option for me, either.
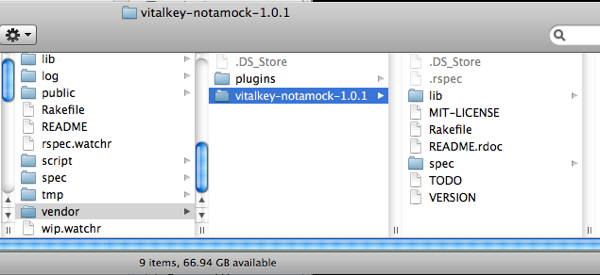
What did work for me was the gem unpack command. This command unpacks the gem file into a folder, without going through the dependency resolution process of a gem install. Here’s a screen shot of how I unpacked the gem into my app’s vendor folder:

The end result is that my vendor/vitalkey-notamock-1.0.1 folder now contains all of the code from the gem:

Setting The Location Of The Gem In The Gemfile
Once the gem has been unpacked into the folder, the Gemfile in the app needs to be updated to point bundler to this folder for this gem. According to the gemfile documentation, this is done with the :path option. Here’s the gem line in my Gemfile, loading my custom gem:

Note that if you don’t specify the version number (the 2nd parameter) then you have to provide a .gemspec file in the folder that you set here. There’s a few different ways to get the gemspec file, but since we know what version we are dealing with, it’s easier to specify the version here.
Bundler’s Auto-Require
The gemfile documentation also talks about a :require option, as shown in the previous screen shot. This is used by bundler to automatically require the right file for the project to use the gem. In many cases, the file that gets required is the same name as the gem. For example, my albacore project gem is named the same as the file that gets required, to use it:
require ‘albacore’
In my rails app’s case, the file to require is not the same name as the gem. By specifying the :require option, though, bundler can still require the file for me, preventing me from having to put a require statement in my app. If I didn’t specify the :require option here, I don’t think bundler would fail to load the gem, but I would have to put the require statement in my code, when I needed this gem:
require ‘not_a_mock’
That’s It. Done
Yeah, I know. This really isn’t that special or difficult. However, it took me a number of hours to figure this out because the documentation for bundler and gemfiles sucks. It’s ambiguous in some places, cryptic in others, and generally assumes that you know everything about how bundler and rubygems work, already. Hopefully this blog post will help someone else and prevent them from having to go through what I went through.
