Angular JS–Part 14, End to end tests
Introduction
The list of earlier posts in this series about Angular JS can be found here.
Automated end to end tests are an important part of the continuous integration and continuous delivery cycle. Without automated end to end tests delivering a new release of an application becomes burdensome. Manual regression testing can take weeks depending how complex the application is. That implicates that code freeze has to happen a long time before the product is ready to be deployed or ready to ship. Not only does this slow down the development or improvement of the application, no, it is also very expensive.
Writing (good) end to end tests of course takes time too and as such costs money. But the investment pays off quickly. Automated tests – once written – can be run again and again in exactly the same way and with exactly the same boundary conditions. This deterministic behavior of automated tests is important in many ways and superior to the often erratic way of testing done manually where the boundary conditions and the way how a test is executed often varies greatly each time
Good end to end tests are not easy to write. But the tasks at hand becomes much easier if our (complex) application is a composite application made-up of many autonomous components. In such a scenario end to end tests really only need to test all parts of a single component and any interaction with other autonomous components can then be mocked or stubbed. On the other hand it is very hard if not near to impossible to write good, stable and maintainable end to end tests for a complex monolithic application.
The Angular team has created Protractor, an end to end test framework which is built on top of WebDriver JS. Protractor runs tests against our application in a real browser in exactly the same way as a user would do. Protractor is specifically build to test Angular applications. Protractor under the hood uses Selenium and as such is a superset of the selenium commands to automate a browser.
Prepare your system
Here I am assuming that you are using a Windows computer. Installation on OS-X or Linux should be straight forward too.
Update Google Chrome
Please make sure you have the latest version of Google Chrome installed. This is very important since otherwise you might have conflicts with the Chrome web driver we’ll install shortly. To make sure you’re up-to-date open Chrome and navigate to About Google Chrome. If your browser is not yet up-to-date then the browser will start updating itself

Install the Java Development Kit
Once this is done we need to make sure we have the newest 32-bit Java Development Kit (JDK) installed. You can download the JDK from here. JDK is needed to run Selenium (which is written in Java).
Install node JS
If you have not done so before please install node JS. You can do it from here.
Install Protractor & Selenium
To start using Protractor it you first need to install it (and implicitly Selenium) on your system. Thus open a bash console and install Protractor globally using the node package manger (npm)
![]()
This will install the protractor (node) module globally such as that you can use it from any directory. If you’re on a Windows machine it will most likely install it into your user profile. On my machine this is
![]()
End to end tests will run hosted by node. To download the (stand-alone) selenium server run this command
![]()
The above command installs the Selenium standalone server as well as the driver for the Chrome browser. If you want to test on other browsers you need to download the corresponding driver(s) from here.
Now we can start the selenium server
![]()
and this is what you should see

The Selenium server will start and (by default) listen at port 4444 (http://localhost:4444/wd/hub)
To verify that Selenium is indeed up and working you can navigate with your browser to the above link. You should see the following 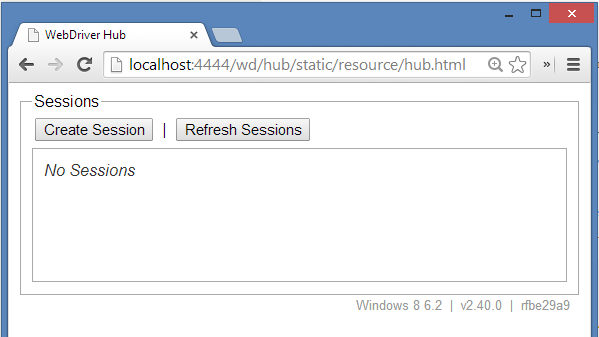
Trouble shooting
If that doesn’t work then probably you must define the JAVA_HOME and update the path variable accordingly. Locate your Java SDK, e.g.
![clip_image001[7]](https://lostechies.com/content/gabrielschenker/uploads/2014/04/clip_image0017.png)
And then add %JAVA_HOME%\bin to your PATH variable
![clip_image002[7]](https://lostechies.com/content/gabrielschenker/uploads/2014/04/clip_image0027.png)
For more details see the following link
Alternatively navigate to the selenium folder (on my machine)
![]()
Where ~ denotes the home directory (in my case /c/users/gschenker)
try to start the Selenium server explicitly with this command
![]()
Note: if you want to start the Selenium stand-alone server from any location then you need to make sure that either
- the chrome driver binary is in the Path (ChromeDriver.exe) or
- You start the Selenium server with this added command line argument</ul> -Dwebdriver.chrome.driver=c:\path\to\your\chromedriver.exe

Please refer to this link for further details about the chrome driver.
Creating a sample test
Create a new project folder, e.g.
![clip_image001[9]](https://lostechies.com/content/gabrielschenker/uploads/2014/04/clip_image0019_thumb.png)
In a bash console navigate to this folder and use bower to install angular.
$bower install angularCreate a simple Angular application where the JavaScript file (app.js) contains the following code
![clip_image001[11]](https://lostechies.com/content/gabrielschenker/uploads/2014/04/clip_image00111_thumb.png)
And the view (index.html) is defined as follows
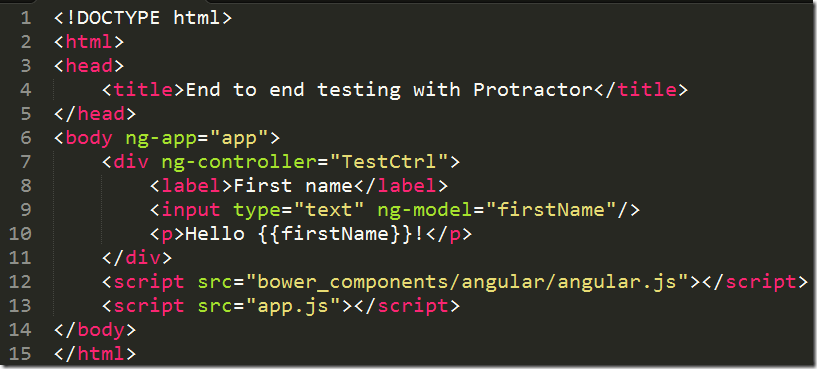
If we run this application then we can enter our first name into the input box and Angular will greet us.
![clip_image001[13]](https://lostechies.com/content/gabrielschenker/uploads/2014/04/clip_image00113_thumb.png)
Let’s write a test that will enter a name into the input box and verify that the correct greeting message is displayed on screen.
Let’s write the test. Create a new file testCtrl_spec.js to the project folder and add the following test
![clip_image002[11]](https://lostechies.com/content/gabrielschenker/uploads/2014/04/clip_image00211_thumb.png)
By default Protractor uses Jasmin as the framework for authoring tests. Jasmin is a behavior-driven development framework (BDD) and as such follows the paradigm of given-when-then. On line 1 we describe what we want to do (the given). On line two we have the actual test defined by the it function. This function contains the when-then part. On line 3 we say: “when we navigate the browser to the given URL…”. On line 4 through 6 we define what we are expecting as a consequence (the then part).
On line 4 we use the element function combined with the by.model function to locate an (HTML) element on our page. In this case we locate the element which uses Angular data binding and is bound to the firstName property of the model. Once we have this element (which is our input tag) we simulate a user entering the text John by using the sendKeys function.
On line 5 we again use the element function this time combined with the by.binding function to locate the (HTML) element where our greeting is output. In out sample this is the <p> tag. Note, protractor is finding this element although the binding part {{firstName}} is only part of the content of the <p> tag!
Note that we expect a web server listening at port 44544 and serving us our index.html sample page. Let’s run IIS Express on this port with the following command
“C:\Program Files (x86)\IIS Express\iisexpress.exe” /path:c:\dev\prototypes\End2EndTesting /port:44544
Also note: on line 3 you need to put the full URL e.g.
http://localhost:44544/index.html and not some abbreviation like localhost:44544/index.html!Last we need a configuration file for protractor such as that the test runner knows which tests to run and how to run them.
Add a file called spec.js to the project folder and add the following information
![clip_image003[5]](https://lostechies.com/content/gabrielschenker/uploads/2014/04/clip_image0035_thumb.png)
Now we are ready to run the test. In the bash console navigate to the project folder and run this command
![clip_image004[5]](https://lostechies.com/content/gabrielschenker/uploads/2014/04/clip_image0045_thumb.png)
Protractor will automatically start Chrome, load our index.html page, fill in the input box and validate that the greeting is correct.
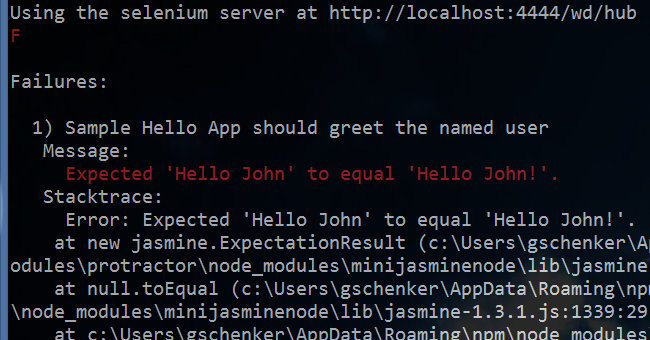
If we did everything right we should see this result in the console
![clip_image005[5]](https://lostechies.com/content/gabrielschenker/uploads/2014/04/clip_image0055_thumb.png)
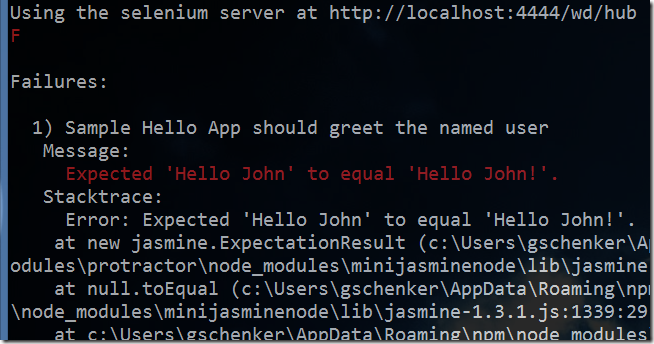
If the test fails we should see something like this
A more complex test
In this test we want to test what happens if we click on a button Load Staff which will load a list of staff from a backend.
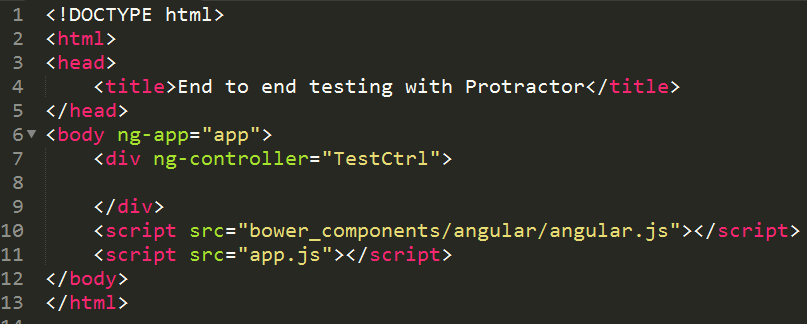
Create a new project folder. Add a file index.html to the folder containing the following HTML.
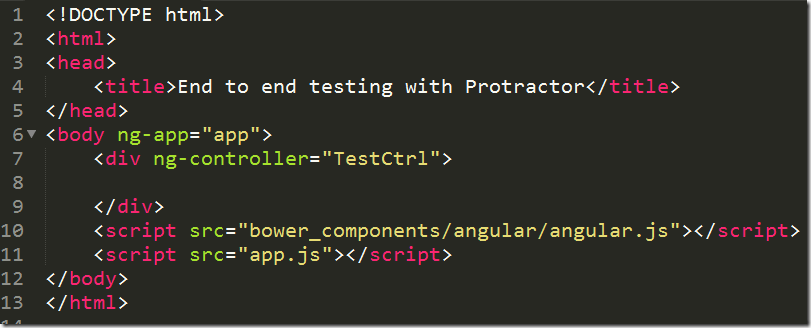
Add the following snippet under the <div>
![clip_image001[15]](https://lostechies.com/content/gabrielschenker/uploads/2014/04/clip_image00115_thumb.png)
Add a file app.js to the project and add this code to define a controller.

Now define the loadStaff function in the controller
![clip_image002[13]](https://lostechies.com/content/gabrielschenker/uploads/2014/04/clip_image00213_thumb.png)
Of course in this sample we are only simulating the backend and are actually serving some pre-canned data. But rest assured the test would work also if there was a real backend call using e.g. the $http or the $resource service.
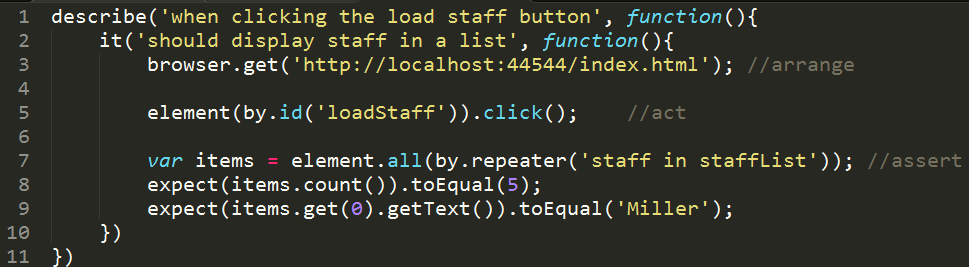
Now let’s look at the test code. Add a file testCtrl_spec.js to your project folder and add the following code snippet to this file

In the test arrange part we load the index.html page (line 3). Then we act by locating the button via it’s ID and clicking on it (line 5). Finally we get all <li> elements that will be created by Angular. These elements are identified by the ng-repeat directive staff in staffList (line 7) and we assert that we have 5 items as expected (line 8). Finally on line 9 we make sure that the name in the first list item is Miller. Note the element.all(…) syntax used in line 7 to retrieve multiple elements instead of just a single one
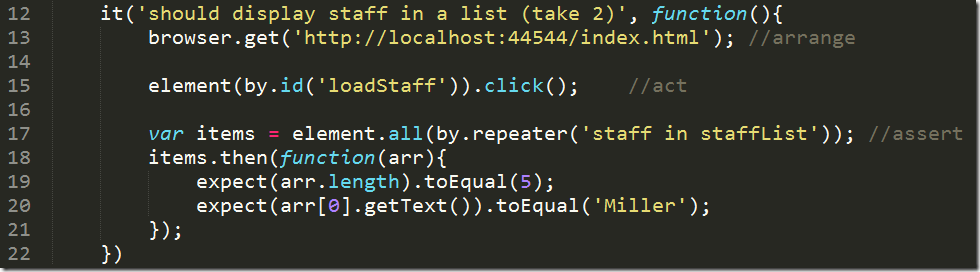
Note: A more robust way of writing the same test is using promises (see here for inspiration; line 42ff)
Do not forget to add the configuration file for protractor to the project. You can use the same file (content) that we introduced in the previous sample.
Now we can run protractor again
![clip_image005[7]](https://lostechies.com/content/gabrielschenker/uploads/2014/04/clip_image0057_thumb.png)
and we should see a test with two passing/fulfilled expectations.
Using page objects
When we are building up a library of end-to-end tests we might want to make sure that our tests are robust and maintainable. One possible and recommended way to improve tests is to abstract the details of a view and define so called Page Objects. These are simple JavaScript functions that provide a nice API to a view to test and encapsulate the “ugly” code needed to identify and/or manipulate DOM objects.
Let’s create a simple sample – a login page. Here is the HTML
![clip_image001[17]](https://lostechies.com/content/gabrielschenker/uploads/2014/04/clip_image00117_thumb.png)
Let’s call this view login.html. As we can see we have various elements on this view that we want to interact with; a username and password input element, a login button and a <div> with a status message. Let’s abstract this page/view. Add a new file login-test.js to the project and add this code
![clip_image002[15]](https://lostechies.com/content/gabrielschenker/uploads/2014/04/clip_image00215_thumb.png)
We now have a LoginPage object (in JavaScript a function is an object) with 3 properties userName, password and status and 4 methods setUserName, setPassword, login and get.
We can the write a test (or many different tests…) and use this page object.
![clip_image003[9]](https://lostechies.com/content/gabrielschenker/uploads/2014/04/clip_image0039_thumb.png)
Please note that the test looks much more readable. We can reason about the business or workflow logic much better if we do not have all the nasty Protractor and/or Selenium details littered through the code. Also it is much easier to maintain our tests in case we are going to change some details on the login view since we only will have to update the corresponding page object.
Other samples
Please make sure you look into code! Julie, the author of protractor has many sample tests. Some of them can be found here
https://github.com/juliemr/protractor-demo/blob/master/test/spec.js
For more samples regarding how to select elements on a page see here
https://github.com/juliemr/protractor/blob/master/spec/basic/findelements_spec.js
Links
http://product.moveline.com/testing-angular-apps-end-to-end-with-protractor.html

![clip_image001[11]](https://lostechies.com/content/gabrielschenker/uploads/2014/04/clip_image00111.png)

![clip_image001[13]](https://lostechies.com/content/gabrielschenker/uploads/2014/04/clip_image00113.png)
![clip_image002[11]](https://lostechies.com/content/gabrielschenker/uploads/2014/04/clip_image00211.png)
![clip_image003[5]](https://lostechies.com/content/gabrielschenker/uploads/2014/04/clip_image0035.png)
![clip_image005[5]](https://lostechies.com/content/gabrielschenker/uploads/2014/04/clip_image0055.png)
![clip_image001[15]](https://lostechies.com/content/gabrielschenker/uploads/2014/04/clip_image00115.png)

![clip_image002[13]](https://lostechies.com/content/gabrielschenker/uploads/2014/04/clip_image00213.png)

![clip_image001[17]](https://lostechies.com/content/gabrielschenker/uploads/2014/04/clip_image00117.png)
![clip_image002[15]](https://lostechies.com/content/gabrielschenker/uploads/2014/04/clip_image00215.png)
![clip_image003[9]](https://lostechies.com/content/gabrielschenker/uploads/2014/04/clip_image0039.png)