AngularJS–Part 16, Forms
A list of all previous posts in this series about Angular can be found here.
Introduction
Most applications offer some way of adding or changing data to the user. In this post I want to discuss data entry in an Angular application and analyze what Angular has to offer us in this regard. It turns out that Angular does not reinvent the wheel but rather augment the existing features for data entry provided by HTML5. In a typical HTML page we use the form tag to define an area which is used to add new or change existing data. Inside the form tag we can then use input tags of various types (text, number, date, checkbox, etc.) to edit individual pieces of data.
As a starting point let’s create a very simple data entry form in pure HTML5. This sample is a login form where the user has to enter a username and a password and where there is a login button she can click.
Angular Forms
Angular augments the functionality provided by the HTML5 form significantly. If we give the form a name (not an id!) Angular will provide us programmatic access to the form via the scope of the controller which governs the region where the form is located. If we name our form loginForm we then can access it via $scope.loginForm. The loginForm itself is then a JavaScript object which exposes various useful properties or features of the form.
Validating a form
Most importantly we have properties $valid and $invalid on the form which tell us whether or not our form in in a valid state. We can now bind to these values in our view. Let’s make the above sample an Angular form now. To be able to have the form in an invalid state we’ll add the HTML5 required attribute to the userName and password input tags.
Note that I have added the attribute novalidate to the form tag to suppress the normal HTML5 validation and rather rely on the validation through Angular. If we load the above page in our browser we can see that initially the form is invalid since both data entry fields are empty.
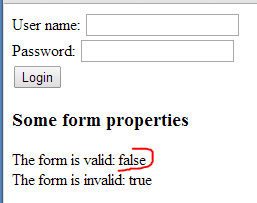
As soon as we enter something in both fields the form becomes valid which is shown in the section where we display the form properties.
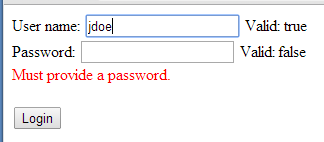
We cannot only determine whether the whole form is valid or not but also does Angular provide us the validity of each individual data entry control on the form. To access the validity of a control we have to name it similar as we did with the form. Each named control then becomes a property on our loginForm object. Let’s use this possibility to display the state of each input control right after the control itself
And this is how it should look like in the browser

We can now use what we just learned to conditionally display some error message next to each input element if it is invalid. For this we use the ng-hide attribute on a div tag which contains the error message. In the case of the userName input this would look like this
And again in the browser we get something like this if we have a valid and an invalid input control
We can of course also keep the login button disabled while the form is invalid by using the ng-disabled directive on the button
Is the form dirty?
Angular also provides us the two properties $dirty and $pristine (the opposite of $dirty) to determine whether or not the user has changed some data in the form. Similar to the case of validity discussed above Angular also provides us the dirty state on an individual input control level. Thus loginForm.userName.$dirty tells us whether or not the user has changed the user name.
First let’s use the form level properties and use them in the section where we display the form properties
Initially our form will be clean or pristine. As soon as the user starts to type something in any of the input fields the form gets dirty. We can reset the dirty status of the form by using the $setPristine() function provided by Angular on our form. Let’s add a button to the form to achieve this.
Currently we are displaying error messages next to each input control which is invalid. This is annoying if the user has not yet visited and changed the appropriate control. We want to only display the error message if the control is dirty and invalid. Using the $dirty flag we can easily achieve this e.g. for the user name control
Note that I have changed the directive from ng-hide to ng-show and I am using the combination of $invalid and $dirty. Now, to be able to see the error text we have to first enter some username such as that the control is dirty and then erase the content of the input.
Summary
In this post I have discussed the Angular form. Angular augments the base form functionality provided by HTML5. It is very easy to determine the validity of the form as a whole as well as of each individual data entry control of the form. We can also determine whether the form is dirty as a whole or whether or not an individual data entry control of the form is dirty or pristine. This post is only scratching at the surface. Many many more advanced scenarios can be handled with ease. In my next post I’ll discuss some of those more advanced scenarios.