Creating an Ubuntu developer VM on Hyper-V
Introduction
I had a need to quickly create a Linux VM on a Windows 8.1 machine to use for Angular JS and .NET development. I have not been using Unix or any variant of it for years so this was new land for me. This post is thought mainly as a note to myself for future reference but I’m of course pleased if someone else might find it useful.
As a Linux distro I chose Ubuntu since it seems to be the most popular one at the time of writing. The versions I used to create my VMs are 14.04 (stable) and 14.10. I selected Hyper-V as a host since it comes natively with Windows 8.x.
Goal
With the VMs I want to achieve the following goals
- Develop Single Page Applications using Angular JS
- Develop backend services using Node JS
- Develop backend services using .NET (i.e. Mono and .NET vNext)
- Run MongoDB and GetEventStore
- Use the same tools and libraries for development and continuous integration as directly on Windows</ul> Ok then, let’s start…
Hyper-V
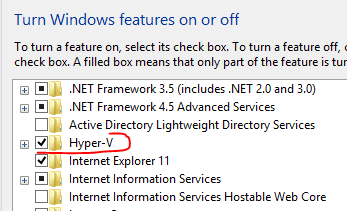
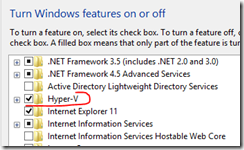
First we need to enable Hyper-V on the host machine. For this open the Control Panel and select Programs and Features. Select Turn Windows features on or off. Check Hyper-V (if not already selected)
After Hyper-V has been installed and enabled you might need to reboot your machine.
Next run the Hyper-V Manager and under Actions double click the Virtual Switch Manager… to create a new Virtual Network Switch. Select External as the type of switch.
Now we are ready to create our VMs.
Download and install Ubuntu
Download Ubuntu 14.04 or 14.10 from here. Download the 64bit version if you have a decent PC or Laptop (min. 3GB RAM, not older than 5 years).
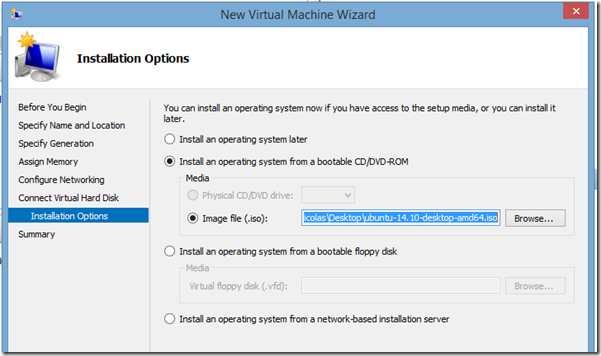
Using the Hype-V Manager create a new VM. A wizard will guide you through the process. Make sure you select Generation 1 as the generation of the VM when asked. I assigned 4 GB of Startup Memory to my VM and I leave the Use Dynamic Memory for this virtual machine checkbox unchecked. When configuring the network select the new virtual network switch that you created before. Then I leave the default selection for the virtual hard disk (create new, 127 GB). Under Installation Options select Install an operating system from a bootable CD/DVD-ROM and select Image file (.iso). Browse for the Ubuntu ISO image that you just downloaded.
 </p> </p> </p> </p>
Double check all the selections you’ve made and then hit Finish to start the creation of the VM. Note, this will not yet start the installation of Ubuntu.
Connect to the new VM you just created and hit the Start button. The VM will start up and Ubuntu will display some startup errors that for this time we can just ignore. Once the install screen of Ubuntu appears I recommend to select Try Ubuntu (and not Install Ubuntu). This gives us the opportunity to first try out whether Ubuntu will run fine on our machine. Specifically of interest is the fact whether or not we get a network connection from Ubuntu. After a few seconds Ubuntu is ready to go. Try to open Firefox and navigate to any Web Page, e.g. www.cnn.com to make sure the network connection is available. If that works also try out some other applications or features of Ubuntu.
Assuming all went well then we are ready to install Ubuntu. For a detailed step-by-step instruction I recommend this Youtube video. Otherwise just follow this condensed list
- Double click the Install Ubuntu 14.x shortcut on the desktop
- Follow the wizard and answer a few questions
- On the second step select Download updates while installing and Install this third-party software.
- Under Installation type select Something else and hit Next
- Select New Partition Table…
- Select the free space entry in the list and hit the + button to create a new partition. Create a ~24-40 GB big Primary partition for the mount point / (root partition)
- Select the free space entry in the list and hit + again to create a swap partition. Size ~2GB, Type: Primary, Use as: swap area.
- Select the free space entry in the list and hit + again to create a home partition. Size: all the remaining space, Type: Primary, Mount point: /home
- Finally hit Install Now</ul>
- Finally select the time zone you’re in as well as the keyboard layout
- Lastly enter the required data to create a user (admin)</ul> Depending on your Laptop or PC the installation will take about 5-30 minutes. Once the installation is finished restart Ubuntu. If restarting Ubuntu doesn’t work then you might need to stop the VM and start it again.
Configuring Ubuntu as a development machine
Adjusting the screen resolution
In Hyper-V the screen resolution of a Ubuntu VM can be adjusted by changing the grub file
- Open a Terminal (Ctrl-Alt-T)
- Type: sudo vi /etc/default/grub
- Find the line starting with GRUB_CMDLINE_LINUX_DEFAULT, and add video=hyperv_fb:[the resolution you want]. If the resolution I want is 1280×720 then my line ends up looking like this:
GRUB_CMDLINE_LINUX_DEFAULT=”quiet splash video=hyperv_fb:1280×720″- Write the changes and quit vi.
- Run: sudo update-grub
- Reboot the virtual machine </ol>
Installing Chrome
The favorite browser when developing Angular JS applications is Google Chrome. Let’s install it. We can do it from here: https://www.google.com/chrome/. Select the 64bit .deb package for Debian/Ubuntu. This will download a .deb package which can be installed using the Ubuntu Software Center.
Installing Sublime Text 3
My favorite text editor for web development is Sublime Text 3. Thus we download and install this editor from here: www.sublimetext.com/3. Select the Ubuntu package for 64 bit. The downloaded package can then be installed with the Ubuntu Software Center tool.
Installing developer tools & libraries
Next I use the Advanced Package Tool (apt) to install Git and Node JS. For this we open a terminal (CTRL-ALT-T). We then execute the following commands one after the other
-
sudo apt-get update
-
sudo apt-get install git
-
sudo apt-get install gitk
-
sudo apt-get install nodejs
-
sudo apt-get install npm
</ul> Initialize Git with your user name and email
- git config –global user.name “[your-name]”
- git config –global user.email “[your-email-address]”</ul> To enable Node package manager npm to work as expected we need to create a sym link from node to nodejs
An alternative is to install node from a PPA which contains both node and npm and avoids to have to create a sym link (see here http://askubuntu.com/questions/49390/how-do-i-install-the-latest-version-of-node-js/83290#83290)
Then we use npm to install Bower, Gulp, Karma and Protractor, etc. globally.
-
sudo npm install bower –g
-
sudo npm install gulp –g
-
sudo npm install nodemon –g
-
sudo npm install serve -g
-
sudo npm install karma –g
-
sudo npm install karma-jasmine –g
-
sudo npm install protractor –g
-
sudo webdriver-manager update
</ul> nodemon can be used to auto-refresh a node application, i.e. to auto-restart node each time a watched file changes. serve is a very simple web server to serve static files. We use gulp for all our automation tasks.
Testing the installation
Let’s create a new sample folder sample1 and navigate to it. Let’s init a git repository for this sample and also init npm and bower using the following commands
-
git init
-
vi .gitignore
–> add the files/directories to ignore, e.g. bower_components, node_modules, dist, etc.-
bower init
-
npm init
-
git add –A
-
git commit –m “First commit”
-
gitk
</ul>
Installing Mono
Please refer here and here for more details
Add the Mono Project GPG signing key
Next, add the package repository by running this command
If on Ubuntu 1.10 or later… also run the following command
Now, using apt, install Mono (the complete package, note: this may take a while…) and also install xsp4 (a lightweight and simple web-server written in C#)
-
sudo apt-get install mono-complete
-
sudo apt-get install mono-xsp4
</ul>
Testing Mono
Please try to create the hello world programs as described here. To create the source files just use Sublime or the vi editor. Please note that to compile the WinForm Hello World you need the following command
mcs hello.cs -pkg:dotnet -lib:/usr/lib/mono/2.0Otherwise you will get an error (error CS0006: Metadata file ‘cscompmgd.dll’ could not be found)
Installing MonoDevelop
Using apt install all of the following packages
-
sudo apt-get install monodevelop
-
sudo apt-get install monodevelop-nunit
-
sudo apt-get install monodevelop-versioncontrol
</ul>
-
sudo apt-get install monodevelop-versioncontrol
-
sudo apt-get install monodevelop-nunit
-
sudo apt-get install mono-xsp4
-
gitk
-
git commit –m “First commit”
-
git add –A
-
npm init
-
bower init
-
vi .gitignore
-
sudo webdriver-manager update
-
sudo npm install protractor –g
-
sudo npm install karma-jasmine –g
-
sudo npm install karma –g
-
sudo npm install serve -g
-
sudo npm install nodemon –g
-
sudo npm install gulp –g
-
sudo apt-get install npm
-
sudo apt-get install nodejs
-
sudo apt-get install gitk
-
sudo apt-get install git
- Reboot the virtual machine </ol>
- Run: sudo update-grub
- Write the changes and quit vi.
- Find the line starting with GRUB_CMDLINE_LINUX_DEFAULT, and add video=hyperv_fb:[the resolution you want]. If the resolution I want is 1280×720 then my line ends up looking like this:
- Type: sudo vi /etc/default/grub
- Select the free space entry in the list and hit + again to create a home partition. Size: all the remaining space, Type: Primary, Mount point: /home
- Select the free space entry in the list and hit + again to create a swap partition. Size ~2GB, Type: Primary, Use as: swap area.
- Select the free space entry in the list and hit the + button to create a new partition. Create a ~24-40 GB big Primary partition for the mount point / (root partition)
- Select New Partition Table…
- Under Installation type select Something else and hit Next
- On the second step select Download updates while installing and Install this third-party software.
- Follow the wizard and answer a few questions
- Run MongoDB and GetEventStore
- Develop backend services using .NET (i.e. Mono and .NET vNext)
- Develop backend services using Node JS