Result: Directing Workflow With A Return Status And Value
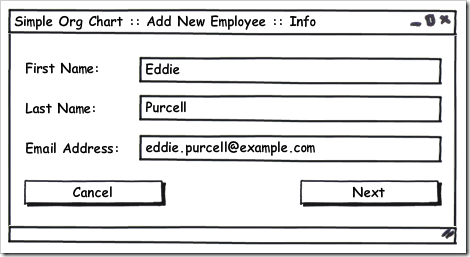
I often code user interfaces that have some sort of cancel button on them. For example, in my upcoming ‘Decoupling Workflow’ presentation, I have the following screen:
Notice the nice cancel button on the form. The trick to this situation is that I need to have my workflow code understand whether or not I clicked Next or clicked Cancel. Depending on the button that was clicked, I need to do something different in the workflow. If I click cancel, throw away all of the data that was entered on the form. If I click next, though, I need to store all of the data and continue on to the next screen.
The Result and ServiceResult
In the past, I’ve handled these types of buttons in many, many different ways. I’ve returned null from the form, I’ve checked the DialogResult of the form, I’ve done out parameters for methods, and I’ve done specific properties on the form or the form’s presenter to tell me the status vs the data. Recently, though, I’ve begun to settle into a nice little Result
- Provides a result status – for example, a ServiceResult enum with Ok and Cancel as the two options
- Provides a data object (the
generic in Result ) for the values I need, if I need them
Here is the code for my ServiceResult and my Result
public enum ServiceResult
{
Ok = 0,
Cancel = 1
}
public class Result<T>
{
public ServiceResult ServiceResult { get; private set; }
public T Data { get; private set; }
public Result(ServiceResult serviceResult): this(serviceResult, default(T)){}
public Result(ServiceResult serviceResult, T data)
{
ServiceResult = serviceResult;
Data = data;
}
}
</div> </div>
Putting Result To Work
</h3>
With this simple little solution, I can create very concise and clear workflow objects that know how to handle the cancel button versus the next button. The code becomes easier to read and understand, and makes the real workflow that much easier to see. The workflow code that runs the “Add New Employee” process for the screen shot above, is this:
public void Run()
{
Result<EmployeeInfo> result = GetNewEmployeeInfo.Get();
if (result.ServiceResult == ServiceResult.Ok)
{
EmployeeInfo info = result.Data;
Employee employee = new Employee(info.FirstName, info.LastName, info.Email);
Employee manager = GetEmployeeManager.GetManagerFor(employee);
manager.Employees.Add(employee);
}
}
</div> </div>
Notice the use of Result in this code. I’m checking to see if the result.ServiceResult is Ok before moving on to the use of the data. The GetNewEmployeeInfo class return a Result object from the .Get() method. The EmployeeInfo object contains the first name, last name, and email address of the employee as simple string values (and in the “real world”, the EmployeeInfo object would probably contain the input validation for these).
</p>
Because Result is a generics class and returns from the .Data property, I can specify any data value that I need and it returned from the presenter in question. This is where the real flexibility of the Result object comes into play. When I have verified that the user clicked OK, via the result.ServiceResult property, I can then grab the real EmployeeInfo object out of the result.Data parameter which isstrongly typed to my EmployeeInfo class. Once I have this data in hand, I can do what I need with it and move on to the next step if there are any.
</p>
Conclusion
Having tried many different approaches to workflow code, I’m fairly well settled into this pattern right now. That doesn’t mean it won’t evolve, though. The basic implementation would cover most of what I need right now, but could easily be extended to include different “status” values instead of just the ServiceResults of OK and Cancel. Overall, though, this simple Result class is saving me a lot of headache and heartache trying to figure out what to return from a method so that a workflow can figure out if the user is continuing, cancelling, or whatever.
</p>
With this simple little solution, I can create very concise and clear workflow objects that know how to handle the cancel button versus the next button. The code becomes easier to read and understand, and makes the real workflow that much easier to see. The workflow code that runs the “Add New Employee” process for the screen shot above, is this:
public void Run()
{
Result<EmployeeInfo> result = GetNewEmployeeInfo.Get();
if (result.ServiceResult == ServiceResult.Ok)
{
EmployeeInfo info = result.Data;
Employee employee = new Employee(info.FirstName, info.LastName, info.Email);
Employee manager = GetEmployeeManager.GetManagerFor(employee);
manager.Employees.Add(employee);
}
}
</div> </div>
Notice the use of Result
Because Result
Having tried many different approaches to workflow code, I’m fairly well settled into this pattern right now. That doesn’t mean it won’t evolve, though. The basic implementation would cover most of what I need right now, but could easily be extended to include different “status” values instead of just the ServiceResults of OK and Cancel. Overall, though, this simple Result
Conclusion

