Responding To Growl Notification Clicks With MacRuby
In my last post, I detailed the process of setting up a MacRuby app to send Growl notifications. To get even more mileage out of Growl, though, it’s a good idea to response to various interactions with the notifications that you send. For example, you can have your application respond to your notice being clicked, or to the notice timing out and disappearing from the screen.
To get started, open the sample app that we created from the previous post.
The Growl Delegate
Open the ApplicationDelegate.rb file – this is the file that responds to our general application events. In the “awakeFromNib” event, we set our Growl delegate to “self” – the ApplicationDelegate class. It turns out you don’t have to do this if you are not going to respond to any growl events. You can set the delegate to “” and Growl will not send any events to your app.
In our application, though, we want to set up a click event. Since we already have the delegate set to self, we can simply add the delegate method for clicked:
def growlNotificationWasClicked(context)
</p>
end
</pre>
This method will be called any time a user clicks on a notification that our application sends. From this method, we can do anything we want – take our app to a specific screen, run a background process, kick off another app or process, send another growl notification or anything else that we can think of. It’s our code, after all, and we get to determine what it does.
The Context Parameter
Having the method defined and the delegate set up is only part of what we need. The context parameter (which can be named anything you like) is also important.
Looking back at the growl notification that we are sending from our ApplicationDelegate, there is a clickContext key in the hash. At this point, we have set it to nil, but if we want to use any of the callback methods from Growl, we need to set this to something other than nil. When we set this value, it will be passed to our clicked callback method. This allows us to provide context to the method – hence the name of the parameter – which can be used to determine what actions to take.
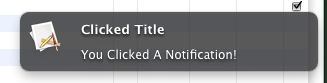
For this example, set the value of clickContext to “You Clicked A Notification!”
GrowlApplicationBridge.notifyWithTitle("Our Growling Title",description: "this is a really big description of really cool things! now you can take over the world with Growl from MacRuby!",notificationName: "Test",iconData: nil,priority: ,isSticky: false,clickContext: "You Clicked A Notification!")
If you do not provide some form of data for the context, the clicked callback will not execute.
The Clicked Callback Method
As a simple example of using the clicked callback method, we can send another Growl notification. In this case, we will take the context and use it as the Growl description. The ApplicationDelegate class now looks like this:
framework "Growl"
</p>
class ApplicationDelegate
def awakeFromNib()
GrowlApplicationBridge.setGrowlDelegate(self)
end
def growlNotificationWasClicked(context)
GrowlApplicationBridge.notifyWithTitle("Clicked Title",
description: context,
notificationName: "Test",
iconData: nil,
priority: ,
isSticky: false,
clickContext: nil)
end
end
</pre>
Note that we are setting the clickContext to nil for this send notification. If we set it to anything else, we would allow the user to click it and it would call back into this same method. This isn’t necessarily a bad thing – but could be if we aren’t careful.
The End Results
Run the app from Xcode and when the first notification pops up, click on it. You will then see a second notification that should look like this: