AngularJS–Part 5, pushing data to the server
Introduction
This is a series of posts to describe our approach to slowly migrate a Silverlight based client of a huge and complex LOB to an HTML5/CSS3/JavaScript based client. These posts report on the lessons learnt and are meant to be used as a reference for our development teams. The first few post can be found here
- AngularJS – Part 1
- AngularJS – Part 1, Feedback
- AngularJS – Part 2, the controller
- AngularJS – Part 3, Inheritance
- AngularJS – Part 4, Accessing server side resources</ul> In my last post I introduced the $http** service that can be used to access server side resources. So far we have looked at how we can query data on the server by using the HTTP GET method. In many web applications the HTTP GET method is used a lot more often than any other method. But from time to time we want to push some data gathered from the user to the server. Here we have various methods to do so. the most common methods are the HTTP POST, PUT or DELETE methods.
In this post I will also for the first time discuss some specifics of the architecture of our enterprise application and what that means for the design of our Web client. But lets first start with the basics.
Sample
We will create a simple sample to demonstrate the use of the $http service to send data to the server. In this sample we will use pretty much all the techniques that we have learned so far. In our sample we want to display a list of existing tasks with their status. We also want a Refresh button which we can click to get the latest list of tasks if we think that our currently displayed task list is stale. The list of tasks shall be provided by a RESTful service.
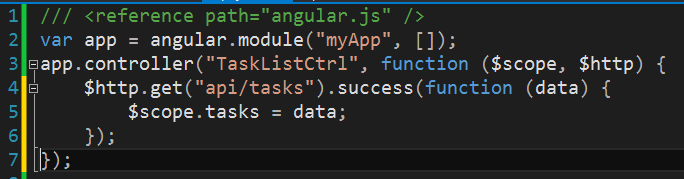
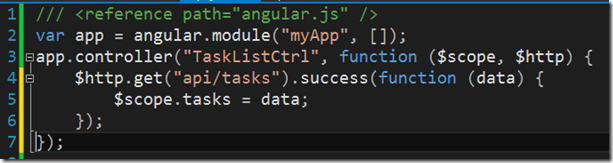
Let’s open our HelloAngular sample in Visual Studio. Add another HTML page called step5.html to the solution. Also add a JavaScript file step5.js to the solution. In the JavaScript file define an AngularJS application called MyApp. Add a controller TaskListCtrl to the AngularJS application. In the controller constructor use the $http service to access the list of defined tasks at the URI api/tasks. When the call successfully return assign the data of the response to the variable tasks defined on the $scope. So far our JavaScript file should look like this
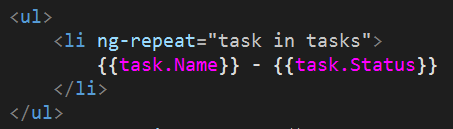
The HTML snippet to display the list of tasks looks like this
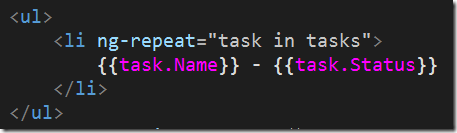
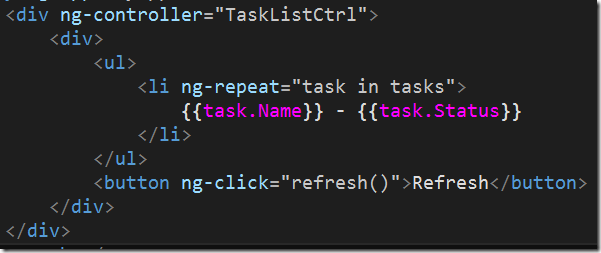
It is simply an unordered list with a list item for each task in the tasks collection of the controller. The above HTML snippet is nested in a div tag which has the ng-controller directive as an attribute. Just as a reminder: the whole part of the view which is nested inside a tag with a ng-controller directive is managed by the respective controller. Below the list of tasks we also want a button which when clicked will reload the tasks from the server in case our data has become stale. The button click event is linked to a refresh() method of the controller via the ng-click directive. All in all the complete view area managed by our TaskListCtrl controller looks like this
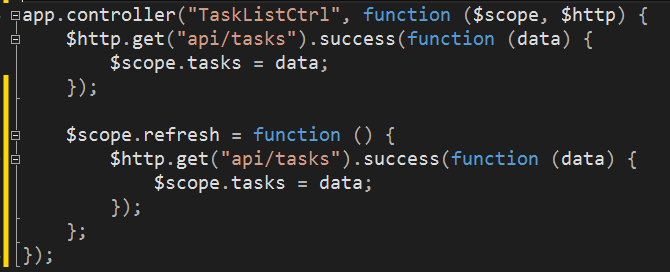
Now we need to define the refresh function on the $scope of the controller. Thus our controller looks like this
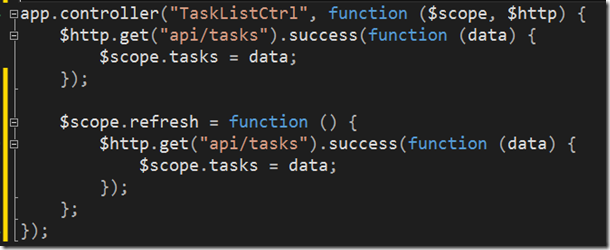
The body of the function is just a copy of the $http.get call that we had already implemented earlier. We can now run the application (assuming we have a RESTful service listening at api/tasks and providing us a JSON-formatted list of tasks)
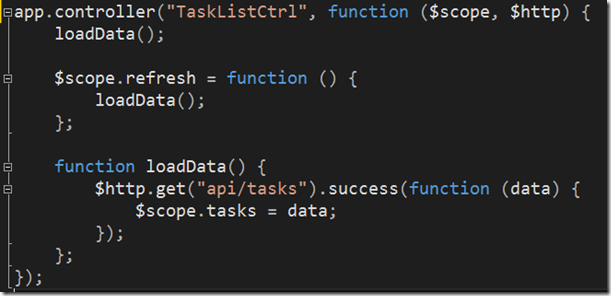
It is of course bad to have such a code duplication and we should refactor the controller. This is what we get
Sample REST service
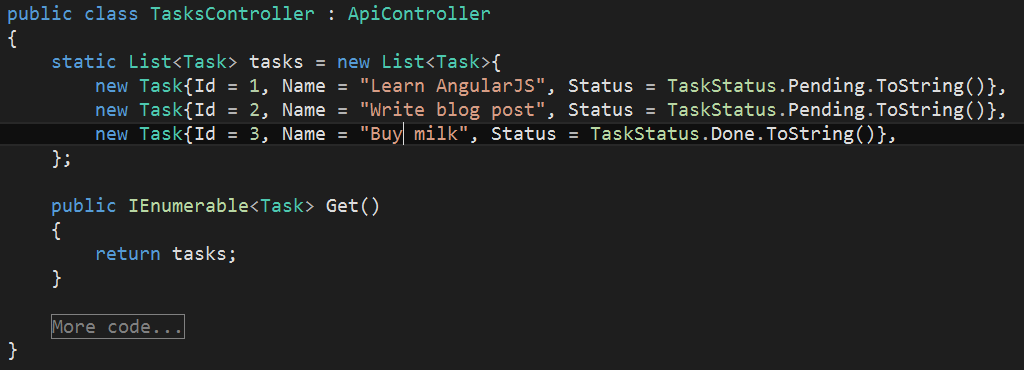
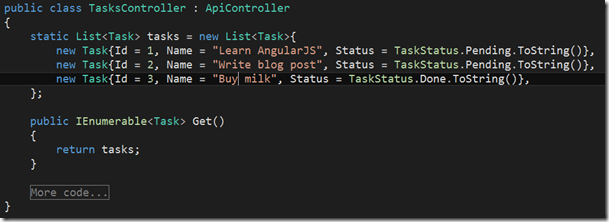
When using Visual Studio 2012/2013 we can simply add a Web API controller to our project. In this controller we only need to implement the Get method so far. In our simple sample the Get method shall return a pre-canned list of sample tasks.
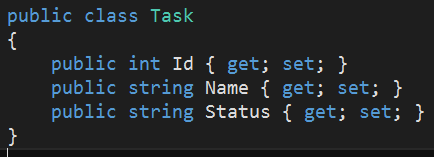
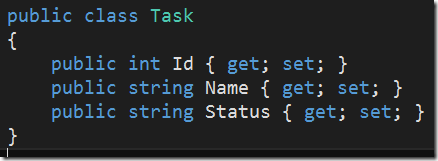
where the class Task is defined like this
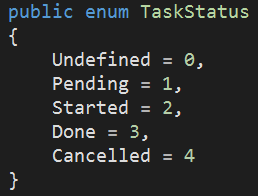
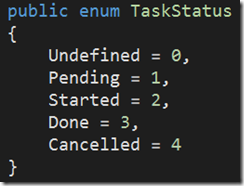
and the TaskStatus enumeration like this
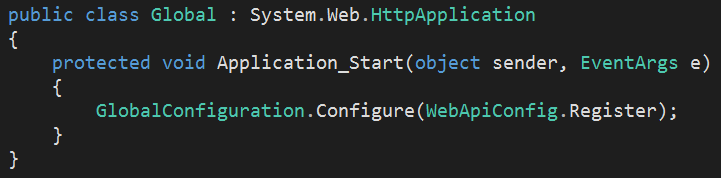
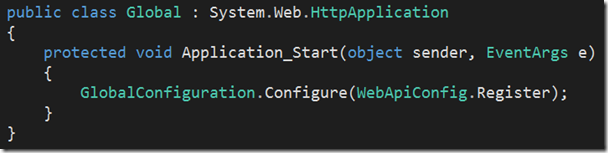
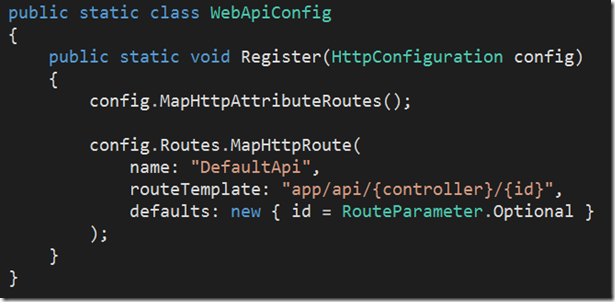
We need to bootstrap the REST service thus we add a Global.asax file to the project and define the code behind as follows
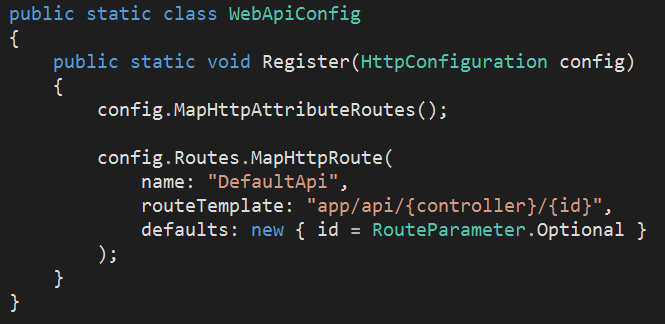
In the GlobalConfiguration class we just define the server routing such as that the URI api/tasks that we use in our AngularJS client maps to the Get method of the TasksController class.
Creating a new task
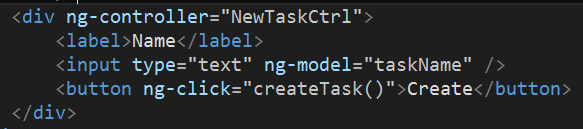
In our view lets define a new region where we can create a new task by entering a task name and pushing this new task to the server when clicking a create button. This area shall be managed by its own controller NewTaskCtrl and the controller shall be a child of the TaskListCtrl. Thus we nest the area inside the div that contains the ng-controller directive for the TaskListCtrl controller.
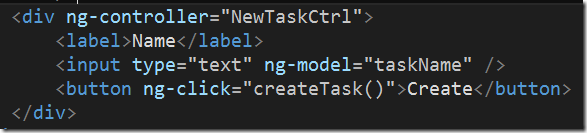
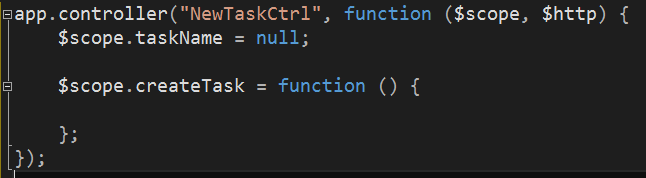
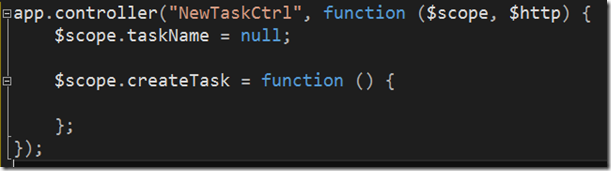
When looking at the above snippet we can see that we need to define a new Angular controller having a taskName property and a createTask function defined on the $scope.
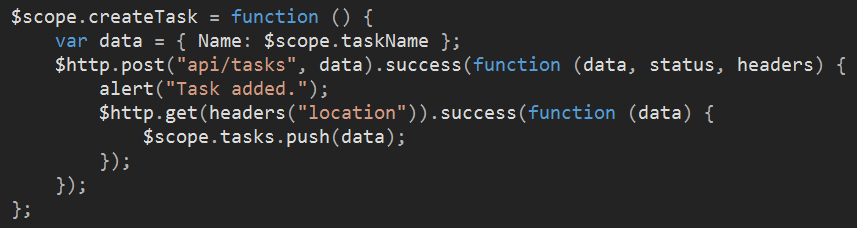
In the body of the createTask function we have to put the logic which takes the task name entered by the user and pushes this value to the server. We will use the $http.post method to send our task to the backend. If everything goes well the server responds with a location entry in the response header. This location entry will contain the URI to the newly created task. We will then use $http.get with this URI to retrieve the new task and once we get it from the server append it to our tasks collection. Since the tasks collection is defined on the $scope of the TaskListCtrl controller and we are in the NewTaskCtrl controller we only have access to this collection if the NewTaskCtrl is a child controller of the TaskListCtrl.
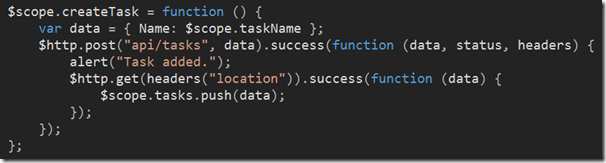
The post method accepts the URI as a first and the payload (content) as a second parameter. The post method is again an asynchronous method and thus returns a promise. We can register a success function (and optionally also an error function) with the promise. As detailed in the documentation the success callback function has the three parameters data, status and headers where data represents the content of the response, status represents the status code returned by the server in the response and headers is a collection of name value pairs as found in the header of the server response. From the headers collection we extract the location value which we use in the subsequent $http.get method call.
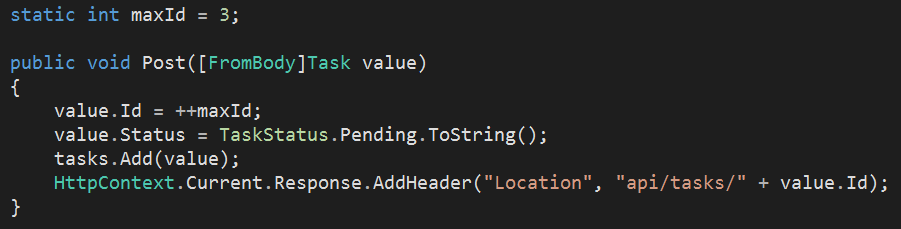
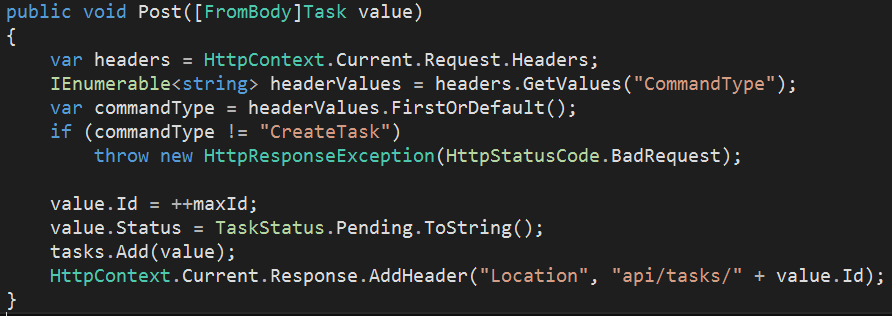
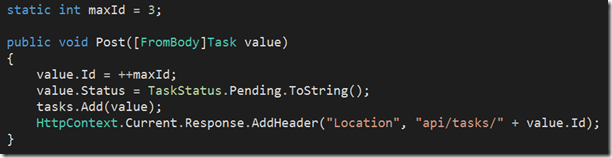
Lets look at the server side and extend our REST service. We add a Post method to the TasksController which will just create a new Task instance with the data received from the client and append this task to the list of per-canned tasks. The response to the client is then enriched with a location header entry which will contain the URI to the newly created task, e.g. app/tasks/7 if the new tasks has ID=7.
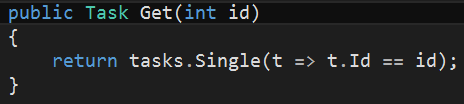
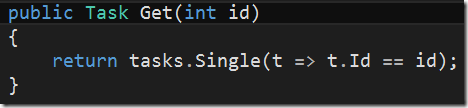
We also need to provide a method in our REST service to handle Get requests for a single task. This is simple
And now we are ready to run our application and create some new tasks.
Can we improve?
Not only should we push the data to the server but also we should tell the server the context, that is, we send a command to it.
If we provide context to the server, then the server knows what to do with the data. This kind of operation is very different from a classical CRUD approach where the client just tells the server to CREATE/INSERT or UPDATE something. Insert and update (or even more general SAVE) methods are very generic and they do not reveal the intent of the client. The “why does the client want me to do something?” question goes lost when only using generic save operations.
CQRS and REST
There is a lot of discussion about whether the two concepts of REST and CQRS can be combined in a meaningful application. As we will see the answer is yes, of course. Others have written some profound articles about combining REST with CQRS. Thus I invite you dear reader to read those articles if you want to dig a little bit deeper. I specifically want to point out this article which was just published a couple of days ago on InfoQ.
I can see 3 ways of combining a RESTful API with CQRS
- Send the command as payload to a URI containing the command type, e.g.
URI: api/tasks/1/complete
- The request body contains the command type as well as the command itself, e.g.
URI: api/tasks
Body: { CommandType: “CompleteTask”, Command: {} } or
{ CommandType: “ChangeDueDate”,
Command: { DueDate: “1/1/2014” } }
- The request header contains the command type and the body contains the command
URI: api/tasks
Header: Command-Type: “ChangeDueDate”
Body: { DueDate: “1/1/2014” }</ul>
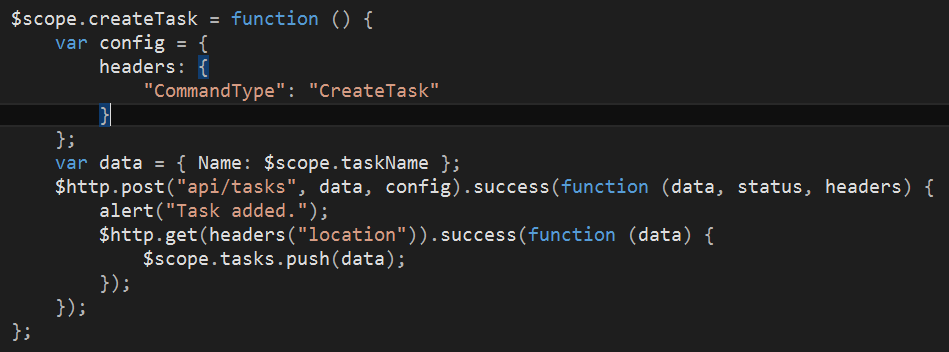
That said, lets adjust out code. To define a custom header in our POST request we can use the optional config parameter and within define our custom header CommandType. We want to create a new task and thus we change our createTask function as follows.
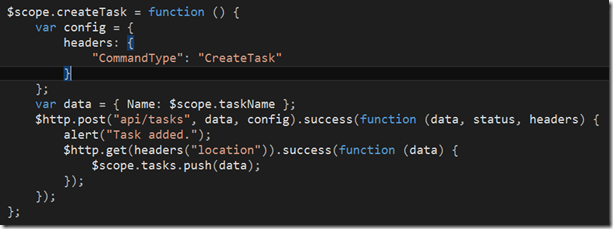
Note that the config parameter is optional and it is the third parameter of the post method. On the server side we have to unwrap the custom header and can the use it to determine what the context of the POST request is. In our sample we will reject any command type other than CreateTask.
In a more complex situation with many possible command types we would probably use the strategy pattern to handle the individual commands.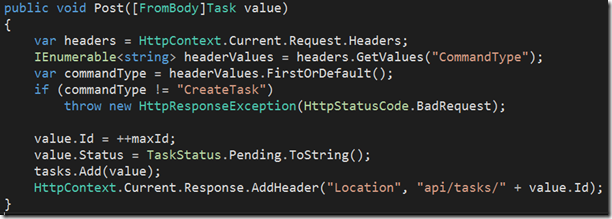
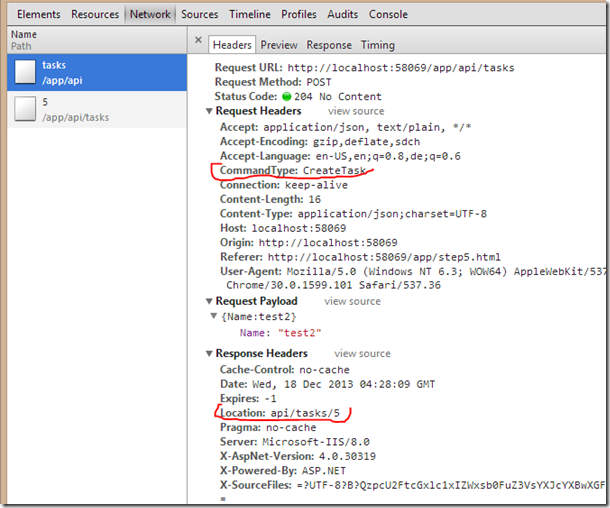
Using the developer tools of the browser we can see that the header of our POST request indeed contains the custom entry CommandType and the header of the response contains the Location header with the URI pointing to the newly created task.
 </p>
</p></font></font>
Summary
I have discussed how we can transfer data entered by a user to the server by using the $http service. Since our enterprise solution is not the typical CRUD type application we use CQRS as an architectural pattern. Our client sends intention revealing commands to the backend instead of just very generic “save” requests. I have shown how we can create such a command in AngularJS and send it to the server. Finally I have also shown how a simple implementation of a RESTful service backing our Angular client can look like.
I have added the code that I presented so far in my series about AngularJS to GitHub. It can be found here.
- The request header contains the command type and the body contains the command
URI: api/tasks
- The request body contains the command type as well as the command itself, e.g.
URI: api/tasks
- AngularJS – Part 2, the controller
- AngularJS – Part 1, Feedback