Mercurial workflows: local development work
The nice thing about distributed version control systems (DVCS) such as Git and Hg is that they both allow me to basically decide how my source control should fit with my short and long-term development workflows. A while back, I wrote what was basically a stream of consciousness post on getting my Git workflow working in Hg. Well, a teammate tried to follow those steps…and found that I missed a few important nuggets.
My local workflow revolves around local branches and rebasing. There are plenty of good articles out there on why this is an interesting and valuable workflow to know and understand, so I won’t rehash all the arguments. I will say that I like this workflow because it:
- Gives me a clean, linear, understandable timeline
- Allows me to keep lines of work separate from each other, until it’s ready to push back upstream
- Works well in the face of unpredictable work
- Is light, quick, and does not leak into the public, mainline work
I tried a few other options, such as real branches, patch queues, and so on, but none had the same flavor that I was looking for with local topic branches. With local topic branches, I don’t use different commands for committing (as I would with patch queues), nor do my branches leak metadata into the public timeline, as it would with normal Hg branches.
First, let’s get our local environment set up appropriately.
Prepping our environment
The cornerstone of my local development workflow include the Rebase and Bookmarks extension. To enable these extensions, just modify your hgrc file. You’ll also want to enable tracking the current commit for bookmarks. This ensures that our bookmark gets moved up with each commit, instead of getting just stuck on one. Your hgrc file would now include:
[extensions]
rebase =
bookmarks =

[bookmarks]
track.current = True
I’ve enabled the Rebase and Bookmarks extension, and configured bookmarks to track the current commit. Tools like TortoiseHg have features that light up when bookmarks are enabled, so you’ll have all sorts of things help you in those tools.
Now that we have our extensions enabled, we need to create our local marker for a master branch. This bookmark represents the last pushed commit, so you can execute the “outgoing” command to make sure that you have nothing to push:

If everything’s good, we’ll create the “master” bookmark:
![]()
Git will create a “master” branch by default when you clone, but we’ll need to do this manually. You can think of “master” as trunk. It represents the mainline of the code we’re working on, and everything will be pulled into this line, both from upstream and from our local branches. Our repository explorer, as seen in TortoiseHg, now looks like:

Note here that “master” is orange. This indicates that “master” is the current bookmark being tracked. Now that we have our local repository set up, we can walk through making local changes.
Scenario 1: One local branch, no upstream changes
First, let’s create a local topic branch and make some changes:
- hg bookmark SomeTopic
- –work work work
- hg commit –Am “Simple Change”
- — work work work
- hg commit –Am “Some other change”
At this point, we decide we want to push our changes up. We first want to synchronize our local repository with upstream, but we want to do this on master. So we:
- hg checkout master
- hg pull –rebase
We switch back to the master branch and synchronize with upstream. But since there aren’t any upstream changes, we want to now fold our SomeTopic branch back to master. Here’s what the picture looks like right now:

Since there are no other local branches, we follow a special workflow as Mercurial’s rebase extension does not do a fast-forward merge by default. That is, if I tell Hg to rebase or merge SomeTopic, I really just want to move master up to SomeTopic, and not perform some merge. So I:
- hg checkout SomeTopic
- hg bookmark -f master
- hg bookmark -d SomeTopic
- hg push -b master
I switch back to the SomeTopic branch, and move the master bookmark up to SomeTopic. I could have done this with “hg bookmark –f master –r SomeTopic”, but I want to switch to SomeTopic instead. I delete the SomeTopic bookmark, as “master” is now moved up to SomeTopic. Finally, I push master, and ONLY master up. I don’t want any other local topic branches to get pushed until they’re integrated with my mainline master branch. When we’re finished, this is what our local repository looks like:
Scenario 2: Need to work on unrelated items but not push unfinished work
aka, the whole reason for topic branches. In this case, we’ve created our local topic branch, but now some other work comes in that we need to do. We need to work on something else unrelated to our feature work, and don’t want to push the feature work until it’s done. Our local repository first starts out like this:
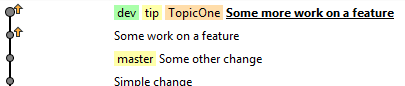
Just to review what we’re seeing here, the “master” bookmark points to the last pulled commit from upstream. We’re currently on the TopicOne bookmark, indicated here because it’s orange. The two up arrows indicate that I have not yet integrated and pushed my TopicOne branch. You can also execute “hg bookmark” at the command line to view the bookmarks and your current tracked one:

So we’re working on TopicOne, which might represent some feature we’re working on. Some other work comes up, maybe it’s to fix some CSS or a batch script that has a higher priority than this feature. But we don’t want to push our TopicOne changes yet, it’s not ready to deploy, the tests are broken, it’s just not finished. So, we’ll start a new topic by:
- hg checkout master
- hg bookmark TopicTwo
At this point we can start committing as need be:
- work work work
- hg ci –Am “Critical work”
- work work work
- hg ci –Am “More critical work”
Once we’ve done that first commit, Hg will tell you that a new head was created. This is because we first switched back to master, created a new bookmark, and started committing. Here’s what our repository looks like right now:
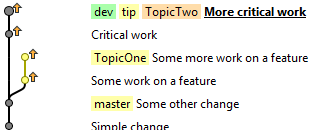
Again, master sits back as our last pulled commit. It’s the critical placeholder that helps us know where to start new topic branches from. It’s not required, as I could look at these arrows to know what the last pulled commit was to start from, but it’s a lot easier when doing rebases and merges.
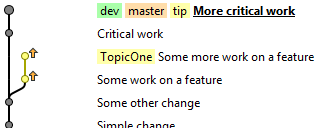
Now that TopicTwo is finished, I want to integrate TopicTwo into master and push it back upstream. Because master is a direct ancestor of TopicTwo, I only need to follow the Scenario #1 workflow:
- hg co master
- hg pull –rebase
- hg co TopicTwo
- hg bookmark –f master
- hg bookmark –d TopicTwo
- hg push –b master
It’s very important that I only push master, as that lets my local repository now look like:
Now that my critical work is done, I can go back to working on TopicOne:
- hg co TopicOne
- work work work
- hg ci –Am “Finishing work on a feature”
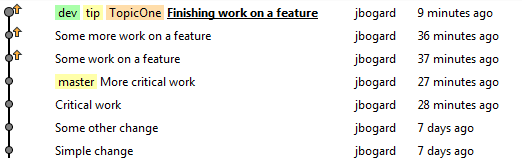
Once I do this, my local repository looks a little changed now:
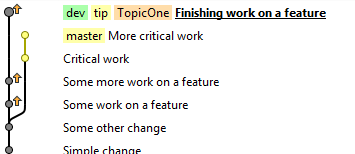
Here we see the master branch hanging off to the side, and my un-pushed changes in the TopicOne timeline. But now master is no longer in the ancestry of TopicOne. Now that I want to integrate TopicOne into master, I can either merge this branch, or rebase it. I prefer rebase, so I’ll follow the normal rebase workflow. But first, whenever we’re about to push changes, we ALWAYS:
- hg co master
- hg pull –rebase
Now that we’re sure we have the latest and greatest, we can rebase our TopicOne onto master:
- hg co TopicOne
- hg rebase –b TopicOne –d master
We switch to the TopicOne branch, then rebase from the base of TopicOne to the destination of master. This command replays the commits from TopicOne onto master, then deletes the TopicOne commits. Because the timeline changes, these are entirely new commits with new hashes, but containing the exact same changes/commit messages/commit times:
Even though I committed two of my changes before the original TopicTwo branch, after a rebase, these commits show up after the TopicTwo. This is because a rebase replays the commits one at a time on top of the destination (master). At this point, I can run the build to make sure everything works, and then follow the normal workflow when master is a direct ancestor of my topic branch, skipping the steps of pulling (we already did that):
- hg bookmark –f master
- hg bookmark –d TopicOne
- hg push –b master
Finally, here’s what my repository looks like:
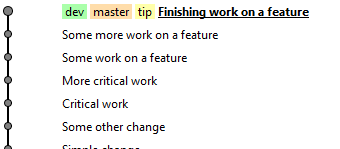
Because I’ve always rebased, no one ever needs to know about my topic branches until I integrate. The pushed timeline is always a clean, linear progression for the mainline master branch (in this case, it’s “dev” as the actual Hg branch). With topic branches, each topic is independent of each other, and I decide when that topic is ready to be integrated into the mainline. I might never integrate back, and switching topic branches is a VERY VERY fast “hg checkout” command away. This workflow is fast, cheap, flexible, and allows me to have one working directory and one repository that contains all the work I’m doing, no matter what its state.
When working with other people, it’s inevitable that file conflicts arise. In the next post, I’ll dive in to how to deal with conflicts along each step of the way and how this workflow functions in a team environment.