- changed the compiler to GCC 4.2
- added -lgov to the Other Linker Flags
- set Generate Test Coverage Files to Yes
- set Instrument Program Flow to Yes
- Xcode 4 – Xcode 4 is a big jump from 3. I have to admit Visual Studio is great, yet I like the simple yet complete IDE. You can get this in the AppStore or from the developer site.
- CodePilot – a good tool for searching through source code and files.
- AppCode – this is a new IDE to the market from JetBrains. It has a lot of great potential with the backing of JetBrains.
- Accessorizer – This is a must have tool for XDE. It helps to enforce coding styles and reduces typing. You can pick this up in the AppStore.
- TeamCity – This is what I use to do Continuous Integration builds for my projects.
- AppScanner – Find what might get you rejected before submitting your app. It will look for private API usage.
- OmniGraffle – A great tool to use for designing just about anything. I use it to do most of my iPhone / iPad layouts. Helps make doing the UI much easier.
- Kaleidoscope – Probably the best diff tool for the Mac. Great UI and integration with just about everything.
- Versions – A great tool for use with Subversion. Although I am a command line guy, I use it to watch projects I am interested in or use.
- SourceTree – A great tool for use with Mercurial and Git. Again, I am a command line guy, but I use it to watch projects I am interested in or use.
- CSSEdit – Do you have a love / hate relationship with CSS? This will make you forget most of the hate.
- TextMate – The jack of all trades text editor.
- XScope – If you do a lot of web development, you will love this tool. It makes doing pixel perfect measurements a breeze on screen.
- HTTPScoop – A great tool for sniffing HTTP traffic.
- HTTP Client – A great tool to test out those web sites to see what is going on.
- SOAP Client – I don’t use this a much anymore, but if you run across SOAP methods you have to use, good to have this tool around. I almost put this in the open source area because you can get the code for this.
- XML-RPC Client – Yes they still exist. If you want to test out those methods… this tool is helpful.
- Icons – Get those icons for you Mac / iOS app with shine.
- Sound Stage – After you make that great iOS app, record your demo to get those sales.
- Facebook
- Facebook IOS SDK – If you want to do any Facebook integration with your app, this is the SDK for you.
- Three20 – Good set of UI classes to help build your app. If you want to connect your TableView to the internet as a data source, this can help.
- ASIHttpRequest – If you are doing anything network you will want to use this library.
- JSON Framework – Framework for creating / reading JSON objects,.
- MBProgressHUD – If you are displaying a HUD or progress indicator and want something a little more than the activity indicator, use this.
- TapkuLibrary – A great library that has some good reusable tools / UI code.
- NSLogger – Track down those annoying bugs and extend NSLog.
- RestKIT – I have not used this yet but looks promising if you are doing REST calls in your application.
- iOS Azure Toolkit – Good toolkit to connect easily to Windows Azure.
- OCHamcrest – Toolkit to write matchers for your tests. Replaces the asserts you normally use.
- OCMock – Mocking framework for your tests.
- Tuneup JS – A set of extensions for the UI Automation Instruments tool.
- Download the latest version of TeamCity
- Open a Terminal Window
- Change to the directory where you unzipped TeamCity (/Application/TeamCity)
- Change to the bin directory
- Run TeamCity by executing the runAll.sh script (./runAll.sh start)
- Apple’s Documentation on Unit Testing – This defines the difference between Application and Logic tests.
- Chris Hanson’s Articles on Unit Testing – A good overview of unit testing on the Mac with XCode
- A good description of how to do this on the Apple Mailing List
- Another good description at Grokking Cocoa
- Source Control – If you don’t store your code in source control, you’re putting your company at risk.
- Test-Driven Development produces higher-quality code. Behavior Driven Design – Behavior is documentation for other developers and users.
- Build Systems – Building is more than just compiling code.
- Continuous Integration – Check in early and often.
- Real Time Code Review – Two heads are better than one.
- Refactoring: Easy as red light green light.
- Read Code – “You don’t become a better writer by just writing.” Scott Hanselman
- Code In Increments – Real programmers work for hours and hours straight, without a break, without even looking up. Don’t break your flow to stop and compile: just keep typing! 🙂
- Sharpen your skills by learning a new language.
- Learn SOLID
- Single Responsibility Principle – There should never be more than one reason for a class to change.
- Open Closed Principle – A class should be open for extension but closed for modification.
- Liscov Substitution Principle – Subtypes must be substitutable for their base types.
- Interface Segregation Principle – Clients should not be forced to depend upon interfaces that they do not use.
- Dependency Inversion Principle – High level modules should not depend upon low level modules. Both should depend upon abstractions. Abstractions should not depend upon details. Details should depend upon abstractions.
- Know when to unlearn. The ways you learned when you first started are clearly the best ways. Not much has changed since then, really. 🙂
- Be a Mentor
Build Numbers in Xcode
Working on a Mac / iOS projects, I have been trying to come up with an easy way to bump versions when it goes out the door for testing or production. Mostly I have been working it out manually, yet that is now fun after the dozenth time. I started looking around for something that would fit my workflow. I found a couple of posts that help me out.
After reading the two posts (especially the last one), it should be easy to follow what I am doing to bump the versions of the application. It feels natural with the gitflow technique. Download the code from the GitHub project here.
Enjoy!
An Agile Approach to Building a Mac Application
I have written quite a bit of articles on iOS and Mac applications using agile techniques (unit testing, continuous integration, etc) and in this post, I am going to put it all together. We will go through how to setup the project, build the application test first, how to integrate code coverage and source control flow to build features.
The Application
The application itself is not all that important. I picked something that would be easy to build and demonstrate the concepts. The application is a contact application. I based it around the post of Building a Modern Cocoa App by Martin Pilkington. I think the post does a great job of explaining an approach to building modern Cocoa Applications that I have taken when building apps for the Mac. The contact manager application is a Cocoa Application that uses Core Data as it’s backing store with Unit Tests which gives us two projects, ContactManager and ContactManagerTests.
Setup
After creating the project in Xcode 4, I needed to make a few changes to the project. The first thing I wanted to do is change to use the LVVM 2 compiler and the lldb debugger. I also set the build to always run the static analyzer. The other thing I wanted to do is get code coverage, the problem is that LLVM 2 doesn’t have a way to do code coverage (that I know of) and you have to use GCC. With the introduction of schemes in Xcode 4, this problem becomes easy. I created a new scheme based on the current one called ‘Code Coverage’ and also added a new configuration called Coverage. I also added some tools to the project. Since I am going to be doing test first, I added the OCMock framework and because I wanted some output for the code coverage, I added the lcov toolset from Linux (geninfo, genhtml).
For OCMock, I added the framework to the ContactManagerTests project and added the path to the framework on the Framework Search Paths.
For the Coverage configuration in the ContactManager project, I did the following:
For the Coverage configuration of the ContactManagerUnitTests project, I made a couple of changes: first I added a run script phase to the end of the project. I also changed the Test After Build to Yes because I wanted to make sure that the tests ran completely before the coverage.
All of this setup can be done once and create a custom project if you create a lot of these types of projects.
Test First
Now that we have everything setup and ready to go, we need to figure out how to break this code into it’s parts. The application stores contacts in Core Data and uses binding KVO / KVC to build out the UI. The first story I decided to take on saving a contact (since that is one of the major features of the app). I am going to describe this story (and not all of them) and you can look at the rest of the code to see how things
Save a Contact
I decided that I wanted to store first name, last name, email and phone number. Nothing amazing here. I do this with the Core Data modeler and create a Contact object class from the model I created. After this I decide to create a ContactDataController that would manage contact data. I decided to also add a CoreDataController that would manage the Core Data infrastructure (much like that from the Modern App by Martin). One thing I didn’t want is a Singleton. Singletons are really hard to test and I avoid them as much as possible. For this I decided to inject the CoreDataController into the ContactDataController and make that the default initializer.
Once I had this infrastructure and tests in place I created the UI and the list and detail view controllers for the UI, I needed to figure out how to add the tests to ensure that things are working properly. Chris Hanson has had a great set of posts on doing just this. The main idea is that you will trust that Cocoa will do the right thing (KVO / KVC) but you want to verify that all the things are setup to make it work. I did just this by creating some simple methods that verify that Cocoa hooked up my Views and Controllers and that I didn’t forget anything. If you look at the tests, it is pretty easy to see how this works.
That is the pattern that I followed for all the code in this application. You can review the rest of the code to see how it all fits together.
Code Coverage
After the setup, when you run your tests, you get the code that is covered. The key here is how you want to view it. Once you have your code instrumented, you can use a tool like CoverStory to view it, yet I wanted something more automated. The Run Script for the ContactManagerUnitTests run the gcov tools on the project and generate an html report that you can view anytime. It includes the OS X libraries (I have not figure out how to ignore those) and your code.
Source Control Flow
This one was pretty easy as well. I followed the process from here. They call this git flow and it is pretty well laid out. I used this for all my projects now. The key is that you have two branches: master and develop. You do everything off develop and master is pretty much your release. I find that doing this helps me focus on working on one thing at a time. If I am writing a large commit message that includes to much work… I feel I am breaking some sort of magical law :).
Wrap Up
The code is the best place to learn. I hope you find a few nuggets in here that you can use on your projects. It has taken me a while to find my groove yet I am really happy with this now.
If you want to know more about Unit Testing I would go check out Unit Testing with XCode.
Mac and iOS Custom UI Component Database
After yesterdays post on my Dev Toolbox on the Mac I realized I left out a couple of good things:
I have been playing around with the Windows Azure Toolkit and it is quite cool. Cloud + Phone is fun!
Mac and iOS Development Toolbox
I have been building for the Mac and iOS for the last couple of years and the list of tools I have ben using has been growing (and shrinking). There is a great development community around the Mac / iOS. There are a lot of other tools / code out there that you can read to learn more.
Tools
OSS
Testing
Enjoy!
Unit Test Logging for Builds with Xcode 4 and Team City
One of the things I wanted to do after getting comfortable with the iOS/Mac platform(s) was trying to take my “agile” ways to the platforms (for this post specifically testing). I started learning all this in the Xcode 3 days. I really think with the release of Xcode 4, things are getting much better. WIth workspaces, schemes and better unit testing integration, I believe Xcode 4 is making my life as a developer easier on the platform.
All the code for this project can be found on github here.
Unit Testing
Unit testing is by far the lowest hanging fruit. I spent a good bit of time learning the shipping tools for Xcode (OCUnit). I also spent some time looking at the unit testing tools like GHUnit and Google Toolbox for Mac (GTM), yet I am pretty pragmatic and found that for the most part, OCUnit did what I needed. The only other tool that I use for testing is OCMock. I know a lot of people also use OCHamcrest for extending the assertion macros, I just have not found I use it myself. I know a lot of people are using specifications these days to do more user level testing. There are a few projects out there that you might find interesting:
Continuous Integration
This is where the rubber meets the road. Getting your software working on your machine is one thing (and sometimes a hard thing), yet having a repeatable automated build that can build and test your software on another machine is something that makes me feel all warm and fuzzy inside. I have been using JetBrain’s TeamCity for a few years now and wanted to get my project building, archiving, reporting unit tests and possibly code coverage (more about code coverage in another post).
Getting TeamCity up and running is fairly straightforward.
The hard part was getting the project running with test output, which is what this long winded post is all about.
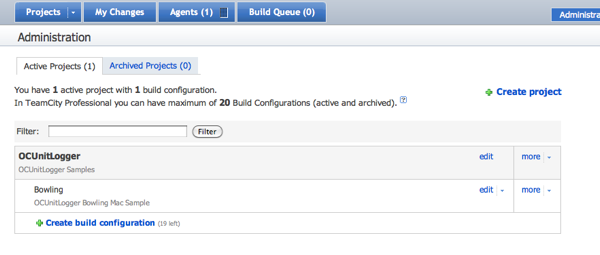
Team City Project Setup
Using a sample project based on the bowling game unit testing example, here is how the project is setup. This is based on the sample for the OCUnitLogger project. This is a very simple setup and you can make this as complicated (or as easy) as you need it to be.
Setup a Project
I created a project called OCUnitLogger and give it a good description.
Setup a Build Configuration
I created one called Bowling with a description.
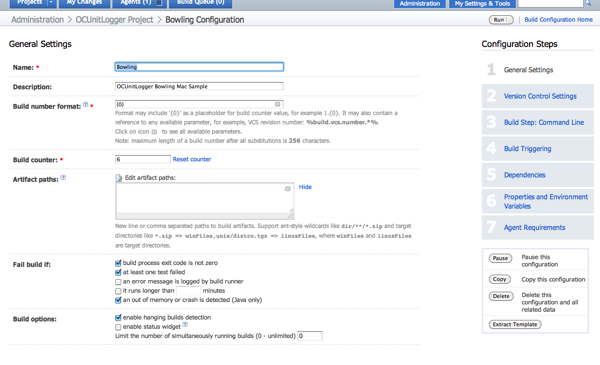
Setup the General Settings
I left all the defaults on this one.
_Setup the Version Control Settings
_ I left the defaults on most of these
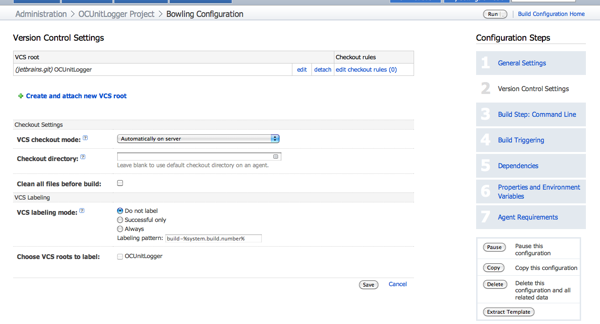
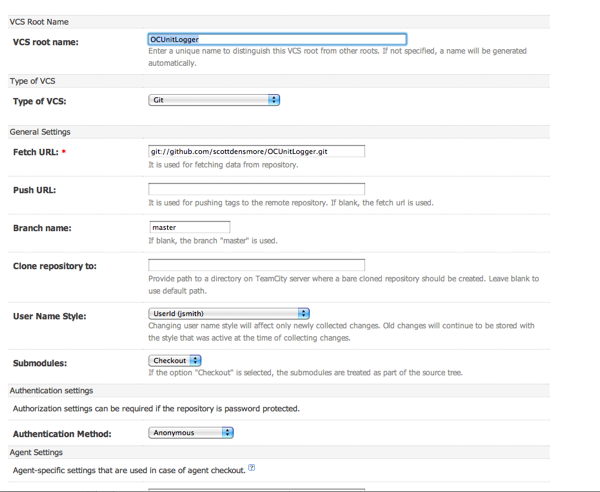
Setup a VCS Root
I set this to use git and check out anonymously using the default polling policy.
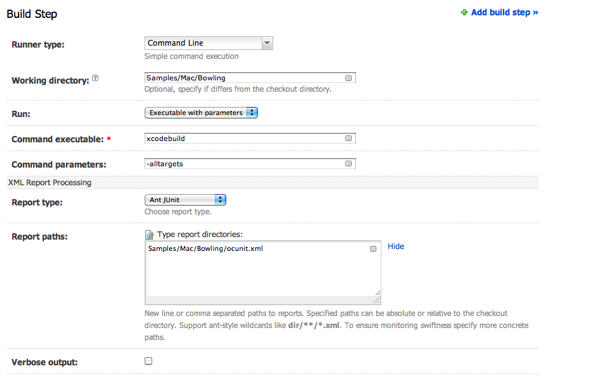
Setup a Build Step
This build step is probably the most important part. Building the project is quite easy. You setup the build to build from the command line using xcodebuild. (You can see usage for xcodebuild using xcodebuild -usage.) I have setup this project to just build all targets for this project. Also, I setup the reporting for my tests as JUnit and where it can find the xml file (more on this later).
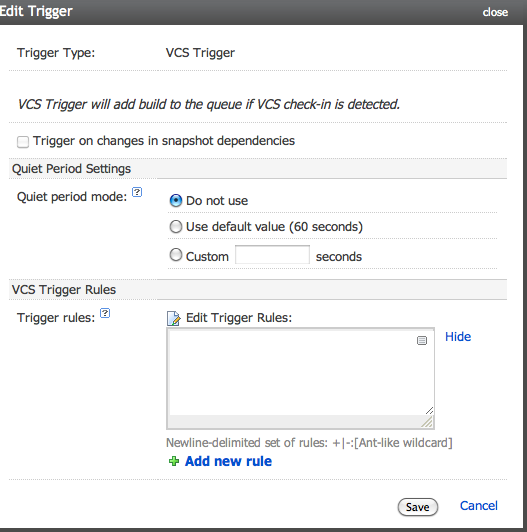
Setup a Build Trigger
We want the build to trigger every time a checkin occurs so we set that up.
 The Logger
OCUnit works using the NSNotificationCenter. By creating a new object to listen for the events, we can create an xml document that mimics JUnit output.
NSNotificationCenter *center = [NSNotificationCenter defaultCenter];
[center addObserver:self selector:@selector(testSuiteStarted:) name:SenTestSuiteDidStartNotification object:nil];
[center addObserver:self selector:@selector(testSuiteStopped:) name:SenTestSuiteDidStopNotification object:nil];
[center addObserver:self selector:@selector(testCaseStarted:) name:SenTestCaseDidStartNotification object:nil];
[center addObserver:self selector:@selector(testCaseStopped:) name:SenTestCaseDidStopNotification object:nil];
[center addObserver:self selector:@selector(testCaseFailed:) name:SenTestCaseDidFailNotification object:nil];
The new object is called OCUnitToJUnitLogger. I create a static instance and in each notification we generate the required nodes. I am using the Google Data XML node so that this works in both a Mac and iOS project.
static OCUnitToJUnitLogger *instance = nil;

static void __attribute__ ((constructor)) OCUnitToJUnitLoggerStart(void)
{
    instance = [OCUnitToJUnitLogger new];
}

static void __attribute__ ((destructor)) OCUnitToJUnitLoggerStop(void)
{
    [instance writeResultFile];
    [instance release];
}
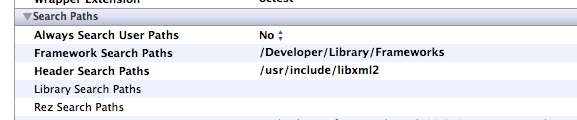
The output goes to a file called ocunit.xml. You can change this in the OCUnitToJUnitLogger.m on line 88.
It is pretty easy to use. Drag the Logger folder into your project for your unit testing bundle and build. You will also need to add the libxml2.2.7.3 (or the latest) library to your link phase and then add /usr/include/libxml2 to the header search path.

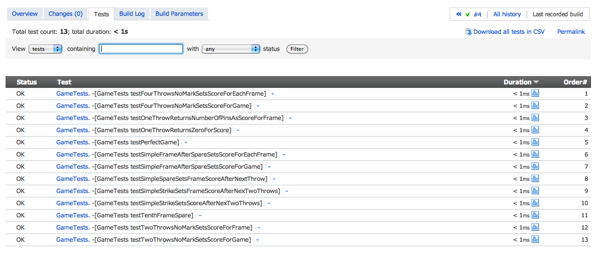
The Bowling Project
The bowling project is a Coca Framework project created with Unit Tests. It is pretty standard stuff. The only thing I did was add the logger to the project and this is what I get from TeamCity:
Conclusion
This is a pretty simple add to any of your projects. If you are using TeamCity and want to have a good log for your unit tests, you can drop this in and have TeamCity do the rest. If you want to make it better please fork from here and pound away.
Debugging Unit Tests for the iPhone/iPad
Update 8/17/2010
I changed the Environment Variable arguments to make it easier and remove the unnecessary quotes around the directories. I now just use the SDK_ROOT for both DYLD_FRAMEWORK_PATH and DYLD_LIBRARY_PATH variables.
I have been working my way through a new iPhone app. I have been doing this TDD. One problem that I ran into was one of my tests failed, yet I could not figure out how to get it working easily so I wanted to debug my Unit Tests. This should be straight forward, yet it took me a while to figure out using the metaphors and tools of XCode (built in OCTest). I know that many people will say I should use GHUnit or GTM (Google Toolbox for Mac). I have tried both of these and I really don’t like them because they don’t feel as integrated into XCode (not that any of these tools do but that is another story). I spent a good bit of time searching around for how to do this for iPhone/iPad apps. The following articles are the best I found (although didn’t answer the questions completely):
After reading through these articles and many others I finally came up with the solution. I am using 3.2.3. Most of these articles are talking about earlier versions of XCode. Most of the solutions work (especially the last one). My biggest problem that I wanted to solve is make sure that when I switched SDK (iPhone 4 to iPad 3.2), the custom executable (more on this in a minute), otest, that I used was for the right SDK. Unfortunately, each SDK (Mac OS X 10.x, iPhone and iPad) have their own version of otest. So if I wanted to debug a universal iPad/iPhone application, I needed to point to the right otest.
When you create a UnitTest bundle in XCode, it runs a script to run the Unit Tests when you build that target. If you look at this script (/Developer/Tools/RunUnitTests), you will notice that it figures out what platform you are building for and then calls the RunPlatformUnitTests script. If you go to Terminal and do find /Developer -name RunPlatformUnitTests, you will see that there is one for each platform. Each one of these set specific environment variables and run the correct otest with the bundle passed into the script. Armed with this information and the information I got from the articles I could setup my environment to debug unit tests now.
How to Setup XCode
The first thing I did was add a custom executable to my project (that already had a UnitTest bundle target). I named it otest and pointed it to the otest for the iPhone 4 SDK (you could pick the one for iPad if you want). If you do a find for otest in the Developer directory (find /Developer -name otest) you will see that for each SDK, it is located in the Developer/user/bin/ folder. This was the important part of the puzzle. When you open the general table of your Custom Executable information windows, you will see a drop down for Path Type. Instead of Absolute Path you set this to Relative to Current SDK. This will then allow you to run the corrent otest depending on what SDK you pick.

Once you have this part, the rest is just setting the environment variables and the arguments for otest. You will need to pass the name of your unit test bundle (mine is UnitTests.octest). Optionally you could pass what test(s) you want to run, but I take the default to run them all. The only thing about the environment variables is that you will need to use quotes if there are spaces when things get expanded. I am not going to try and discuss each one, I leave that as an exercise for the reader. Here is the setup I have:

Once this is setup, you can debug your Unit Tests. As mentioned in the Grokking Cocoa article, you can clone your unit test bundle and remove the run script so you can build and debug at the same time, I don’t ever do this. If your tests fail after building, you can just do a run debug and still debug without building again. I find this easier than managing another target.
| Name | Value |
|---|---|
| DYLD_ROOT_PATH | $(SDKROOT) |
| DYLD_FRAMEWORK_PATH | ${BUILD_PRODUCTS_DIR}:${SDK_ROOT}:${DYLD_FRAMEWORK_PATH} |
| IPHONE_SIMULATOR_ROOT | $(SDKROOT) |
| CFFIXED_USER_HOME | $(HOME)/Library/Application Support/iPhone Simulator/User/ |
| OBJC_DISABLE_GC | YES |
| DYLD_LIBRARY_PATH | ${BUILD_PRODUCTS_DIR}:${SDK_ROOT}:${DYLD_LIBRARY_PATH} |
| DYLD_NEW_LOCAL_SHARED_REGIONS | YES |
| DYLD_NO_FIX_PREBINDING | YES |
Hope someone finds this a useful.
There can be only One RoleEntryPoint
Last week we were finalizing the production of Windows Azure Architecture Guidance Part 1, when we came across a problem with the code. We had a few machines that were failing when trying to start the WebRole for the project. Here are the event log entries for one of the machines (They were all logged by the HostableWebCore on the local machine):
1: The worker process for application pool ‘{E2160A33-4856-41E2-B811-E19D71F18B22}’ encountered an error ‘The configuration section ‘system.webServer/globalModules’ cannot be read because it is missing a section declaration ‘ trying to read global module configuration data from file ‘\?C:Users
2: The worker process for application pool ‘{E2160A33-4856-41E2-B811-E19D71F18B22}’ encountered an error ‘Cannot read configuration file ‘ trying to read configuration data from file ‘\?C:Users
3: The Windows Process Activation Service received a change notification, but was unable to process it correctly. The data field contains the error number.
4: The Windows Process Activation Service encountered an error trying to read configuration data for config section ‘system.applicationHost/webLimits’ from file ‘\?C:Users
On another machine we got this error:
The Windows Process Activation Service encountered an error trying to read configuration data from file ‘\?C:WAAGs0deployment(42)resdeployment(42).aExpense.Azure.aExpense.0temptempapplicationHost.config’, line number ‘0’. The error message is: ‘Cannot read configuration file
All this lead me to believe that something was going on with the coping of the files during the process of deploying locally. It seemed like the files were not getting copied before the HostableWebCore (IIS) was trying to read them causing the WebRole to stop. To make a long story short, this had nothing to do with the problem. The errors were actually caused by having multiple RoleEntryPoints defined in the WebRole project (this can be caused by having multiple RoleEntryPoints defined in any assembly that represents a WebRole or WorkerRole). The reason the errors manifested the way they did is because the projects were being run inside of Visual Studio. When Visual Studio runs the project it deploys it and then tells the Dev Fabric to run the project. The problem is that when it fails to start the project in a specified time (because of an error) it removes all the deployed files and the HostableWebCore reports an error that it can not find them. To see the real problem you can use csrun.exe and run the package file and see the error in the Dev Fabric UI (csrun myproject.csx ServiceConfiguration.cscfg).
So all this comes down to the fact that we had a abstract class that we used to inherit functionality for RoleEntryPoints. What happens is that when the Role starts up, Windows Azure uses reflection to find the class that inherits from RoleEntryPoint. Since we have two, it picks one of them and sometimes it picks the wrong one. Since reflection is non-deterministic, this will cause the failure. To fix this, we moved the abstract class to another assembly.
We have filed a bug against this and maybe they will come up with a way to fix it. Until then, I hope this helps people if they run into this problem.
MonoTouch Comparison with Apple Tools
I have been playing around with MonoTouch trying to figure out if I liked the new approach to building Cocoa Touch apps. I decided to take a couple of the samples built using MonoTouch and build them for the Cocoa Touch using Apple’s toolset.
HelloWorld
I decided to start out with the easiest thing first: building HelloWorld based on this article. I read through the article and built the Apple version first. Open XCode and choose a new Window-based application. This is the closest to the iPhone application from MonoTouch. The first thing I noticed is that I do things opposite of how they are done in MonoTouch. When I am going to create outlets for connecting objects from Interface Builder, I do that in code then go to Interface Builder. This is how “stylish” programmers do things. At least that is what I learned at the Big Nerd Ranch. So I opened up the header file and updated it to look like this:
#import <UIKit/UIKit.h>
@interface HelloWorldObjCAppDelegate : NSObject <UIApplicationDelegate> {
    UIWindow *window;
    UIButton *button;
    UILabel *label;
}
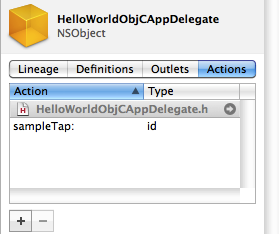
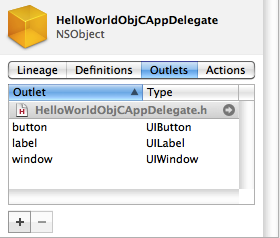
@property (nonatomic, retain) IBOutlet UIWindow *window;
@property (nonatomic, retain) IBOutlet UIButton *button;
@property (nonatomic, retain) IBOutlet UILabel *label;
- (IBAction)sampleTap:(id)sender;
@end
I added two properties for the button and label. I use custom Text Macros for doing this so I don’t have to do a lot of typing [more on this later]. After this I opened up Interface Builder and setup the interface and made the connections. The connections are the same except they are already part of the UIApplicationDelegate.
|
|
Now for the fun part. Adding in the code for the actions. Unlike Cocoa on Snow Leopard, there is no support for blocks on the iPhone so I don’t get similar delegate support. If you want to have it you can get plblocks. The code in the implementation file looks like this:
@implementation HelloWorldObjCAppDelegate
@synthesize window;
@synthesize button;
@synthesize label;
- (IBAction)sampleTap:(id)sender {
    [label setText:@"Second button clicked"];
}
- (void)buttonEvent:(id)sender {
    static int count = 0;
    [label setText:[NSString stringWithFormat:@"I have been tapped %d times.", count++]];
}
- (void)applicationDidFinishLaunching:(UIApplication *)application {
    [button addTarget:self action:@selector(buttonEvent:) forControlEvents:UIControlEventTouchDown];
    // Override point for customization after application launch
    [window makeKeyAndVisible];
}
- (void)dealloc {
    [window release];
    [button release];
    [label release];
    [super dealloc];
}
@end
The addTarget:action message is what happens under the covers when you connect your action and event in Interface Builder. I set the text for the label using NSString stringWithFormat:. This is just like string.Format with printf arguments. All in all, not much code except for the release calls and not much difference in the hello world.
RSS Reader
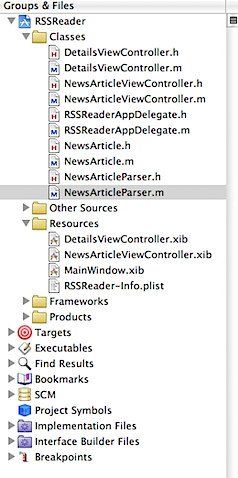
I moved to a little harder sample. I am using the RSS Reader tutorial. The first thing I needed to do is figure out the layout of the response from the rss. I use HTTP Client to view requests / response. In XCode I created a Navigation based application. I renamed a few files (RootViewController -> NewsArticleViewController) via the Rename refactoring support in XCode (yes XCode has some refactoring and also takes snapshots of your code before it makes the changes). I also added the News Article model class and a parser for the rss feed. The Cocoa framework doesn’t have a built in XML Document, but instead uses SAX style NSXMLParser. I wanted to hide this and also do it in a background thread using an NSOperation. Here is what my project looks like:
I will not bore you with the gory details of the code in the parser. I could have used some third party library code to make it easier, yet I decided to stick with what comes in the box. Check out the touchcode project if you want something else. The key was to have it parse through the code and build up the models from the rss feed. Another difference is that I reference the DetailsViewController from the NewsArticleViewController. I dragged a UIViewController into the controller and set it’s class to DetailsViewController in the identity inspector and NIB name to DetailsViewController in the attributes inspector.
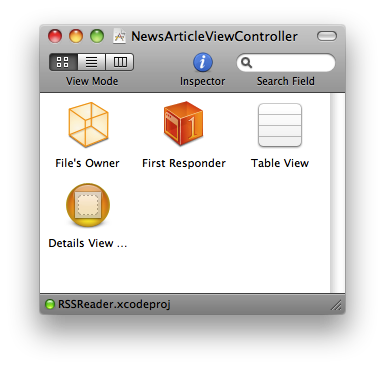
I added an outlet in the NewsArticleViewController and hooked this up in Interface Builder. I added the title to the navigation controller and showed it so I could navigate back to the list. The UI needs a little love to spice it up. Given everything, not much more code than MonoTouch.
The Takeaways
MonoTouch is a great start. It comes down to language differences. If you want to learn more about them Matt Gallagher has an amazing post that you should read. It took me a while to get comfortable with Objective-C (a couple of months). The language itself is pretty easy. I really like it because of the dynamic nature. The IDE is lacking in functionality especially a debugger, which makes it hard to switch. I find the use of classes for delegate markers a little odd since they are protocols in Obj-C and more akin to interfaces. I understand the reason for not doing this is because in Obj-C, things can be optional. This is not possible in a strongly typed language like C# (see Matt’s post). The Garbage Collection is nice yet I think as a platform, Cocoa Touch will get GC just like Cocoa for OS X. I am more of an XCode person, so I wish they would have invested in working with XCode. All in all, to really understand building Cocoa Touch apps, you will need to understand the underlying framework (Cocoa Touch). The abstraction is interesting to make it work with a static language like C#. I will keep my eye on this to see where it goes. I don’t think it is worth the $500 US to switch for me right now.
Tools
Accessorizer – good code generator / helper / expander
Orlando .NET User Group Talk – 12 Practices to be a Better Developer
Last week I gave a talk at the Orlando .NET User Group on Practical Software Craftsmanship – 12 Practices to be a Better Developer. Most of these 12 are just things I have learned over my years of development. I promised I would put links to the slides and resources from my talk. They are in no particular order and I don’t claim they are nothing more than fortune cookie wisdom :D. I will try and write more about these in the future.
Download 12 Steps to a Better Developer.pptx.zip (15261.7K)
The 12 Practices
Resources
These are great places to pick up some of the key concepts:
Scott Hanselman – Reading To Be A Better Developer
Singletons Are Evil Part 2
A while back I wrote a post about why singletons are evil. I still agree with that statement, yet after my comment on twitter today, I think I need to show how you can solve this problem differently.
The first problem we need to solve is creating the instance itself. This can become difficult if we have dependencies and we are trying to limit the creation. For example we have class Foo that is our singleton:
public static class Foo
{
	static Foo instance;

	public static Foo Current
	{
		if (instance == null)
		{
			instance = new Foo();
		}
		return instance;
	}

	public void SomeMethod()
	{}

	public void SomeOtherMethod(int x, int y)
	{}
}
Great! Easy enough and no big issues other than this is quite contrived and nothing in the real world is this easy. So lets go ahead and tackle the next big problem: Multithreading. We fix our class with a double check lock and end up with this:
public static class Foo
{
	static volatile Foo instance;
	static object syncObj = new object();

	public static Foo Current
	{
		if (instance == null)
		{
			lock (syncObj)
			{
				if (instance == null)
					instance = new Foo();
			}
		}
		return instance;
	}

	public void SomeMethod()
	{}

	public void SomeOtherMethod(int x, int y)
	{}
}
I am starting to feel a little dirty, but I can handle a little dirt. Now we are good except that Foo now has a dependency: Bar. Why the dependency? Well that is the object that we use to get some of the information we want in our singleton. Ok, lets see what this looks like:
public static class Foo
{
	readonly Bar bar;
	static volatile Foo instance;
	static object syncObj = new object();

	private Foo(Bar bar)
	{
		this.bar = bar;
	}

	public static Foo Current
	{
		if (instance == null)
		{
			lock (syncObj)
			{
				if (instance == null)
					instance = new Foo(new Bar(new Baz()));
			}
		}
		return instance;
	}

	public void SomeMethod()
	{}

	public void SomeOtherMethod(int x, int y)
	{}
}
At this point alarm bells should be going off and your brain should be going to DEFCON 1. We introduced Bar only to see that it needed a Baz. We have violated SRP and coupled all our classes together. Now imagine writing a test around any class that needed to use Foo. You get one Foo and all its dependencies that need to be cleared between tests. This causes you to write that clear method on your class that really is only needed to get rid of state you were trying to support anyway.
So hopefully by now, we agree that this is evil. Yet, I agree that singletons are something useful in the right scenario. So how can you avoid Global Thermonuclear War when using a singleton? Well fire up your trusty IoC container and let it manage it for you. Here is an example in Unity.
public class Baz{}
public class Bar
{
	readonly Baz baz;

	public Bar(Baz baz)
	{
		this.baz = baz;
	}
}

public class Foo
{
	readonly Bar Bar;

	public Foo(Bar bar, Baz baz)
        {
		Bar = bar;
		Baz = baz;
	}

	public void SomeMethod()
	{}

	public void SomeOtherMethod(int x, int y)
	{}
}
...
IUnityContainer container = new UnityContainer();
container.RegisterType(typeof(Baz), typeof(Baz));
container.RegisterType(typeof(Bar), typeof(Bar));
container.RegisterType(typeof(Foo), typeof(Foo), new ContainerControlledLifetimeManager());
Now we have separated the creation of the object and it’s life time from the object itself. This way we let the container handle the singletoness of the object and it’s creation. You still have to deal with multithreaded access to the dependencies of Foo, but when you decide that is just way to evil and there are better ways to solve this problem, you can change the lifetime management and go on about your business. This also frees you up to easily test this object and perform refactorings (like the ones Sean is talking about this month).
Did I mention singletons are evil?
Deliverance by Opeth
subscribe via RSS