Fluent Silverlight – Part 3 – Binding Events to Commands
Introduction
In the last two posts I introduced Fluent Silverlight which is a new framework designed to offer a strongly typed alternative to the XAML based definition of Silverlight views and its “magic string” based data binding of properties of the view controls and I explained in details how we provide data binding between the view model and the view. In this post I want to discuss the details on how we bind events of Silverlight controls to corresponding commands defined in the view model. Those events are mostly triggered by user actions like clicking on a menu item or button or entering text into a text box. One of our goals is to have an implementation of the MVVM pattern where the view is as humble as possible. In this context humble means that the view should contain the bare minimum possible of logic. And if ever the view contains logic this logic should be really simple and mostly of type display logic. Data binding of properties helps a lot in this regard. But also binding of events of controls to corresponding commands defined in the view model is an additional big step in the chosen direction.
Binding Events to Commands
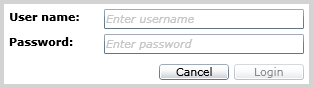
To demonstrate the binding of commands to events triggered by user actions let’s take a simple use case which should be familiar to all of you dear readers. It is the famous login screen. Usually when logging into an application the user has to provide a user name and a password. She can then either abort the use case by clicking on the cancel button of try to login by clicking on the login button. In our case the login button should only be enabled if the user has entered a valid user name and password. On the other hand the user should always be able to abort the operation. Thus the cancel button has always to stay enabled.
The view
With the aid of our fluent interface we have defined the above view. The code in the view looks like this
public override void Initialize()
{
Content = this.GridFor("Grid1")
.Background(Colors.White)
.Height(80)
.Margin(3, 10, 3, 5)
.AddColumn.Width(100)
.AddColumn.Star()
.AddRow.Auto()
.AddRow.Auto()
.AddRow.Auto()
.PlaceIntoCell(0, 0, this.TextBlockFor("User name:")
.FontWeight.Bold()
.Margin(5, 5, 0, 0)
)
.PlaceIntoCell(1, 0, this.TextBlockFor("Password:")
.FontWeight.Bold()
.Margin(5, 5, 0, 0)
)
.PlaceIntoCell(0, 1, this.TextBoxFor(m => m.Username)
.Watermark("Enter username")
.Width(200)
.Margin(0, 5, 5, 0)
)
.PlaceIntoCell(1, 1, this.TextBoxFor(m => m.Password)
.Watermark("Enter password")
.Width(200)
.Margin(0, 5, 5, 0)
)
.PlaceIntoCell(2, 1, this.StackPanelFor()
.Orientation.Horizontal()
.HorizontalAlignment.Right()
.Margin(0, 10, 0, 5)
.AddChild(this.Button("Cancel")
.Width(70)
.Margin(0, 0, 5, 0)
.OnClick(m => m.CancelCommand))
.AddChild(this.Button("Login")
.Width(70)
.Margin(0, 0, 5, 0)
.OnClick(m => m.LoginCommand))
);
}</p>
The above code defines a login view with two labels (instances of type TextBlock) and the two text entry fields for the user name and the password. Additionally we have two command buttons – one to request login and the other to abort the process.
I am not going to discuss the layout of the view in this post. I frankly admit being a terrible designer!
The important part of the code that I want to discuss here is the binding of the click event of a button to a respective command of the view model. The binding is defined by a lambda expression similar to the binding of properties described in the previous post.
this.Button("Login")
.OnClick(m => m.LoginCommand)</p>
that is, the click event of a button with content “Login” is bound to the LoginCommand in the view model.
The view model
In the view model we define the LoginCommand as a public field of type DelegateCommand
public DelegateCommand<object> LoginCommand;</p>
The delegate command is generic to allow for a parameter of any type to be passed when executing the command. In our case we don’t need a parameter thus we just defined the generic parameter of the delegate command to be of type object.
The LoginCommand must the be instantiated which usually is done in the constructor of the view model. When instantiating a delegate command one has to provide a delegate to an execute method which is called whenever the command is triggered. Optionally one can also pass a delegate to a method which determines the availability of the command in a given context.
public LoginViewModel(ILoginView view)
{
...
LoginCommand = new DelegateCommand<object>(OnLogin, CanLogin);
...
}</p>
and then the corresponding methods in the view model
private void OnLogin(object obj)
{
// define action here...
}
private bool CanLogin()
{
return IsValid();
}</p>
here the IsValid method makes a simple validation of the username and password properties and returns true if they are in a valid state. Remember that the control bound to a command in the view model is automatically enabled or disabled if the command to which it is bound is available or not.
The ButtonBaseBinder class – or – how to bind a command
The ButtonBase class is the super class of Silverlight controls having a click event like Button, CheckBox, HyperLink, etc. We want to bind the click event of such a control to a (delegate) command defined in the view model. Such a command implements the following interface
public interface IFsCommand
{
bool CanExecute();
void Execute(object parameter);
event System.EventHandler CanExecuteChanged;
}</p>
Whenever the click event of a bound control is raised the Execute(…) method of the bound command should be automatically invoked. Whether a command is available in a given context is determined by the CanExecute() method of the corresponding command. The bound controls should automatically be enabled or disabled depending on the response of this method.
Usually a command is exposed as a public field in the view model. In the view an event of a control is bound to a command in the view model with the aid of a lambda expression similar to this one
m => m.LoginCommand</p>
In our builder when having such a lambda expression we can get to the command instance with the following code fragment
var fi = ((MemberExpression)expression.Body).Member as FieldInfo;
if (fi != null)
{
var command = (IFsCommand)fi.GetValue(model);
}</p>
Here the model is an instance variable of the builder. Now we want to bind the click event of the control to the command. This can be done like this
control.Click += (sender, e) => command.Execute(null);</p>
that is we register a lambda expression with the event. Note that the execute method expects one parameter. In this simplified case we just pass a null value. Depending on the situation we can pass a relevant value. In the case of a CheckBox we could e.g. pass the value of the IsChecked property as a parameter.
We have mentioned above that the visibility of the bound control should automatically be synchronized with the output of the CanExecute() method of the command. This is accomplished with the following code fragment
command.CanExecuteChanged += (sender, e) => { control.IsEnabled = command.CanExecute(); };
// the following line is needed such as that the initial setting is correct
control.IsEnabled = command.CanExecute();</p>
Whenever the CanExecuteChanged event of the command is raised the IsEnabled property of the bound control is set to the value returned by the CanExecute() method of the command.
All in all we can summarize this and receive as a result
public abstract class ButtonBaseBinder<THIS, TControl, TModel> : ContentControlBinder<THIS, TControl, TModel>
where TModel : class
where TControl : ButtonBase
{
protected ButtonBaseBinder(TModel model, TControl element)
: base(model, element)
{
}
public THIS OnClick<T>(Expression<Func<TModel, DelegateCommand<T>>> expression)
{
var command = PrepareCommand(expression, true);
control.Click += (sender, e) => command.Execute(null);
command.CanExecuteChanged += (sender, e) => { control.IsEnabled = command.CanExecute(); };
// initial setting
control.IsEnabled = command.CanExecute();
return thisInstance();
}
protected IFsCommand PrepareCommand<T>(Expression<Func<TModel, DelegateCommand<T>>> expression)
{
var fi = ((MemberExpression)expression.Body).Member as FieldInfo;
if (fi != null)
{
return (IFsCommand)fi.GetValue(model);
}
throw new ArgumentException("The expression cannot be used to bind an action/delegate command to an event.");
}
}</p>
In a similar way as shown with the click event it is possible to bind a command to other events of a control. one example would be the TextChanged event of a TextBox.</p>
Summary
In this post I have show how to bind an event of a Silverlight control to a command defined in the view model. To really implement the MVVM pattern with a humble view it is important not only to bind the properties of the view model to respective properties of the view but also the actions a user can trigger via the view. Actions are most often triggered by various types of buttons like menu items, hyper links and normal command buttons. With the technique shown in this post the whole presentation logic can be handled in the view model. In such a way it is also possible to unit test the whole system since the view model can be easily tested and developed in isolation whereas the view cannot since it has to run embedded into the browser; that is the Silverlight framework.