Walking through the creation of a complex installer package
Introduction
In this post I want to describe the issues and pain points I had when trying to generate a setup package for a complex product with many thousand of files. This is a post mainly for self documenting purposes but hopefully it might add some other people trying to create a complex product installer.
I received the following list of requirements
- The install process must be transactional
- Repair of a corrupt installation must be possible
- Patching and Upgrading must be possible
- Some files (mainly config files) must be backed up during an upgrade
- Must be able to automatically launch an application at the end of the install
- Must support localization
- Can automatically create a virtual directory and an application pool for IIS
- Can assign write permissions for specific folders to users/groups
In the past our company had used Install Shield to generate the setup packages. But this was overly complex and became a maintenance burden with the time. Not to mention that Install Shield is rather expensive compared to the two products discussed in this post which are both – ahhh – free! The products I want to have a look at in this post are WIX and NSIS.
WIX – Windows Installer XML
WIX is an open source project of Microsoft. It is based on the Microsoft Windows Installer technology. Everything about WIX (download and documentation) can be found here.
Tutorial
If you are new to WIX I absolutely recommend to read this wonderful and extensive tutorial.
“… Instead of a tool with a graphical interface that allows the developers to collect the files and other related tasks making up the installation process manually, it is much more like a programming language. Integrating perfectly with the usual process of creating applications, it uses a text file (based on the increasingly popular XML format) to describe all the elements of the installation process. The toolset has a compiler and a linker that will create the setup program just like our usual compiler creates our application from the source files. Therefore, WiX can be made part of any automated application build process very easily, be that based either on the classical technology of makefiles or the similar features of contemporary integrated development environments. …”
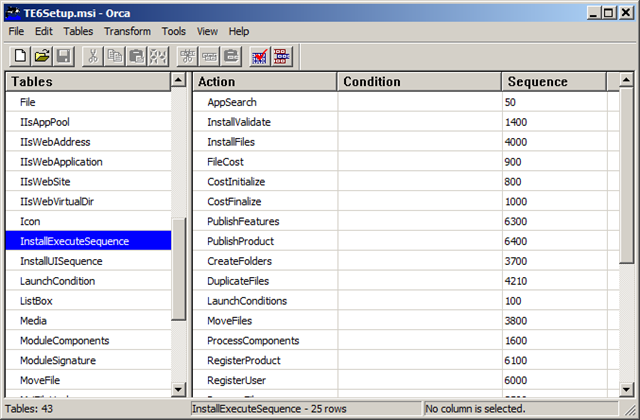
Analyze an existing MSI package with ORCA
If you ever want to analyze the .msi package created by WIX there is a tool called ORCA available in the Microsoft Windows SDK. With this tool any detail of such a package can be analyzed in details, e.g. the components included, the icon used or the install execution sequence.
Let’s now have a look at various elements of a setup project in WIX.</p>
Defining Variables
If you are used to e.g. Nant or MSBuild you certainly define properties which later on you use in the script instead of hard coded values. WIX has a similar concept of variables. With the aid of pre-processor <?define …> statements we can define variables that later on can be used at the place of hard coded values
<?define BuildPath = ".......build" ?>
<?define Help = "$(var.BuildPath)Help" ?>
<?define Skin = "$(var.Help)Skin" ?>
<?define Data = "$(var.Help)Data" ?></p>
Note that once a variable is defined it can be used by applying the following syntax: $(var.VariableName). It took me a while to find this all out since unfortunately it is not well documented in the WIKI.
Properties
To define a property and assign a (constant) value use a statement similar to this
<Property Id='NOTEPAD'>Notepad.exe</Property></p>
Note that when using an all caps id for the property the property is considered to be global and can be used every where in the setup files.
To define the value of a property with a nested statement like a registry search
<Property Id="IIS">
<RegistrySearch Id="IISInstalledVersion"
Root="HKLM"
Key="SOFTWAREMicrosoftInetStp"
Type="raw" Name="MajorVersion" />
</Property></p>
In the above snippet the property IIS is assigned the value of the registry key HKLMSOFTWAREMicrosoftInetStpMajorVersion which is a DWORD in this case. If IIS 7.0 is installed the property IIS would contain the value “#7”.
Such a property can then e.g. be used in a condition. The following condition tests whether IIS 6.0 or 7.0 is installed on the current machine
<Condition Message="This setup requires IIS 6.0 or 7.0 is installed.">
<![CDATA[IIS="#7" OR IIS="#6"]]>
</Condition></p>
Use environment variables to set properties, e.g.
<Property Id='ROOTDRIVE' Value='$(env.SystemDrive)' /></p>
For a full list of all possible system directory values take a look here.
Components
The component is the atomic unit of things to be installed. It consists of resources—files, registry keys, shortcuts or anything else—that should always be installed as a single unit. Installing a component should never influence other components, removing one should never damage another component or leave any orphaned resource on the target machine. As a consequence, components cannot share files: the same file going to the same location must never be included in more than one component.
A component has to have its own Id identifier as well as its own GUID.
<Component Id='Component 1' Guid='170A4245-9DE3-4bd7-B68A-110000000010'>
...
</Component></p>
Once defined a component can be referenced by its id, e.g.
<ComponentRef Id='Component 1' /></p>
Component Groups
A component group is a handy way to tie together a group of related components.
<ComponentGroup Id='Help'>
<ComponentRef Id='Help'/>
<ComponentRef Id='Help.Content'/>
<ComponentRef Id='Help.Content.Administration'/>
...
</ComponentGroup></p>
later on in the setup package this group of components can be easily referenced, e.g.
<Feature Id='Core' Title='Core' Level='1'>
...
<ComponentGroupRef Id='Help' />
...
</Feature></p>
Conditions
Often we need to define some conditions, e.g. launch conditions, conditional installation of some components, etc. For this purpose we have the <Condition Message=’…’>Inner text</Condition> construct. Here at the place of ‘Inner text’ one would define the condition (logic). If the condition is a launch condition and the evaluation of the condition logic result in false then the install process would be aborted and the text in the Message attribute would be reported. Typical launch conditions are
Request for sufficient privileges
<Condition Message="You need to be an administrator to install this product.">
Privileged
</Condition></p>
a specific version of a framework (e.g. .NET 3.5) must be installed
<Condition Message="This application requires .NET Framework 3.5. Please install the .NET Framework then run this installer again.">
<![CDATA[Installed OR NETFRAMEWORK35]]>
</Condition></p>
IIS 6.0 or above must be installed
<Condition Message="This setup requires IIS 6.0 or 7.0 is installed.">
<![CDATA[IIS="#7" OR IIS="#6"]]>
</Condition></p>
For the above condition to work we have to define the property IIS since this is a custom property. We can do so with the following snippet
<Property Id="IIS">
<RegistrySearch Id="IISInstalledVersion"
Root="HKLM"
Key="SOFTWAREMicrosoftInetStp"
Type="raw" Name="MajorVersion" />
</Property></p>
here the value of the property IIS is set by the nested registry search which looks for a required key in the registry.
Permissions on folders
If we want to create a folder during setup which has special permissions we can use the following snippet inside a component
<CreateFolder Directory='index'>
<!-- pay attention when using on non-english system! -->
<Permission User="Everyone" GenericAll="yes" />
</CreateFolder></p>
Permissions and globalization/localization issues
Regarding localization issues have a look at this article.
The following snippet would cause problems on a computer having a say German Windows operating installed
<CreateFolder Directory='index'>
<Permission User="Users" GenericAll="yes" />
</CreateFolder></p>
since the group ‘Users’ is called ‘Benutzer’ in German. Thus we need a more sophisticated way using custom actions and conditions. First we define a global(!) property with a default value
<Property Id="USERGROUP_USERS" Value="Users"/></p>
then we define a custom action to apply the localized name for the group ‘Users’
<CustomAction Id="SetUserGroup_Users_De"
Property="USERGROUP_USERS"
Value="Benutzer"
Return="check" /></p>
and then we execute the correct custom action based on the condition on which system language the operating system uses
<InstallUISequence>
<Custom Action="SetUserGroup_Users_De" After="LaunchConditions">
SystemLanguageID = "1031"
</Custom>
<Custom Action="SetUserGroup_Users_Fr" After="LaunchConditions">
SystemLanguageID = "1036"
</Custom>
...
</InstallUISequence></p>
finally the Permission tag uses our global property which now should contain the correct value
<CreateFolder Directory='index'>
<Permission User="[USERGROUP_USERS]" GenericAll="yes" />
</CreateFolder></p>
Wow, this is a lot of work. Way too complicated in my opinion. If somebody know a more elegant way to do it, I am open for any suggestions!
Extensions
WIX provides some useful extension for common tasks. The namespace of an extension must be defined in the file where the respective functionality is used. If we want to use the IIS extensions then use the following definition
<Wix xmlns='http://schemas.microsoft.com/wix/2006/wi'
xmlns:iis="http://schemas.microsoft.com/wix/IIsExtension">
...
</Wix></p>
Now the commands provided by the extensions can be used like this
<!-- Create an application pool on IIS -->
<iis:WebAppPool Id='TestAppPool' Name='Test Application Pool' Identity='networkService'/></p>
which creates a new application pool for IIS during installation.
Define an application pool for IIS
On task of our setup package is to create a new application pool for IIS during installation. It comes handy that WIX provides an extension providing IIS related tasks which among other tasks allows us to just do that. First we have to define the namespace for the extension
<Wix xmlns='http://schemas.microsoft.com/wix/2006/wi'
xmlns:iis="http://schemas.microsoft.com/wix/IIsExtension"></p>
then we can use all available commands. In our case this is the one we need
<iis:WebAppPool Id='SampleAppPool' Name='Sample Application Pool' Identity='networkService'/></p>
The above command creates a new application pool and assigns it the network service identity. Note that the command has to be a child of a component.
Create a virtual directory for IIS
Not only do we have to create a new application pool but also we need a new virtual directory for IIS. With the same extension we can use this fragment to do just that
<iis:WebVirtualDir Id="MyWebApp" Alias="MyWebApp"
Directory="INSTALLDIR"
WebSite="DefaultWebSite">
<iis:WebApplication Id="SampleWebApplication" Name="Sample" WebAppPool="SampleAppPool" />
</iis:WebVirtualDir></p>
The above command creates a new virtual directory for the physical folder [INSTALLDIR] and calls it MyWebApp. The new virtual directory is defined for the DefaultWebSite. It then creates an Web application and assigns this application to the application pool created previously. Again this command has to be a child of a component.
Now finally we have to define what is our DefaultWebSite. This is done with the following command
<iis:WebSite Id='DefaultWebSite' Description='Default Web Site' Directory='TARGETDIR'>
<iis:WebAddress Id="AllUnassigned" Port="80" />
</iis:WebSite></p>
Note that the above command usually should not be put inside a Component otherwise if put it inside the Component, a new Web Site will be created and uninstall will remove it.
Modularize the setup
When building a complex setup package it is advisable to modularize it. SRP anybody…? We have modules, includes and fragments for this purpose. There will be one main .wxs file and several satellite .wxs or .wxi files.
The main installation file
We have to have one main wxs file which defines our overall setup package. The schema of this file contains the following main parts
1: <?xml version="1.0" encoding="utf-8"?>
2: <Wix xmlns='http://schemas.microsoft.com/wix/2006/wi'>
3:
4: <Product Id='170A4245-9DE3-4bd7-B68A-100000000000'
5: UpgradeCode='170A4245-9DE3-4bd7-B68A-200000000000' ...>
6:
7: <Package .../>
8:
9: <!-- Define the directory structure on target computer -->
10: <Directory Id='TARGETDIR' Name='SourceDir'>
11: <Directory Id='ProgramFilesFolder' >
12: <Directory Id='INSTALLDIR' Name='TOPAZ TE6'>
13: <!-- define more (sub-) directories if needed -->
14: ...
15: </Directory>
16: </Directory>
17: </Directory>
18:
19: <!-- Define the components and component groups -->
20: <DirectoryRef Id="INSTALLDIR">
21: <Component Id='Component 1' Guid='170A4245-9DE3-4bd7-B68A-110000000010'>
22: ...
23: </Component>
24: </DirectoryRef>
25:
26: <!-- Define the list of features available to install -->
27: <Feature Id='Complete' Level='1'>
28:
29: <Feature Id='Feature 1' Title='Feature 1' Level='1'>
30: <ComponentGroupRef Id='Group 1'/>
31: ...
32: <ComponentRef Id='Component 1'/>
33: <MergeRef Id='Merge Module 1'/>
34: </Feature>
35:
36: <Feature Id='Feature 2' Title='Feature 2' Level='1000'>
37: ...
38: </Feature>
39:
40: </Feature>
41: </Product>
42: </Wix></p>
The root node on line 2 is <Wix> and we have to define at least the root namespace “http://schemas.microsoft.com/wix/2006/wi”.
The wix node has a single child node <Product> which defines such things as the name of the product, the manufacturer, the version, etc. Very important are also the Id and the UpgradeCode of the product tag which uniquely define an installed product. Both of them are GUIDs. The UpgradeCode is very important if you plan to patch or upgrade an installation in the future since (to work properly) the patch- or upgrade package will have to reference this UpgradeCode.
On line 7 we define the (setup-) package in more details. There we define the required version of the Microsoft Windows installer, whether or not the package is compressed, the manufacturer and other things.
Starting from line 10 we have the definition of the directory structure we want to create on the target computer.
Starting from line 20 we define the components that shall be included in our setup package.
On line 27 and following we define the list of features this setup package provides. This list is visible to the user during the setup and he can enable or disable certain features. Normally during a setup the user is presented with 3 choices
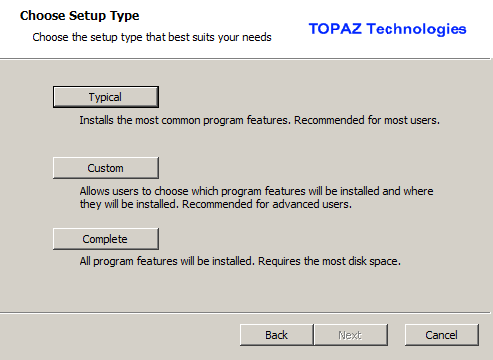
The Level attribute of a feature determines whether a feature is included in the typical or only in the complete setup. In our sample Level=’1’ means that the feature is included in the typical setup whilst Level=’1000’ means it is not included.
Include Files
The content found in an Include file is just imported and placed at the position where you put an <?include …> pre-processor directive, e.g.
<?include MyIncludeFile.wsi?></p>
A include file usually has the extension .wsi. As an example I have defined an include file which contains (some of) the launch conditions of our setup
<?xml version='1.0'?>
<Include xmlns='http://schemas.microsoft.com/wix/2006/wi'
xmlns:iis="http://schemas.microsoft.com/wix/IIsExtension">
<!-- check whether .NET 3.5 SP1 is installed -->
<PropertyRef Id="NETFRAMEWORK35"/>
<PropertyRef Id="NETFRAMEWORK35_SP_LEVEL"/>
<Condition Message="This application requires .NET Framework 3.5. Please install the .NET Framework then run this installer again.">
<![CDATA[Installed OR NETFRAMEWORK35]]>
</Condition>
<Condition Message="This application requires .NET Framework 3.5 SP1. Please install the .NET Framework then run this installer again.">
<![CDATA[Installed OR (NETFRAMEWORK35_SP_LEVEL and NOT NETFRAMEWORK35_SP_LEVEL = "#0")]]>
</Condition>
<Condition Message="You need to be an administrator to install this product.">
Privileged
</Condition>
...
<Include></p>
Please note that the root tag of an include file has to be <Include> and not
Fragment
Useful if you want to define a component or component group that later on is referenced in the main .wxs file. As an example I take the component responsible to install the online help for the product
<?xml version='1.0'?>
<?define BuildPath = ".......build" ?>
<?define Help = "$(var.BuildPath)Help" ?>
<?define Skin = "$(var.Help)Skin" ?>
<?define Data = "$(var.Help)Data" ?>
<Wix xmlns='http://schemas.microsoft.com/wix/2006/wi'>
<Fragment Id='FragmentHelp'>
<ComponentGroup Id='Help'>
<ComponentRef Id='Help'/>
<ComponentRef Id='Help.Skin'/>
<ComponentRef Id='Help.Data'/>
</ComponentGroup>
<DirectoryRef Id="Help">
<Component Id="Help" Guid="170A4245-9DE3-4bd7-B68A-110000000003">
<File Id='Reviews.pdf' Name='Reviews.pdf' Source='$(var.Help)Reviews.pdf' DiskId='1'/>
</Component>
<Directory Id='Help.Skin' Name='Skin'>
<Component Id="Help.Skin" Guid="170A4245-9DE3-4bd7-B68A-110000000013">
<File Id='Blank.htm' Name='Blank.htm' Source='$(var.Skin)Blank.htm' DiskId='1' />
<File Id='BrowseSequences.htm' Name='BrowseSequences.htm' Source='$(var.Skin)BrowseSequences.htm' DiskId='1' />
<File Id='Favorites.htm' Name='Favorites.htm' Source='$(var.Skin)Favorites.htm' DiskId='1' />
<File Id='Index.htm' Name='Index.htm' Source='$(var.Skin)Index.htm' DiskId='1' />
...
</Component>
</Directory>
<Directory Id='Help.Data' Name='Data'>
<Component Id="Help.Data" Guid="170A4245-9DE3-4bd7-B68A-110000000023">
<File Id='Alias.xml' Name='Alias.xml' Source='$(var.Data)Alias.xml' DiskId='1' />
...
</Component>
</Directory>
</DirectoryRef>
</Fragment>
</Wix></p>
At the top I define a component group which in turn is then referenced in the main .wxs file by its it (here ‘Help’). Below I define the components with their content. In this case I want to install some files in a Help subfolder of the installation folder. The help subfolder in turn has two child folders Skin and Data which in turn will contain other files. The whole definition is wrapped by a Fragment tag.
Merge Module
Merge modules are used to deliver shared code, files, resources, registry entries, and setup logic to applications as a single compound file.However, a merge module cannot be installed alone, it must be merged into an installation package. A very basic module definition is given below
<?xml version='1.0'?>
<Wix xmlns='http://schemas.microsoft.com/wix/2006/wi'>
<Module Id='TestModule' Language='1033' Version='1.0.0.0'>
<Package Id='170A4245-9DE3-4bd7-B68A-100000000000'
Description='Basic Merge Module'
Comments='A basic Windows Installer Merge Module'
Manufacturer='TOPAZ Techonlogies'
InstallerVersion='200' />
<Directory Id='TARGETDIR' Name='SourceDir'>
<Directory Id='MyModuleDirectory' Name='.'>
<Component Id='MyModuleComponent' Guid='170A4245-9DE3-4bd7-B68A-100000000001'>
<File Id='readme2' Name='readme2.txt' Source='readme2.txt' />
</Component>
</Directory>
</Directory>
</Module>
</Wix></p>
The above merge module just installs a single file ‘readme2.txt’ into the target directory. The main difference between the wxs file of an normal install and the wxs file of a merge module is that the former has a
Standard Actions
There are many standard actions available but not scheduled by default. ScheduleReboot, for instance, will instruct the user to reboot after the installation:
<InstallExecuteSequence>
<ScheduleReboot After='InstallFinalize' />
</InstallExecuteSequence></p>
If the need to reboot depends on a condition (for instance, the operating system the installer is running on), we can use a condition:
<InstallExecuteSequence>
<ScheduleReboot After='InstallFinalize'>VersionNT = 400</ScheduleReboot>
</InstallExecuteSequence>
A reboot will be required if the OS is Windows NT 4.0.
Custom Actions
It’s not only these so-called standard actions that you can schedule and re-schedule. There are a couple of custom actions as well (custom here means that they don’t appear in the standard course of events but we can use them wherever and whenever we like). A very common need is to launch the application we have just installed or to show a readme.txt file in Notepad.exe at the end of the installation? To do the latter we just add the following code to the .wxs file
<!-- show the readme.txt file at the end of the installation -->
<Property Id='NOTEPAD'>Notepad.exe</Property>
<CustomAction Id='LaunchFile' Property='NOTEPAD' ExeCommand='[SourceDir]readme.txt' Return='asyncNoWait' />
<InstallExecuteSequence>
<Custom Action='LaunchFile' After='InstallFinalize'>NOT Installed</Custom>
</InstallExecuteSequence></p>
The “NOT Installed” condition means that the action is only executed if the product has not already been installed at a previous time.
Features
When installing an application we usually are presented with a list of features we can install. Some of them are mandatory and some of them are optional. The list
<Feature Id='Complete'
Title='TOPAZ Enterprise 6.0'
Description='The complete package'
Display='expand'
ConfigurableDirectory='INSTALLDIR'
Level='1'>
...
</Feature></p>
Please note the attribute ConfigurableDirectory which defines the directory that can be configured by the user during setup. In our case this would be the INSTALLDIR which by default points to the sub-folder “TOPAZ TE6” of the program files folder (refer to chapter: the main installation file).
The attribute Level=’1’ indicates that this feature is included in the typical installation.
The features can be (hierarchically) nested. That is each feature can have as many child features as needed. Inside a feature tag we have to reference the components, component groups or merge modules which pertain to the said feature. E.g.
<Feature Id='Core' Title='Core' Level='1'>
<ComponentRef Id='Backup' />
...
<ComponentGroupRef Id='Help' />
...
<MergeRef Id='MyModule' />
</Feature></p>
In the above case the feature ‘Core’ would contain the component Backup, the component group Help and the merge module MyModule amongst others.
Compile and link the installation package</p> </p> </p> </p>
The creation of an .msi package is a two step process. First we have to compile the .wxs and .wxi files and then link them. The compiler is called candle.exe and the linker light.exe.
Assuming we only have one .wsx file called Product.wxs and we use functionality of the two extensions IISExtension and WixUtilExtension the creation would be
candle.exe Product.wxs -ext IISExtension -ext WixUtilExtension
light.exe Product.wixobj -ext IISExtension -ext WixUtilExtension</p>
</p>
which results in a Product.msi file.
If our Product.wxs file references components or component groups defined in another fragment file (e.g. called FramgmentHelp.wxs) then our calls have to be modified as follows
candle.exe Product.wxs FragmentHelp.wxs -ext IISExtension -ext WixUtilExtension
light.exe Product.wixobj FragmentHelp.wixobj –out Product.msi -ext IISExtension -ext WixUtilExtension</p>
Please note the “–out Product.msi” part of the second command. Since we have more than one input file for the linker we have to define the name for the output file.
If we have many include- and fragment files and/or merge modules to include in our compile and link process then we can also define a (text) file from where the candle.exe and the light.exe take their input and thus our commands will be
candle.exe @candleInput.txt
light.exe @lightInput.txt</p>
Dealing with many files
Our setup package contains many hundred files. It would be a tedious task to add them all manually to the respective wxs files. Unfortunately it is not possible to use file names with wildcards (IMHO this is one of the major disadvantages of WIX compared to NSIS). Each file has to be explicitly added to the setup. Thus I decided to write a small application that automatically creates those entries for me.
Starting from a given base directory the program loops through all files and recursively through all sub-folders and creates the appropriate XML fragments. Having a directory structure like this
ParentFolder
File1
File2
ChildFolder1
File3
GrandChildFolder1
File4
File5
ChildFolder2
File6</p>
the application creates an XML fragment like this
<ComponentGroup Id='ParentFolder'>
<ComponentRef Id='ParentFolder'/>
<ComponentRef Id='ParentFolder.ChildFolder1'/>
<ComponentRef Id='ParentFolder.ChildFolder1.GrandChildFolder1'/>
<ComponentRef Id='ParentFolder.ChildFolder2'/>
</ComponentGroup>
<DirectoryRef Id='ParentFolder'>
<Component Id='ParentFolder' Guid='...'>
<File Id='...' Name='File1' Source='$(var.ParentFolder)File1' DiskId='1' />
<File Id='...' Name='File2' Source='$(var.ParentFolder)File2' DiskId='1' />
</Component>
<Directory Id='ParentFolder.ChildFolder1' Name='ChildFolder1'>
<Component Id='ParentFolder.ChildFolder1' Guid='...'>
<File Id='...' Name='File3' Source='$(var.ParentFolder)ChildFolder1File3' DiskId='1' />
</Component>
<Directory Id='ParentFolder.ChildFolder1.GrandChildFolder1' Name='GrandChildFolder1'>
<Component Id='ParentFolder.ChildFolder1.GrandChildFolder1' Guid='...'>
<File Id='...' Name='File4' Source='$(var.ParentFolder)ChildFolder1GrandChildFolder1File4' DiskId='1' />
<File Id='...' Name='File5' Source='$(var.ParentFolder)ChildFolder1GrandChildFolder1File5' DiskId='1' />
</Component>
</Directory>
</Directory>
<Directory Id='ParentFolder.ChildFolder2' Name='ChildFolder2'>
<Component Id='ParentFolder.ChildFolder2' Guid='...'>
<File Id='...' Name='File6' Source='$(var.ParentFolder)ChildFolder2File6' DiskId='1' />
</Component>
</Directory>
</DirectoryRef></p>
where at the place of the ‘…’ the application puts a GUID. The code is really simple; it’s just a recursive walk through the directory structure and its files.
In the main wxs file I then just reference the component group e.g.
<ComponentGroupRef Id='ParentFolder' /></p>
Nullsoft Scriptable Install System – NSIS
I will touch this framework only briefly since in the end we decided to take WIX for our purposes. Everything about NSIS (download and documentation) can be found here.
“… NSIS is a professional open source system to create Windows installers. It is designed to be as small and flexible as possible and is therefore very suitable for internet distribution. …
NSIS is script-based and allows you to create the logic to handle even the most complex installation tasks. Many plug-ins and scripts are already available: you can create web installers, communicate with Windows and other software components, install or update shared components and more. …”
NSIS is NOT based on the Microsoft Windows Installer technology! Thus no msi files are produced but rather exe files. My first impression of the product was very good. I especially liked the speed of an installation. Even complex installations take a fraction of the time a MS Windows Installer based installation needs.
The Installer Script File
As said above NSIS is a script base install system. Our installation script we have to place in a file with the extension nsi.
Such a file can be compiled to a setup package with this simple command line
makensis.exe TOPAZ.nsi</p>
where TOPAZ.nsi contains our installation scripts. The compilation is very quick. The creation of a setup package can thus be very easily integrated in an automated build.
Define Variables
We can define variables for further usage as follows
!define COMPANY "TOPAZ Technologies"
!define COMPANYLEGAL "Ldt"
!define URL "http://www.topazti.com"
!define PRODUCT "TE6"</p>
we can also conditionally define a variable depending on the fact whether or not the variable has already been defined e.g. as a command line parameter when calling the NSIS make
!ifndef VERSION
!define VERSION "0.1.0"
!endif</p>
later on a variable can be referenced by using the ${VariableName} syntax, e.g.
;Set default installation folder
InstallDir "$PROGRAMFILES${COMPANY}${PRODUCT}"</p>
This is very similar to what we are used from tools like Nant.
Predefined variables are accessed with the syntax $VariableName; that is no curly braces are needed. An example would be
SetOutPath "$INSTDIR"
which sets the output directory to the content of the pre-defined variable INSTDIR.
Sections
A nsi file consists of several sections. At least two of them are needed; one to define the install actions and one to define the un-install actions.
- Each section contains zero or more instructions.
- Sections are executed in order by the resulting installer, and if ComponentText is set, the user will have the option of disabling/enabling each visible section.
- If a section’s name is ‘Uninstall’ or is prefixed with ‘un.’, it’s an uninstaller section.
Section "Core" SEC_CORE
...
SetOutPath "$INSTDIR"
...
SectionEnd</p>
Adding Files to the Setup Package
To add a single file to the setup package use a command similar to this
File readme.txt</p>
To add a whole tree of files (while maintaining the hierarchy) I use a command similar to this
File /r /x .svn /x index /x log ....build*.*</p>
The above command starts from a base directory (here a relative path ‘….build*.*’) and traverses the whole sub-tree and adds all files found including their relative folders. By using the ‘/x folderName’ command line parameter I can exclude certain files or folders. Compared to how much effort is needed with WIX to accomplish the same thing is is really a “killer feature”.
Creating Directories on the target machine
to conditionally create a directory on the target machine I use the following syntax
IfFileExists $INSTDIRindex +2 0
CreateDirectory $INSTDIRindex</p>
User Interface
There are several different UI available for the installer; standard, modern UI and ultra modern UI. In the sample we will use the modern UI. To use this UI we have to include the corresponding library with this command
!include "MUI2.nsh"</p>
later in the script file we have e.g.
!insertmacro MUI_PAGE_WELCOME
!insertmacro MUI_PAGE_LICENSE ".Eula.rtf"
!insertmacro MUI_PAGE_COMPONENTS
!insertmacro MUI_PAGE_DIRECTORY
!insertmacro MUI_PAGE_INSTFILES
!define MUI_FINISHPAGE_NOAUTOCLOSE
!define MUI_FINISHPAGE_SHOWREADME "$INSTDIRreadme.txt"
!insertmacro MUI_PAGE_FINISH
!insertmacro MUI_UNPAGE_WELCOME
!insertmacro MUI_UNPAGE_CONFIRM
!insertmacro MUI_UNPAGE_INSTFILES
!define MUI_UNFINISHPAGE_NOAUTOCLOSE
!insertmacro MUI_UNPAGE_FINISH</p>
The above fragment defines that we want to have a set of pages defined in the modern UI library included during our setup and during the uninstall of the product. Of course we should not forget to provide resources of the desired language used by the installer. This can be done by adding this statement
!insertmacro MUI_LANGUAGE "English"</p>
Functions
We can define functions in our installer file. As an example I provide the function used to detect whether IIS is installed and whether it is at least IIS 6.0.
Function CheckIISVersion
ClearErrors
ReadRegDWORD $0 HKLM "SOFTWAREMicrosoftInetStp" "MajorVersion"
ReadRegDWORD $1 HKLM "SOFTWAREMicrosoftInetStp" "MinorVersion"
IfErrors 0 NoAbort
Abort "Setup could not detect Microsoft Internet Information Server v5 or later; this is required for installation. Setup will abort."
IntCmp $0 6 NoAbort IISMajVerLT6 NoAbort
NoAbort:
DetailPrint "Found Microsoft Internet Information Server v$0.$1"
Goto ExitFunction
IISMajVerLT6:
Abort "Setup could not detect Microsoft Internet Information Server v6 or later; this is required for installation. Setup will abort."
ExitFunction:
FunctionEnd</p>
The script language is simple but powerful. It remembers a little bit the old days we still used to develop in assembler.
A function like the above one can then be called from a section of the installation file
Section "Install Virtual Directory" SEC_IIS
Call CheckIISVersion
Call ...
...
SectionEnd</p>
Register Product and prepare Uninstaller
NSIS does not automatically register an installed product on the system such as that it is visible in the list of installed products. We have to manually do this. I use the following section to just accomplish this task. The section creates some registry keys and finally creates an uninstaller exe in the install directory.
Section "-Common Items" SEC_COM
;Store installation folder
WriteRegStr HKCU "Software${COMPANY}${PRODUCT}" "" $INSTDIR
;Add uninstall information to Add/Remove Programs
WriteRegStr HKLM "SoftwareMicrosoftWindowsCurrentVersionUninstall${COMPANY} ${PRODUCT}"
"DisplayName" "${COMPANY} ${PRODUCT}"
WriteRegStr HKLM "SoftwareMicrosoftWindowsCurrentVersionUninstall${COMPANY} ${PRODUCT}"
"URLInfoAbout" "${URL}"
WriteRegStr HKLM "SoftwareMicrosoftWindowsCurrentVersionUninstall${COMPANY} ${PRODUCT}"
"Publisher" "${COMPANY} ${COMPANYLEGAL}"
WriteRegStr HKLM "SoftwareMicrosoftWindowsCurrentVersionUninstall${COMPANY} ${PRODUCT}"
"DisplayVersion" "${VERSION}"
WriteRegStr HKLM "SoftwareMicrosoftWindowsCurrentVersionUninstall${COMPANY} ${PRODUCT}"
"UninstallString" "$"$INSTDIRuninstall.exe$""
;Create uninstaller
WriteUninstaller "$INSTDIRUninstall.exe"
SectionEnd</p>
In my opinion this puts an unnecessary burden onto the shoulders of the developer since every single installed product has to be registered. Thus I would expect that this happens automatically. Also there is no such thing as an automatic repair functionality. Compared to WIX we have a clear disadvantage here.
Summary
In this post I have shown in detail the various steps needed to create a setup package with WIX for a product consisting of many hundreds of files. The setup package also assigns write access for certain folders to specific users and/or groups. It creates a virtual directory for the application and defines a new application pool to which the virtual directory is assigned. Furthermore the setup creates a backup of pre-existing configuration files when upgrading a previous version of the product. The whole setup is fully transactional and can be changed or repaired at a later time. The product is ready for patches or upgrades if needed. I have also shown how the setup can be localized.
We use WIX to create our setup packages. WIX is free and open source. Some tasks could be simpler or more streamlined (like e.g. the usage of properties) and the documentation could be more detailed. Once all missing pieces of information are collected the creation of a setup package is straight forward and easy to do.
IMHO comparing NSIS with WIX is similar to comparing C++ (no .NET) with C# on .NET. With NSIS you have much more fine grain control of the installation process than with WIX. On the other hand you have to invest more time in providing such useful features as transactional install and repair functionality as well as fail-safe de-installation. This was the main reason that we finally decided to take WIX as our tool for the creation of setup packages. Still I think NSIS is a very powerful and mature product with lightening speed.