WIX and Custom Actions
Introduction
I write this blog-post mainly because I found it hard to get the necessary information about how to create custom actions for WIX. Documentation is sparse and/or incomplete as in many other OSS projects. In a previous blog post I have described the basic steps to create an installer with WIX.
The WIX installer framework makes it relatively easy to create sophisticated installers but there might be some tasks your specific installer needs to execute during installation which are not at all or not easily possible with the aid of WIX. In such situations we can write so called custom actions. These custom actions can either be written in native code (e.g. C++) or in managed code. When writing the custom actions in managed code we have the full power of the whole .NET framework at our disposal.
There might be situations where we cannot use managed actions though; this is the case when during setup the .NET framework is not available or when the .NET framework has been de-installed prior to de-installing the application. In such (rare?) situations we have to implement native custom actions.
Prerequisites
Install the WIX 3.0 (or higher) framework. You can download it from here.
Implementing Custom Actions
In Visual Studio create a Library project and reference the assembly Microsoft.Deployment.WindowsInstaller from the WIX SDK.
Implement your custom action as static method decorated with the [CustomAction] attribute. The signature of the method is as follows
[CustomAction]
public static ActionResult SomeCustomAction(Session session)
{ ... }
.csharpcode, .csharpcode pre
{
font-size: small;
color: black;
font-family: consolas, “Courier New”, courier, monospace;
background-color: #ffffff;
/*white-space: pre;*/
}
.csharpcode pre { margin: 0em; }
.csharpcode .rem { color: #008000; }
.csharpcode .kwrd { color: #0000ff; }
.csharpcode .str { color: #006080; }
.csharpcode .op { color: #0000c0; }
.csharpcode .preproc { color: #cc6633; }
.csharpcode .asp { background-color: #ffff00; }
.csharpcode .html { color: #800000; }
.csharpcode .attr { color: #ff0000; }
.csharpcode .alt
{
background-color: #f4f4f4;
width: 100%;
margin: 0em;
}
.csharpcode .lnum { color: #606060; }
Make sure that you compile your project specifically for the platform for which you create the Installer that is either x86 or 64bit. In my case I want to target x86.
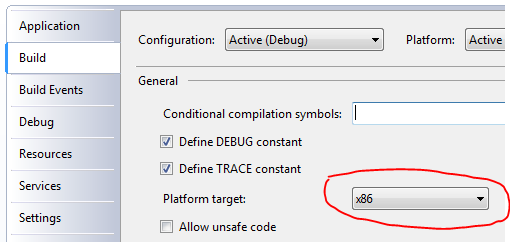
The reason for this is given in the section below.
Let’s create a simple custom action (I am sure this can be done otherwise but this sample is just for illustration…). The custom action determines whether we are running on a 64bit or 32bit OS. We have the following code
public static class OsBitnessProvider
{
    [CustomAction]
    public static ActionResult EvaluateOperationSystemBitness(Session session)
    {
        session["IS64BITOS"] = Is64BitOS() ? "1" : "0";
        return ActionResult.Success;
    }

    public static bool Is64BitOS()
    {
        var processorArchitecture = Environment.GetEnvironmentVariable("PROCESSOR_ARCHITECTURE");
        var processorArchitecture6432 = Environment.GetEnvironmentVariable("PROCESSOR_ARCHITEW6432");
        if (processorArchitecture == "AMD64" ||
            (processorArchitecture == "x86" && processorArchitecture6432 == "AMD64"))
            return true;
        return false;
    }
}
.csharpcode, .csharpcode pre
{
font-size: small;
color: black;
font-family: consolas, “Courier New”, courier, monospace;
background-color: #ffffff;
/*white-space: pre;*/
}
.csharpcode pre { margin: 0em; }
.csharpcode .rem { color: #008000; }
.csharpcode .kwrd { color: #0000ff; }
.csharpcode .str { color: #006080; }
.csharpcode .op { color: #0000c0; }
.csharpcode .preproc { color: #cc6633; }
.csharpcode .asp { background-color: #ffff00; }
.csharpcode .html { color: #800000; }
.csharpcode .attr { color: #ff0000; }
.csharpcode .alt
{
background-color: #f4f4f4;
width: 100%;
margin: 0em;
}
.csharpcode .lnum { color: #606060; }
The result of the action is returned to the caller (the installer) by setting a value in the session object. The session object can be regarded as a dictionary and we can define as many variables as needed. Values are stored as strings.
Note that the method returns an ActionResult. Usually one should return ActionResult.Success even if the method fails otherwise the installer will abort and rollback. A failure and its cause can be returned to the installer by defining a session variable for the exception (and its description) and setting them accordingly, e.g.
session["MYACTIONFAILED"] = "1";
session["MYACTIONEXCEPTION"] = exception.Message;
.csharpcode, .csharpcode pre
{
font-size: small;
color: black;
font-family: consolas, “Courier New”, courier, monospace;
background-color: #ffffff;
/*white-space: pre;*/
}
.csharpcode pre { margin: 0em; }
.csharpcode .rem { color: #008000; }
.csharpcode .kwrd { color: #0000ff; }
.csharpcode .str { color: #006080; }
.csharpcode .op { color: #0000c0; }
.csharpcode .preproc { color: #cc6633; }
.csharpcode .asp { background-color: #ffff00; }
.csharpcode .html { color: #800000; }
.csharpcode .attr { color: #ff0000; }
.csharpcode .alt
{
background-color: #f4f4f4;
width: 100%;
margin: 0em;
}
.csharpcode .lnum { color: #606060; }
Note the use of all capital letters. This is needed to make define these as global variables.
The return value indicating an error can then be used by the installer to e.g. conditionally display an error dialog giving the user more detailed information about the error and possible further actions to execute to solve the problem.
Creating an Installer compatible Package
The Microsoft Windows Installer can not directly use managed assemblies containing custom actions. In order to use your managed custom actions you have to wrap your assembly with the aid of the MakeSfxCA.exe tool which is part of the WIX SDK.
Attention: the MakeSfxCA.exe wants you to provide absolute paths to all elements you specify in the command line parameters.
We can create a simple batch file which will execute the command that creates the package with our custom actions. In my case the command is similar to this (the following command should be on one single line and has been reformatted here to make it easier to recognize the individual parts)</p>
..supportwixsdkMakeSfxCA.exe %CD%MyCustomActions.Package.dll
                                 ..supportwixsdkSfxCA.dll
                                 %CD%MyCustomActions.dll
                                 %CD%CustomAction.config
                                 ..supportwixsdkMicrosoft.Deployment.WindowsInstaller.dll
.csharpcode, .csharpcode pre
{
font-size: small;
color: black;
font-family: consolas, “Courier New”, courier, monospace;
background-color: #ffffff;
/*white-space: pre;*/
}
.csharpcode pre { margin: 0em; }
.csharpcode .rem { color: #008000; }
.csharpcode .kwrd { color: #0000ff; }
.csharpcode .str { color: #006080; }
.csharpcode .op { color: #0000c0; }
.csharpcode .preproc { color: #cc6633; }
.csharpcode .asp { background-color: #ffff00; }
.csharpcode .html { color: #800000; }
.csharpcode .attr { color: #ff0000; }
.csharpcode .alt
{
background-color: #f4f4f4;
width: 100%;
margin: 0em;
}
.csharpcode .lnum { color: #606060; }
Here I am assuming that
- the batch file is located in the same directory as your assembly containing the custom actions
- the assembly is called MyCustomActions.dll
- we want the resulting package to be called MyCustomActions.Package.dll
- the necessary files of the WIX SDK are to be found in the relative path ..supportwixsdk
-
we want to target x86 and thus we are referencing the 32 bit version of the SfxCA.dll which is part of the WIX SDK (the SDK comes with two versions of the SfxCA.dll, one for 32 bit and one for 64 bit. Choose the right one which is in accordance with the target platform you chose for your custom actions project)</li>
- you have prepared a CustomAction.config file. It describes the runtime your managed custom actions are dependent upon.
- %CD% is a command prompt macro that expands to “current directory” (remember: MakeSfxCA.exe wants absolute paths…) </ul>
The content of the CustomAction.config looks like this
<?xml version="1.0" encoding="utf-8" ?>
<configuration>
  <startup>
<supportedRuntime version="v2.0.50727"/>
  </startup>
</configuration>
If we need to add more assemblies to the package then we just add them after the principal assembly MyCustomActions.dll, e.g.
..supportwixsdkMakeSfxCA.exe %CD%MyCustomActions.Package.dll
                             ..supportwixsdkSfxCA.dll
                             %CD%MyCustomActions.dll
                             %CD%AnotherAssembly.dll
                             %CD%StillAnotherAssembly.dll
                             %CD%CustomAction.config
                             ..supportwixsdkMicrosoft.Deployment.WindowsInstaller.dll
.csharpcode, .csharpcode pre
{
font-size: small;
color: black;
font-family: consolas, “Courier New”, courier, monospace;
background-color: #ffffff;
/*white-space: pre;*/
}
.csharpcode pre { margin: 0em; }
.csharpcode .rem { color: #008000; }
.csharpcode .kwrd { color: #0000ff; }
.csharpcode .str { color: #006080; }
.csharpcode .op { color: #0000c0; }
.csharpcode .preproc { color: #cc6633; }
.csharpcode .asp { background-color: #ffff00; }
.csharpcode .html { color: #800000; }
.csharpcode .attr { color: #ff0000; }
.csharpcode .alt
{
background-color: #f4f4f4;
width: 100%;
margin: 0em;
}
.csharpcode .lnum { color: #606060; }
The above command will put the assemblies AnotherAssembly.dll and StillAnotherAssembly.dll into the package.
Using the custom actions
In our .wsx file we have to define the custom action we implemented above
<Product ...>
...
<Binary Id="MyCustomActions" SourceFile="MyCustomActions.Package.dll" />
...
<CustomAction Id="CheckingOsBitness" BinaryKey="MyCustomActions" DllEntry="EvaluateOperationSystemBitness" />
...
</Product>
.csharpcode, .csharpcode pre
{
font-size: small;
color: black;
font-family: consolas, “Courier New”, courier, monospace;
background-color: #ffffff;
/*white-space: pre;*/
}
.csharpcode pre { margin: 0em; }
.csharpcode .rem { color: #008000; }
.csharpcode .kwrd { color: #0000ff; }
.csharpcode .str { color: #006080; }
.csharpcode .op { color: #0000c0; }
.csharpcode .preproc { color: #cc6633; }
.csharpcode .asp { background-color: #ffff00; }
.csharpcode .html { color: #800000; }
.csharpcode .attr { color: #ff0000; }
.csharpcode .alt
{
background-color: #f4f4f4;
width: 100%;
margin: 0em;
}
.csharpcode .lnum { color: #606060; }
By using the <Binary> node we tell the installer that we do not want to install the corresponding file on the target system but only use it during installation. The value of the BinaryKey attribute of the <CustomAction> node references the package containing the custom actions and the value of the DllEntry attribute equals to the name of the method implementing the custom action in our managed assembly.
Later on we can then use the custom action just declared.
<InstallUISequence>
<Custom Action="CheckingOsBitness" After="CostFinalize">NOT Installed</Custom>
...
</InstallUISequence>
.csharpcode, .csharpcode pre
{
font-size: small;
color: black;
font-family: consolas, “Courier New”, courier, monospace;
background-color: #ffffff;
/*white-space: pre;*/
}
.csharpcode pre { margin: 0em; }
.csharpcode .rem { color: #008000; }
.csharpcode .kwrd { color: #0000ff; }
.csharpcode .str { color: #006080; }
.csharpcode .op { color: #0000c0; }
.csharpcode .preproc { color: #cc6633; }
.csharpcode .asp { background-color: #ffff00; }
.csharpcode .html { color: #800000; }
.csharpcode .attr { color: #ff0000; }
.csharpcode .alt
{
background-color: #f4f4f4;
width: 100%;
margin: 0em;
}
.csharpcode .lnum { color: #606060; }
in the above case we run the action just after the CostFinalize event. We only want to run the action if the application is not yet installed that is we do not want to run the action when un-installing the application.