Working with code based templates in Silverlight
Introduction
In our Silverlight projects we are using the AgDataGrid of DevExpress to visualize data. I wrote some expressions that make it possible to use this data grid with Fluent Silverlight. During the writing of those expressions once again I hit some brick walls. In this post I want to show one specific solution to throw down such a wall and continue the journey…
Please refer to this post regarding more detail about Fluent Silverlight.
Problem
Provide a check box column header whose click action can be bound to an action on the view model.
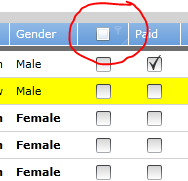
Sounds easy isn’t it? Just define a column header template and… err…
I want to be able to define a data grid having such a column in a way similar to this
var grid = this.AgGridFor<Model, ChildModel>()
                .AddColumn(...)
                .AddColumn(c => c.WithCheckBoxHeader(m => m.SelectAllCommand)
                                    .Value(m => m.Selected)
                                    .ColumnType.CheckColumn()
                                    .Width(50)
                )
                .AddColumn(...)
                ...
// more details...
Where Model represents the view model for the view on which the data grid resides and ChildModel represents the view model of an individual row in the data grid. The SelectAllCommand is a DelegateCommand (badically an action) defined on Model. Finally Selected is a property on the ChildModel.
Problem 1: Microsoft clearly states that all templates have to be written in XAML. There is no (official and supported) way to create a template in code.
Problem 2: How can I bind an event of a control in a template (the check box) to an action on my view model?
Solution
I want to define my column header template in code and this is my example
public class CheckBoxHeader : ContentControl
    {
        public CheckBoxHeader()
        {
            checkBox = new CheckBox { Margin = new Thickness(11, 0, 0, 0) };

            var layoutRoot = new Border
            {
                HorizontalAlignment = HorizontalAlignment.Stretch,
                VerticalAlignment = VerticalAlignment.Stretch,
                Child = checkBox,
            };

            Content = layoutRoot;
        }
    }
.csharpcode, .csharpcode pre
{
font-size: small;
color: black;
font-family: consolas, “Courier New”, courier, monospace;
background-color: #ffffff;
/*white-space: pre;*/
}
.csharpcode pre { margin: 0em; }
.csharpcode .rem { color: #008000; }
.csharpcode .kwrd { color: #0000ff; }
.csharpcode .str { color: #006080; }
.csharpcode .op { color: #0000c0; }
.csharpcode .preproc { color: #cc6633; }
.csharpcode .asp { background-color: #ffff00; }
.csharpcode .html { color: #800000; }
.csharpcode .attr { color: #ff0000; }
.csharpcode .alt
{
background-color: #f4f4f4;
width: 100%;
margin: 0em;
}
.csharpcode .lnum { color: #606060; }
I can overcome the limitation of the Silverlight framework and use the following helper class to instantiate a (named) data template
public static class TemplateHelper
{
    public static DataTemplate CreateNamedDataTemplate<T>(string name)
    {
        return InternalCreateDataTemplate(typeof(T), name);
    }

    private static DataTemplate InternalCreateDataTemplate(Type type, string name)
    {
        var nameAttribute = string.Format("Name='{0}'", name);

        const string format = "<DataTemplate xmlns='http://schemas.microsoft.com/client/2007'" +
                              "              xmlns:controls='clr-namespace:{0};assembly={1}'>" +
                              "   <controls:{2} {3} HorizontalAlignment='Stretch'/>" +
                              "</DataTemplate>";
        var assemblyName = type.Assembly.FullName.Split(',')[0];
        var xml = string.Format(format, type.Namespace, assemblyName, type.Name, nameAttribute);
        return (DataTemplate)XamlReader.Load(xml);
    }
}
.csharpcode, .csharpcode pre
{
font-size: small;
color: black;
font-family: consolas, “Courier New”, courier, monospace;
background-color: #ffffff;
/*white-space: pre;*/
}
.csharpcode pre { margin: 0em; }
.csharpcode .rem { color: #008000; }
.csharpcode .kwrd { color: #0000ff; }
.csharpcode .str { color: #006080; }
.csharpcode .op { color: #0000c0; }
.csharpcode .preproc { color: #cc6633; }
.csharpcode .asp { background-color: #ffff00; }
.csharpcode .html { color: #800000; }
.csharpcode .attr { color: #ff0000; }
.csharpcode .alt
{
background-color: #f4f4f4;
width: 100%;
margin: 0em;
}
.csharpcode .lnum { color: #606060; }
In the above code I use the XamlReader to instantiate an object from a XAML fragment. In this case it is a DataTemplate but it could as well be used to instantiate a ControlTemplate or a Style. In my case the template has to be named since a grid can potentially have multiple check box column headers and I need to be able to identify the right instance later on.
This code looks ugly but this doesn’t bother me since I write it only once and it is hidden in my framework. Whenever I define a grid with a check box column header I do this in a declarative way as shown later in this post and I am not confronted with this ugly code.
I can now define my grid column having a check box column header as follows
var column = new AgDataGridColumn();
var templateName = "checkBoxHeader" + Guid.NewGuid().ToString();
var template = TemplateHelper.CreateNamedDataTemplate<CheckBoxHeader>(templateName);
column.HeaderContentTemplate = template;
...
.csharpcode, .csharpcode pre
{
font-size: small;
color: black;
font-family: consolas, “Courier New”, courier, monospace;
background-color: #ffffff;
/*white-space: pre;*/
}
.csharpcode pre { margin: 0em; }
.csharpcode .rem { color: #008000; }
.csharpcode .kwrd { color: #0000ff; }
.csharpcode .str { color: #006080; }
.csharpcode .op { color: #0000c0; }
.csharpcode .preproc { color: #cc6633; }
.csharpcode .asp { background-color: #ffff00; }
.csharpcode .html { color: #800000; }
.csharpcode .attr { color: #ff0000; }
.csharpcode .alt
{
background-color: #f4f4f4;
width: 100%;
margin: 0em;
}
.csharpcode .lnum { color: #606060; }
So far so good. But what about linking the click event of the check box defined in the template to the action defined on the view model? That is a problem since the template is instantiated by Silverlight during runtime and we have no seam to intercept this and do our binding… or don’t we?
After investigating quite a bit and banging my head against the wall I came out with the following solution:
dataGrid.Loaded += (sender, e) => Deployment.Current.Dispatcher.BeginInvoke(() => InitializeColumnHeader(dataGrid, model, templateName));
.csharpcode, .csharpcode pre
{
font-size: small;
color: black;
font-family: consolas, “Courier New”, courier, monospace;
background-color: #ffffff;
/*white-space: pre;*/
}
.csharpcode pre { margin: 0em; }
.csharpcode .rem { color: #008000; }
.csharpcode .kwrd { color: #0000ff; }
.csharpcode .str { color: #006080; }
.csharpcode .op { color: #0000c0; }
.csharpcode .preproc { color: #cc6633; }
.csharpcode .asp { background-color: #ffff00; }
.csharpcode .html { color: #800000; }
.csharpcode .attr { color: #ff0000; }
.csharpcode .alt
{
background-color: #f4f4f4;
width: 100%;
margin: 0em;
}
.csharpcode .lnum { color: #606060; }
I listen to the loaded event of the data grid and then use the Dispatcher to asynchronously call an column header initialization method. This method uses the visual tree to find an instance of type CheckBoxHeader with the expected template name
private void InitializeColumnHeader(AgDataGrid dataGrid, TModel model, string templateName)
{
    var template = dataGrid.TunnelFindByType<CheckBoxHeader>().SingleOrDefault(h => h.Name == templateName);

    var fi = ((MemberExpression)CheckBoxHeaderClickExpression.Body).Member as FieldInfo;
    var command = (IFsCommand)fi.GetValue(model);
    Action<bool?> action = c =>
                               {
                                   command.Execute(c);
                                   dataGrid.Refresh();
                               };
    template.SetClickAction(action);
}
If such a template instance is found then I call the SetClickAction on it and pass in as a parameter the action that shall be executed when the user clicks on the respective check box in the column header. The action is defined on the model that I pass in as the second parameter of the above function and we get to this action via the expression CheckBoxHeaderClickExpression which represents the expression m => m.SelectAllCommand shown earlier in this post.
To make the picture complete I have to show once again the now extended code of header template
public class CheckBoxHeader : ContentControl
{
    private Action<bool?> action;
    private readonly CheckBox checkBox;

    public CheckBoxHeader()
    {
        checkBox = new CheckBox { Margin = new Thickness(11, 0, 0, 0) };
        checkBox.Click += OnCheckBoxClick;

        var layoutRoot = new Border
        {
            HorizontalAlignment = HorizontalAlignment.Stretch,
            VerticalAlignment = VerticalAlignment.Stretch,
            Child = checkBox,
        };

        Content = layoutRoot;
    }

    public void SetClickAction(Action<bool?> clickAction)
    {
        action = clickAction;
    }

    private void OnCheckBoxClick(object sender, RoutedEventArgs e)
    {
        action(checkBox.IsChecked);
    }
}
.csharpcode, .csharpcode pre
{
font-size: small;
color: black;
font-family: consolas, “Courier New”, courier, monospace;
background-color: #ffffff;
/*white-space: pre;*/
}
.csharpcode pre { margin: 0em; }
.csharpcode .rem { color: #008000; }
.csharpcode .kwrd { color: #0000ff; }
.csharpcode .str { color: #006080; }
.csharpcode .op { color: #0000c0; }
.csharpcode .preproc { color: #cc6633; }
.csharpcode .asp { background-color: #ffff00; }
.csharpcode .html { color: #800000; }
.csharpcode .attr { color: #ff0000; }
.csharpcode .alt
{
background-color: #f4f4f4;
width: 100%;
margin: 0em;
}
.csharpcode .lnum { color: #606060; }
Some more posts will follow showing other problems around creating expressions for the AgDataGrid and the solution I came up. Stay tuned.
Please tell me what you think about the solution presented and share your own solutions. Thanks for any feedback.