Creating Growl Notifications From A MacRuby App
I’ve been wanting an excuse to learn how to code for OSX for a while now, and I finally thought of a project worth trying. In an effort to get up and running on XCode and Cocoa as quickly as possible, a number of people suggested I check out MacRuby. I have to say, I’m quite happy with it so far. I was able to find some simple tutorials to get me moving and started putting together some simple native OSX UIs pretty quickly, with UI elements that actually do things.
One of the goals of the app that I want to build is to show Growl notifications at various times, so I started digging into what this would take. I found a few tutorials, various forums and even a few bug tickets that generally gave me the information I needed, but I had to put it all together myself. So, in an effort to help the community a little more, I am going to try and post a complete tutorial on creating a MacRuby app with Growl notifications.
Getting Started – Xcode And The Growl Frameworks
First, you need a Mac and you need to install the latest and greatest Xcode. Start up Xcode and create a new MacRuby project. Give it a name and save it somewhere. Next, you’ll need the Growl frameworks. Xcode comes with several examples of how to work with Growl, but I found them all to be difficult and couldn’t get them working correctly. A few google searches later and I realized Growl delivers a nice framework package from their website.
Go download the Growl SDK from the Growl website. Open the disk image, and in the Frameworks folder, copy both the “Growl.framework” and “Growl-WithInstaller.framework”. Paste these into /Library/Frameworks on your OSX drive. This will make them easier to find from within Xcode.
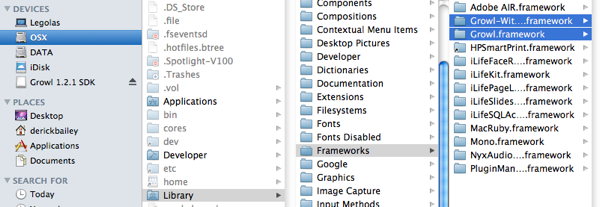
Adding The Growl Framework To Your Project
Open Xcode and your project, and locate Frameworks in the project tree view. Pick one of the framework groups (I chose “Other” for no apparent reason), right click and “Add Existing Framework”. If you got copied the growl frameworks into the right folder, they will show up in the list. Otherwise you’ll have to hunt for them with the “Add Other” button.
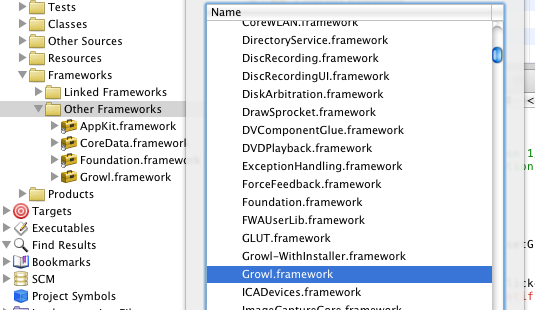
Your projet now references Growl, but it won’t be able to find it at run time. We have to tell the project to copy the framework to the output folder so it can be found at runtime. Find the Targets node in the project treeview, and find your app’s name. Expand that portion of the tree and you will see several build phase. If you have an empty “Copy Files” step, great! If not, you need to right click your app name and “Add” a “New Build Phase” to “Copy Files”. If the Copy Files phase doesn’t open an “Info” screen, double click on it to open it. In this screen, set the “Destination” to “Frameworks” and leave the “Path” blank.

Close this window.
Now drag the Growl.framework from the “Frameworks/Other Frameworks” tree node, down into the “Copy Files” node that you just added. This will tell Xcode to copy the Growl.framework into your project’s output when it builds.
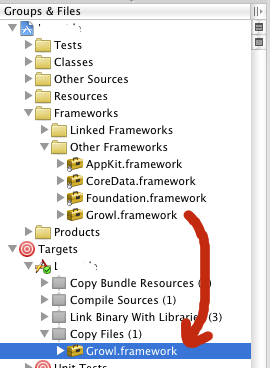
Configuration Growl To Know About Your App
You can’t just send things to Growl and expect it to magically work. You have to configure your app to use Growl and let Growl know what your app wants to do with it – what notifications you want to set up, what you want on by default, etc. There are several ways to configure your app to work with Growl. I chose to use a .growlRegDict file – a Growl Registration Dictionary. It’s an XML file that defines your app in a manner that Growl understands. You could use code to do the registration as well. There are a lot of examples for doing this online.
Start by adding a filed called “Growl Registration Ticket.growlRegDict” to your project. I chose to put this in my Resources folder. I’m not sure if the file must be named this, exactly, but I am fairly certain it has to have the .growlRegDict extension. Once you have the file in place, place the following XML in it:
<!DOCTYPE plist PUBLIC “-//Apple Computer//DTD PLIST 1.0//EN” “http://www.apple.com/DTDs/PropertyList-1.0.dtd”>
<plist version=”1.0″>
</p>
TicketVersion
1
AllNotifications
</p>
Test </array>
DefaultNotifications
</p>
Test </array>
</dict>
</plist>
I’ll let you read all of the documentation on the settings you can supply here. The basics of what you need to know, though, is the “AllNotifications” and “DefaultNotifications” list. Under all notifications, you must supply the names of every notification type your app will send. If you send anything that is not in this list, Growl will ignore it. Under default notifications, you need to tell Growl which of the notification types to enable, by default.
Next, drag the .growlRegDict file from Resources down into “Targets/(project)/Copy Bundle Resources”.
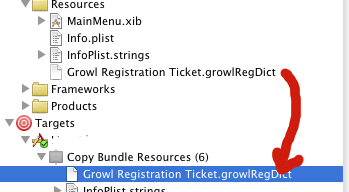
This will copy the resource so that the Growl Application Bridge will be able to find it at runtime.
Configuring Your App To Use Growl
From what I have read, a standard Xcode app will have various application delegates set up. I’m still not entirely sure how to describe these, other than they are classes that meet specific API needs and provide callback methods for various parts of your app. Perhaps the closest thing I can think of from my .NET days is the Event system, which does use delegates under the hood. However, there is a significant difference between a .NET delegate and an XCode/OSX delegate.
If you do not have an app delegate set up, you need to create one for two purposes:
- To register your app with Growl, at startup
- To use Growl callbacks for various events
Add a new ruby document to your project. I called it “ApplicationDelegate.rb” and placed it in the Classes folder of my project:

In this file, define a ruby class called ApplicationDelegate (though the name doesn’t matter that much at this point) and put the following code in it:
framework "Growl"class ApplicationDelegatedef awakeFromNib()GrowlApplicationBridge.setGrowlDelegate(self)endend
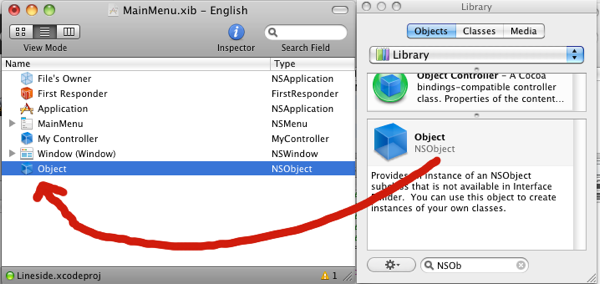
This code will tell Growl that your application is going to be sending notifications, once we have told the system that this class is an application delegate. To do that,open the Interface Builder by double clicking “MainMenu.xib” in the “Resources” folder of your project. Open the Library window by pressing “shift-cmd-L” (or however you want to get it open) and find an Object. Drag an Object over to your MainMenu.xib window, and drop it there. This adds an object that we can wire up to our UI.
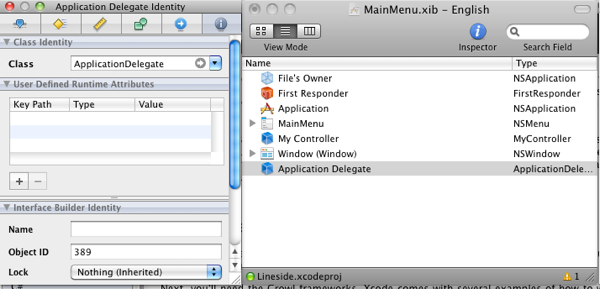
Double click on the Object you just created to open the Info dialog. Set the “Class Identity” to your ApplicationController class.
Then hold down control on your keyboard and click-and-drag from “File’s Owner” down to the “Object” that you just added.
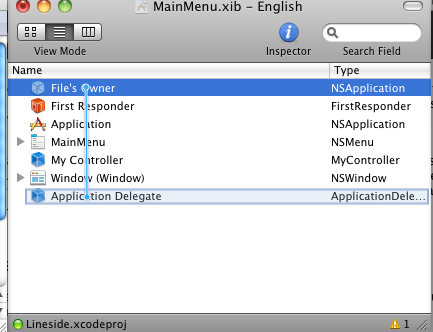
Let go of the mouse button and select “Delegate” from the resulting dialog. This will wire up your ApplicationDelegate so that the “awakeFromNib” method will fire when your app starts up, which will then register your app with Growl.
Make Your App Growl
Now for the fun part… we get to make the app Growl! At a very basic level, it’s easy. All you need to do is call the “GrowlApplicationBridge.notifyWithTitle” method. Somewhere in your app, you need to have some code that calls this method. To start with, you can put it directly into your awakeFromNib method in your Application Delegate class. This will fire off a Growl notification as soon as your app starts up.
def awakeFromNib()GrowlApplicationBridge.setGrowlDelegate(self)GrowlApplicationBridge.notifyWithTitle("Our Growling Title",description: "this is a really big description of really cool things! now you can take over the world with Growl from MacRuby!",notificationName: "Test",iconData: nil,priority: ,isSticky: false,clickContext: nil)end
You can read all the documentation on what these options do. For the most part, though, you need to pay attention to the first parameter and the “description” and “notificationName” in the hash.
The first parameter is the title of the notification. The remaining parameters are all technically a ruby hash using the succinct “key: value” syntax. The “description” is the large text body of the notification that is being sent. The “notificationName” is very important – it’s the name of the notification type that you are sending, and it must be one of the types that you set up in your “Growl Registration Ticket.growlRegDict” file. If you don’t use one that was set up in that file, Growl will ignore the notification.
Assuming my instructions are good, you should be able to run the app from Xcode and see a Growl notification!
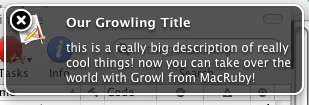
That wasn’t too bad, was it?
And There’s So Much More
I’ve only just started learning MacRuby, XCode, Cocoa, Growl and all the things related to all of this. I know there’s so much more that I’ll be picking up on in the next few weeks while I’m trying to put together my little app. I’ll try to keep posting walk throughs like this, to help out those who would like to learn a little more.
As a preview of what else I’ve learned, though, you can set up a callback from a Growl notification so that when you click on the notification a chunk of code in your app will be executed. This opens up nearly limitless possibilities of what you can do with a Growl notification – launch a web page, launch another app, move your app into a specific feature, and more!
I’ll show you how to set up the click callback delegate in my next post.
Resources
Here are some of the resources I used when figuring this out
- http://growl.info/documentation/developer/ – developer documentation with links to the SDK download
- https://github.com/psionides/MacBlip – a complete MacRuby app, with Growl notifications. I learned a little more about the Growl registration dictionary and how to set up an Application Delegate by examining this project’s source code through Github, directly.
- http://quiteuseful.co.uk/post/99434588/how-to-make-a-growl-app – the basic tutorial that I followed, after learning about the Growl.framework that the Growl developers provide. This is written specifically for XCode and Objective-C, so I had to improvise and interpret a few things in order to do it in MacRuby.
- http://groups.google.com/group/growldiscuss/browse_thread/thread/123037bedd9ee7e4 – discussion about a problem I ran into with the Growl-WithInstaller.framework. I ended up switching back to the plain Growl.framework for now. Hopefully I can get around the problem or find a solution to it, though. I would really like to deliver Growl with the app I’m building.
