- Put Fluent NHibernate into maintenance mode and progressively hand-over responsibility to the community.
- Get my head down and knock out 2.0, and show the NHibernate guys how you should design a programmatic UI
- You deal with multiples of repositories, not a single central repository
- Updates come from a remote repository, and changes are pushed to a remote; none of these repositories have to be the same
- Origin is the canonical name for the repository you cloned from
- Upstream is the canonical name for the original project repository you forked from
- Contributor makes a commit in their local repository
- Contributor pushes that commit to their github
- Contributor issues a pull request to the project
- Project lead pulls the contributor’s change into their local repository
- Project lead pushes the change up to the project github</ol> That’s as complicated as it gets.
Observations on the Play! framework
Java stacks certainly are tall. You have your web server, your application server, servlet container, an IoC container, JPA, JAAS, JAX-RS, and that’s before you actually write any code.
The Play! framework seems set to change all that. It throws nearly all of the enterprise out of Java and instead provides you with a very structured, very Rails-like, web environment. You’ve got routes, controllers, something that resembles ActiveRecord, background jobs, built-in authentication, loads of nice plugins. In general, it’s very refreshing.
For example, in my (relatively flat) stack of Jersey and Jetty, it took me off-and-on about a week to implement Facebook authentication. Lots of fiddling with callback urls and hand-rolling Apache Shiro handlers. I got it working in the end, but it was pretty nasty. By comparison, using Play! was as simple as adding play -> fbconnect 0.5 to the dependencies.yml file (yes, that’s YAML in Java, not XML!) and changing my view to include a new #{fbconnect.button}. That’s it!
Play! also has a fairly unique feature in Java-land, and that’s dynamic reloading and compilation of classes. It’s just like using Ruby. Edit a file, refresh your browser and your changes are immediately visible; not just changes to views, but to the controllers and models too. A great improvement over the regular rebuild/reload cycle.
All in all, Play! has turned out to be an almost perfect Java web framework.
Almost.
Then we get to the testing story. I’m going to be blunt here. Despite Play! promoting how easy it is to test, I’m fairly sure the developers don’t actually do much testing; at the very least, they don’t do much unit testing.
Where to start?
Dependency injection
I’m not talking containers here. A fairly ubiquitous practice for testing web applications is to use constructor injection in your Controllers, injecting any services your controller needs into the constructor; those services are then used by the action methods to do their job, but more importantly they can be mocked or stubbed as part of a unit test.
An ASP.Net MVC example would look something like this:
public class MyController : Controller {
    readonly IMyService myService;

    public MyController(IMyService myService) {
        this.myService = myService;
    }

    public void Index() {
        myService.DoSomething();
    }
}
That way, in a unit test we can do this:
[Test]
public void should_do_something() {
    var myService = MockRepository.GenerateMock<IMyService>();

    new MyController(myService)
      .Index();

    myService.AssertWasCalled(x => x.DoSomething());
}
Piece of cake.
Play! on the other hand is not so simple. Play! requires controller action methods to be static; the justification for this is that controllers have no state, and thus are static. That makes sense, but it does so at the (in my opinion, fairly large) expense of constructor injection. You can’t call a static constructor, so you can’t pass in a dependency, so you can’t mock your dependency.
The equivalent example in Play! would be this:
public class MyController extends Controller {
    public static void index() {
        MyService myService = new MyServiceImpl();
        myService.doSomething();
    }
}
How can we test that controller in isolation? We can’t very easily. At least, not without using something like PowerMock (think TypeMock) to do some bytecode/reflection magic.
One proposed solution to this is to use an IoC container like Google Guice and inject a static field.
public class MyController extends Controller {
    @Inject
    MyService myService;

    public static void index() {
        myService.doSomething();
    }
}
That’s an improvement, but without constructor injection we have to bring a full container into the unit tests or make the field public and overwrite it manually. Not exactly pretty.
Another reason bandied around is “anaemic domain model”. Models should do things, I get that; however, we’re not in Ruby here, if my entity takes a hard-dependency on a service, how exactly am I supposed to test that in isolation? If an email should be sent when a user is created, I don’t want to have an actual SMTP server running just to execute my unit tests. In Ruby we could do some monkey patching and replace the SMTP service at runtime, but this is Java and we can’t do that (without resorting to service locators or singletons). I had an idea of using a JPA interceptor and injecting dependencies into an entity when it’s hydrated by Hibernate, but that just seems like a recipe for disaster.
So, deal breaker number 1: No easy way to mock dependencies, one way or another.
A brief diversion:
Play! doesn’t seem to really do unit testing. It refers to things as unit tests, but really they’re all integration tests. As mentioned already, you can’t easily replace your dependencies with stubs or mocks, so inevitably you need to run your tests against a real database, your emails to a real SMTP service, and your messages to a real messaging queue. This sucks.
I’m all for integration tests, and if I had to pick between them and unit tests, I’d put my money on integration tests; however, I’m not yet of the belief that I can live entirely without unit tests. Some things should still be tested in isolation; specifically, if I’m dealing with external services, I shouldn’t need them up-and-running to run a unit test.
IDE support
Java is where IDEs thrive. Whilst I know Play! is heavily influenced by Rails, I don’t yet think I could live without an IDE. IDEs have their strong points, and unit test runners are one of them. Great little things, one keyboard shortcut and all your tests are spinning away.
Not for Play! though, or not very easily anyway. Despite Play!s “unit tests” being based on JUnit, they can’t actually be ran as plain-old-JUnit tests. If you interact with any of the models, or any of the Play! specific classes, you need the full web environment to be available. In fact, the default runner for unit tests is the website itself. I’m all for running QUnit tests in the browser, but JUnit tests, really? No thanks.
Deal breaker number 2: Can’t run unit tests in the IDE.
It takes 6 seconds on my fairly meaty laptop to run one unit test. That’s unbelievable.
In addition, as Play! requires the web environment to run tests, that also means it kicks off any start-up jobs your application has. So whenever I run a test, it spins up my message queue, my database connection, and runs my data import routines (when in test mode).
Deal breaker number 3: Can’t run unit tests without spinning up the entire website (and that’s not fast).
Example projects
So there’s me thinking “It can’t possibly be this bad”. I decided to have a hunt around and see if there are any open-source applications built with Play!, or at the very least some reasonably sized examples. There were a few; however, none of them had test suites. In fact, nearly all of them still had the default tests that are provided with a new project.
public class BasicTest extends UnitTest {
    @Test
    public void aVeryImportantThingToTest() {
        assertEquals(2, 1 + 1);
    }
}
Finally, one thing that really made me feel that the developers don’t really get testing was their “mock” SMTP service. Take a look at line 36 of their Mail.java. A hand-rolled mock, in the main service. I don’t say this often but: WTF. Is this what’s considered good practice?
I’m so incredibly disappointed in Play!. It’s a wonderful framework which was obviously designed by people who don’t really do testing; or at the very least, don’t do anything other than end-to-end integration tests. I’d love to use Play!, but I just don’t know if I can get past these issues. Everything else about it has been such an improvement over my previous stack, but all of that is next to worthless if I can’t test it.
If anyone has any information or experiences to the contrary, I’d gladly be shown the err in my ways. How do you test with Play!? Integration tests only or is there some secret sauce I’m missing out on?
I really do want to like Play! but it just seems so difficult to do proper testing.
Some links:
Me on NHibernate 3.2
tl;dr No hard feelings. Life goes on. FNH is safe.
So, NHibernate 3.2 comes with a Fluent Interface (sorry Fabio, a “loquacious” interface), fluent configuration, and an externally available alternate mapping in the shape of ConfORM. I made some remarks on Twitter earlier today which kicked up a bit of a storm (one I was notably absent from for the most part). I want to take a moment to articulate my thoughts a bit better, and clear up any misunderstandings.
This is not a coup d’état. I have been approached by the NHibernate guys before about collaborating—three years ago—but I declined. The reasons have been lost in time, but I do feel now that was perhaps a missed opportunity. Since that moment, there’s always been the overarching thought that there would eventually be an official NHibernate code-first interface. And here we are.
There, that should get rid of the sympathy vote and the rage faces. I brought it on myself.
Fluent NHibernate is not going anywhere. NHibernate is notorious for having an obtuse and unfriendly API, and nothing has changed in that respect; there’s still a place for Fluent NHibernate.
There was no way Fluent NHibernate would be merged in to NHibernate Core, before anyone asks. Our codebase is not in any shape to be integrated into anything. I definitely would not suggest that is a good solution to the problem; however, I do think they could’ve spent some time to design an interface which isn’t completely unreadable.
Few people recognise that an API—especially a Fluent Interface—is a user interface and should be designed like anything else the user interacts with. And we all know how good developers are at designing interfaces.

My thoughts now lie in whether there’s the need for me to continue devoting my time to a project which has been made somewhat redundant. By devoting, I mean contributing my weekends or evenings and everything in between.
People have approached me and said “but FNH is so much better!”—and yes it is—but it used to be 100% better than vanilla NHibernate, while now it’s only say 25% better. I could justify the time needed to create a framework that would drastically improve peoples development experience, but can I justify the time for one which’ll marginally improve their experience? That’s a harder sell to the fiancée.

Fluent NHibernate is smaller and more flexible than NHibernate, it’s also more opinionated. I can easily keep ahead with innovative ideas and try experimental things out that NHibernate can’t; however, what’s to stop NHibernate 3.3 or 3.4 from implementing those ideas? Nothing, of course, and nor should there be.
The question is, do I want to be playing a game of cat and mouse with the elephant in the room? (woah, mixed metaphors)
No, I really do not. Competition is only fun when there’s something to gain. If this was a business and my livelihood was on the line, then of course I’d compete, but it’s not; instead, it’s my free time, and I gain time by not competing.
This is a burgeoning thought about my life in .Net in general, but is quite apt for Fluent NHibernate too: Do I continue to neglect my family life, my free time, and my other projects to make life easier for users on a platform—NHibernate in this case—which will inevitably reinvent anything (successful) I do?
I haven’t decided.
All that being said, I like Fluent NHibernate and more-so I like it’s users. Fluent NHibernate isn’t going anywhere, and you have my word I’m not going to just turn the lights off and be done with it.
There are two courses of action, and I’m undecided which I’ll be taking yet:
I’m leaning towards the latter.
And that’s all I’m saying on the matter. Too frequent have these clogging of the Twitter tubes been.
I leave you with this thought:

NDC 2010
NDC 2010 was a huge success, if you ask me. This was largely down to the NDC team, who deserve all the praise they’re getting (and much more). Unlike conferences I’ve been to in the past, NDC was truely by the people, for the people. Scott Bellware put it much better than I could, with his praise for Norwegian Developers (and Kjersti Sandberg). Herself and the rest of the team were there because they wanted to be, not because they had to. The whole attitude surrounding this conference was one of learning, not plugging products or motives.
I could go into great detail about the individual aspects of the conference, but it’s much easier to say that there’s nothing I’d change.
If there’s one conference you should go to next year, make it NDC 2011.
My part in all this…
I presented on two topics at NDC; the first was an introduction to Fluent NHibernate, and the second an introduction and demo of Git. Fluent NHibernate was on the Thursday, and Git the Friday. It was a great experience speaking at an event of this size, and the number of people who seemed genuinely interested in what I had to say (by either turning up to my talks, or approaching me afterwards) was quite humbling. If you’re interested in seeing what I presented, the talks will be on the NDC website before too long.
The videos are becoming available at streaming.ndc2010.no, but they’re suffering from bandwidth issues. If you do want to watch the videos, please stream them until the issues are resolved.
Due to me speaking, and also being woefully unprepared, I didn’t get to see as many talks as I would’ve liked — regardless of how well rehearsed and prepared my talks are, it seems I always end up rewriting them an hour before I go on — I did end up catching Lisa Crispin, Steve Strong, Eric Evans, Greg Young, Jon Skeet, Roy Osherove, Michael Feathers, Sebastian Lambla, and Mark Nijhof. I recommend you catch their talks online when they’re published. The quality of the talks at NDC have been significantly higher than I’ve seen elsewhere, and (more importantly) the technical level seems to be higher too; there was very few basic talks (a few introductions, mine included, but no pandering), but the majority were pretty in-depth. This is quite a contrast to the all-too-often “Microsoft technology of the week” presentations you can get at conferences.
Of course, a big part of any conference is what happens between (and after) the talks. Meeting other developers is a big part of why I go to these things, after all I don’t get out much normally. The socialising aspect of NDC was excellent, good drinks and food was had by all (I have a good idea they did anyway, at least one place we ate refused to serve us as a group anything other than the same meal for everyone!). I can’t possibly list everyone who I met while I was out there, but it was really good to meet up with some people who I’ve known on Twitter for a long time; specifically Hadi Hariri, Steve Strong, Greg Young, Ben Hall, Seb Lambla, Mark Nijhof, and Rob Conery are ones that stand out to me right now.
NDC 2011 will be next year, and it’s looking like it’ll be in May this time. If there’s anyone that’s on the fence about going, I would whole heartedly recommend you do. Even more so, I’d recommend you submit a talk of your own. It’s a great way to test yourself, if nothing else. I’ll definitely be going next year; hopefully I’ll speak again, but if not I’ll still be there. Hope to see you there!
Git E-VAN recording
Last monday (8th of Feb) I did an E-VAN on Git; an introductory talk on Git and DVCS, covering pretty much everything you need to know for day-to-day Git life. I think it went down well, certainly didn’t hear anyone complaining.
The talk was recorded, so if you haven’t already seen it then you can do so at your own leisure.
The video is up on the E-VAN’s Vimeo account, specifically here.</p>
Git: Remotes, contributions, and the letter N
Here’s a few ways to think about Git and it’s distributed nature.
General pushing and pulling

Pushing your changes to a remote: git push remote_name

Pulling changes from a remote: git pull remote_name
Or if you want to rebase:
git fetch remote_name
git rebase remote_name/branch
You can change your
branch.autosetuprebasetoalways, to make this the defaultgit pullbehaviour.
That’s all there is to moving commits around in Git repositories. Any other operations you perform are all combinations of the above.
Github — personal repositories
When you’re dealing directly with Github, on a personal project or as the project owner, your repositories will look like this:

To push and pull changes between your local and your github repositories, just issue the push and pull commands with the origin remote:
git push origin
git pull origin
You can set the defaults for these commands too, so the origin isn’t even necessary in a lot of cases.
Github — receiving contributions
As a project owner, you’ll sometimes have to deal with contributions from other people. Each contributor will have their own github repository, and they’ll issue you with a pull request.

There’s no direct link to push between these two repositories; they’re unmanned. To manage changes from contributors, you need to involve your local repository.
You can think of this as taking the shape of a V.

You need to register their github repository as a remote on your local, pull in their changes, merge them, and push them up to your github. This can be done as follows:
git remote add contributor contributor_repository.git
git pull contributor branch
git push
Github — providing contributions
Do exactly as you would your own personal project. Local changes, pushed up to your github fork; then issue a pull request. That’s all there is to it.
Github — the big picture
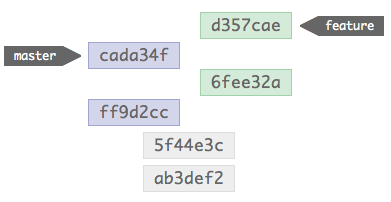
Here’s how to imagine the whole process, think of it as an N shape.
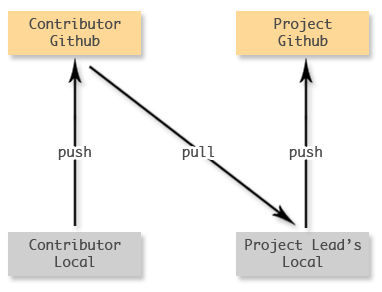
On the left is the contributor, and the right is the project. Flow goes from bottom left, along the lines to the top right.
Behaviours in MSpec
MSpec is awesome, I think it’s praised by myself and others enough for that particular point to not need any expansion; however, there is a particular feature I would like to highlight that hasn’t really got a lot of press: behaviours.
Behaviours define reusable specs that encapsulate a particular set of, you guessed it, behaviours; you’re then able to include these specs in any context that exhibits a particular behaviour.
Lets go with the cliche’d Vehicle example. Given an IVehicle interface, with Car and Motorbike implementations; these all expose a StartEngine method and some properties reflecting the state of the vehicle. We’ll start the engine and verify that it is actually started, whether it’s got anything on the rev counter, and whether it’s killing our planet in the process (zing!).
public interface IVehicle
{
  void StartEngine();
  bool IsEngineRunning { get; }
  bool IsPolluting { get; }
  int RevCount { get; }
}

public class Car : IVehicle
{
  public bool IsEngineRunning { get; private set; }

  public void StartEngine()
  {
    // use your imagination...
  }
}

public class Motorbike : IVehicle
{
  public bool IsEngineRunning { get; private set; }

  public void StartEngine()
  {
    // use your imagination...
  }
}
Those are our classes, if rather contrived, but they’ll do. Now what we need to do is write some specs for them.
public class when_a_car_is_started
{
  Establish context = () =>
    vehicle = new Car();

  Because of = () =>
    vehicle.StartEngine();

  It should_have_a_running_engine = () =>
    vehicle.IsEngineRunning.ShouldBeTrue();

  It should_be_polluting_the_atmosphere = () =>
    vehicle.IsPolluting.ShouldBeTrue();

  It should_be_idling = () =>
    vehicle.RevCount.ShouldBeBetween(0, 1000);

  static Car vehicle;
}

public class when_a_motorbike_is_started
{
  Establish context = () =>
    vehicle = new Motorbike();

  Because of = () =>
    vehicle.StartEngine();

  It should_have_a_running_engine = () =>
    vehicle.IsEngineRunning.ShouldBeTrue();

  It should_have_a_running_engine = () =>
    vehicle.IsEngineRunning.ShouldBeTrue();

  It should_be_polluting_the_atmosphere = () =>
    vehicle.IsPolluting.ShouldBeTrue();

  It should_be_idling = () =>
    vehicle.RevCount.ShouldBeBetween(0, 1000);

  static Motorbike vehicle;
}
Those are our specs, there’s not much in there but already you can see that we’ve got duplication. Our two contexts contain identical specs, they’re the same in what they’re verifying, the only difference is the vehicle instance. This is where behaviours can come in handy.
With behaviours we can extract the specs and make them reusable. Lets do that.
Create a class for your behaviour and adorn it with the Behaviors attribute — this ensures MSpec recognises your class as a behaviour definition and not just any old class — then move your specs into it.
[Behaviors]
public class VehicleThatHasBeenStartedBehaviors
{
  protected static IVehicle vehicle;

  It should_have_a_running_engine = () =>
    vehicle.IsEngineRunning.ShouldBeTrue();

  It should_have_a_running_engine = () =>
    vehicle.IsEngineRunning.ShouldBeTrue();

  It should_be_polluting_the_atmosphere = () =>
    vehicle.IsPolluting.ShouldBeTrue();

  It should_be_idling = () =>
    vehicle.RevCount.ShouldBeBetween(0, 1000);
}
We’ve now got our specs in the behaviour, and have defined a field for the vehicle instance itself (it won’t compile otherwise). This is our behaviour complete, it defines a set of specifications that verify that a particular behaviour.
Lets hook that behaviour into our contexts from before:
public class when_a_car_is_started
{
  Establish context = () =>
    vehicle = new Car();

  Because of = () =>
    vehicle.StartEngine();

  Behaves_like<VehicleThatHasBeenStartedBehaviors> a_started_vehicle;

  protected static Car vehicle;
}

public class when_a_motorbike_is_started
{
  Establish context = () =>
    vehicle = new Motorbike();

  Because of = () =>
    vehicle.StartEngine();

  Behaves_like<VehicleThatHasBeenStartedBehaviors> a_started_vehicle;

  protected static Motorbike vehicle;
}
We’ve now put to use the Behaves_like feature, which references our behaviour class and imports the specs into the current context. Now when you run your specs, the specs from our behaviour are imported and run in each context. We don’t need to assign anything to that field, just defining it is enough; the name you choose for the field is what’s used by MSpec as the description for what your class is behaving like. In our case this is translated roughly to “when a motorbike is started it behaves like a started vehicle”.
There are a couple of things you need to be aware of to get this to work: your fields must be protected, both in the behaviour and the contexts; and the fields must have identical names. If you don’t get these two correct your behaviour won’t be hooked up properly. It’s also good to know that the fields do not need to have the same type, as long as the value from your context is assignable to the field in the behaviour then you’re good; this is key to defining reusable specs for classes that share a sub-set of functionality.
In short, behaviours are an excellent way of creating reusable specs for shared functionality, without the need to create complex inheritance structures. It’s not a feature you should use lightly, as it can greatly reduce the readability of your specs, but it is a good feature if you’ve got a budding spec explosion nightmare on your hands.
Git guts: Merging and rebasing
Here we go again, explaining the internals of Git with the intention of helping you understand what you’re doing day-to-day. Last time I covered branches, HEAD, and fast-forwarding. Today we’ll dive into the guts of merging and rebasing.
Merging branches
You’ve probably merged before. You do it when you want the changes from one branch in another. The principal is the same in Git as it is most other source control systems, but the implementation differs.
Given the following commit structure, consisting of two branches created from the same commit, each with two commits after the branching occurred.
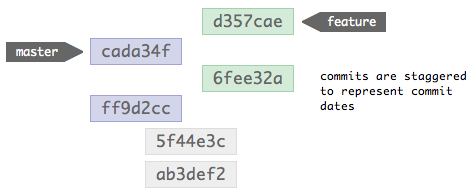
When these two branches are merged together, this is the structure that results:
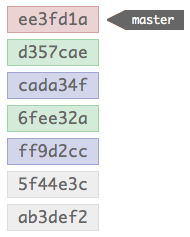
The top-most commit, the red one, is a new commit made by the merge; the merge commit is what reminds Git that a merge occurred next time it’s showing the history. This commit is special, as it contains multiple parent’s in it’s meta-data; these multiple parent’s allow Git to follow the two trees of commits that constituted the branches that were merged.
One difference in how Git handles merges compared to many other SCMs is that it preserves the commits that were made in both branches. In other systems merges are often represented as a single commit containing the squashed contents of all the commits that were made in the branch being merged in. Git doesn’t do this (by default, you can tell it to if you want), and therefore preserves all the commits just as they were made; this is quite nice, as it proves incredibly useful to be able to track the origin of changes beyond the point of a merge.
When you merge two branches, it’s interesting to know that none of the commits are altered in the process. Just bare this in mind for now, I’ll explain why this is good to know later.
After a merge, if you were to view the history, you’d see it shown like the previous example, commits in chronological order; the feature branch commits are interspersed between the master commits.
Yet no commits have been altered in the merge, so how are the commits in a different order? Well, they’re not, Git’s just showing you it in the order you expect it to be in. Internally the structure is still as below:
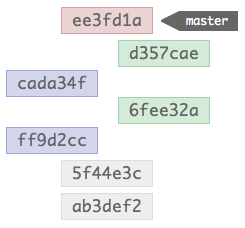
The merge commit instructs Git to walk the two trees while building the history, and it just displays the results in chronological order. This makes more sense if you recall that Git commits don’t hold differences like other SCM systems, instead they each contain a snapshot of the complete repository; while in another SCM the ordering of commits is vital — otherwise the diffs wouldn’t build a valid file — Git is able to infer order without affecting the repository contents.
Looking at it in commit order, you can quite easily see how Git flattens the history to be perceived as linear without ever having to touch any of the original commits.
What happens if there’s a merge conflict?
We’ve all dealt with conflicts in merging before. They typically happen when changes are made to the same file in two branches, in a way that cannot be easily merged (two people edit the same line, for example).
Git’s commit’s are immutable though, so how are the changes that you need to make to resolve these conflicts saved? Simple. The merge commit is a regular commit with some extra meta-data, and so it capable of containing changes itself; merge conflict changes are stored in the merge commit. Again, no changes necessary to the original commits.
Git objects, immutability, and rewriting history
A Git repository is comprised of objects. A file is a blob object with a name attached to it; if you have two files with the same content, that’s just two names to a single blob. A directory is a tree object, which is comprised of other trees and blobs. A commit is an object that references a tree object, which is the state of the repository at the time of committing.
To read more about git objects, I’d definitely recommend you read the Git community book.
Git objects are immutable. To change an object after it’s been created is impossible, you have to recreate the object with any changes made. Even operations that seem to modify objects actually don’t; commit --amend is a typical example, that deletes and re-creates the commit rather than actually amending it.
I mentioned that merges don’t rewrite history, and that it’s a good thing. Now I’ll explain why. When you rewrite history, you do so by making changes to commits that ripple up the commit tree; when this happens, it can cause complications when others merge from you. Given a series of commits, like so:
You then share these commits with another user.
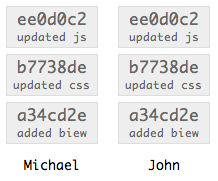
John now has Michael’s commits in his repository; however, Michael notices he’s made a typo in the first commit message, so he amends the commit message. The change in the message requires the commit be recreated. With that first commit recreated, the second commit now has an invalid parent reference, so that commit has to be recreated with the new reference; this recreation ripples it’s way up the tree, recreating each commit with a new parent. Michael has completely rewritten his tree’s history.
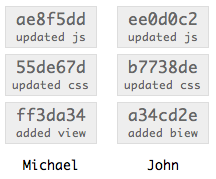
Notice all the commit hashes have changed in Michael’s repository, and John’s now don’t match. If Michael was then to make a new commit to his repository, and John tried to merge that change into his repository, Git would get very upset because the new commit would reference a commit that doesn’t exist in John’s repository.
The golden rule is: rewriting history is fine as long as the commits that will be affected haven’t been made public.
Rebasing
The purpose of a rebase is the same as a merge, to bring two tree’s of commits together. It differs in it’s approach. Rebasing is a seriously sharp tool. Very powerful, but pretty easy to cut yourself with it.
When you rebase one branch onto another, Git undoes any changes you’ve made in the target branch, brings it up to date with the changes made in the source branch, then replays your commits on top. This sounds quite strange, so I’ll go over it step-by-step.
You start with your diverged branches:
If you then rebase feature onto master, Git undoes the changes in master.
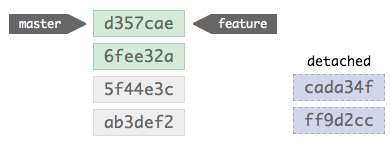
The history of both branches is now the same, master has been updated to reflect feature; the new commits that were made in master are now detached, floating in the repository without anything referencing them.
The next step is to replay the master commits onto the new structure. This is done one-by-one, and can sometimes result in conflicts that will need to be handled like any merge.
After replaying the repository will look like this:
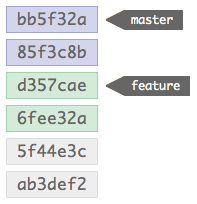
The master branch commits are now on the top of the stack, after the commits from the feature branch.
You should recall that commits are immutable, and for changes to be made commits need to be recreated. A rebase is a destructive operation, as it has to rewrite commits to be able to work. In this case, the commits from feature have been unaffected, but the master commits have been assigned new parents (and thus rewritten). What’s also noticeable is there’s a lack of a merge commit, which isn’t needed because the commits have been integrated into the tree; any conflicts are stored in the amended commits, rather than in a merge commit.
The rewriting of commits in a rebase is what makes it a dangerous operation to perform on any branch that has already been pushed to the public (or specifically, that the changes affected by the rebase have already been pushed to the public). A rebase can cause problems upstream, like mentioned in the previous section.
Rebase has it’s place though. If you’re working locally and haven’t yet pushed your changes public, it can be a useful tool. Rebase can be used to pull in changes from upstream in the order that the upstream repository has them, and your local changes (that can be rewritten because you’re the only one with them) can be replayed on-top; this is a really easy way to keep your repository up-to-date with an authoritative source. You can also use Rebase to manage local branches that you don’t necessarily want polluting the history with merge markers.
When to rebase and when to merge?
Merge when you’ve already made changes public, and when you want to indicate that two tree’s have converged. Rebase pretty much any other time.
That’s it for this time. Same deal as last time, if you have anything you’d like me to cover I’ll nail it in the next one.
Git’s guts: Branches, HEAD, and fast-forwards
Lets get some learning done. There are a few questions that keep cropping up when I introduce people to Git, so I thought I’d post some answers as a mini-series of blog posts. I’ll cover some fundamentals, while trying not to retread too much ground that the fantastic Git community book already covers so well. Instead I’m going to talk about things that should help you understand what you and Git are doing day-to-day.
What’s a branch?
I know what you’re thinking. “C’mon, we know what a branch is”. A branch is a copy of a source tree, that’s maintained separately from it’s parent; that’s what we perceive a branch to be, and that’s how we’re used to dealing with them. Sometimes they’re physical copies (VSS and TFS), other times they’re lightweight copies (SVN), but they’re copies non-the-less. Or are they?
Lets look at it a different way. The Git way.
Git works a little differently than most other version control systems. It doesn’t store changes using delta encoding, where complete files are built up by stacking differences contained in each commit. Instead, in Git each commit stores a snapshot of how the repository looked when the commit occurred; a commit also contains a bit of meta-data, author, date, but more importantly a reference to the parent of the commit (the previous commit, usually).
That’s a bit weird, I know, but bare with me.
So what is a branch? Nothing more than a pointer to a commit (with a name). There’s nothing physical about it, nothing is created, moved, copied, nothing. A branch contains no history, and has no idea of what it consists of beyond the reference to a single commit.
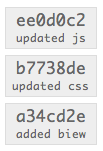
Given a stack of commits:

The branch references the newest commit. If you were to make another commit in this branch, the branch’s reference would be updated to point at the new commit.

The history is built up by recursing over the commits through each’s parent.
What’s HEAD?
Now that you know what a branch is, this one is easy. HEAD is a reference to the latest commit in the branch you’re in.
Given these two branches:

If you had master checked out, HEAD would reference e34fa33, the exact same commit that the master branch itself references. If you had feature checked out, HEAD would reference dde3e1. With that in mind, as both HEAD and a branch is just a reference to a commit, it is sometimes said that HEAD points to the current branch you’re on; while this is not strictly true, in most circumstances it’s close enough.
What’s a fast-forward?
A fast-forward is what Git does when you merge or rebase against a branch that is simply ahead the one you have checked-out.
Given the following branch setup:

You’ve got both branches referencing the same commit. They’ve both got exactly the same history. Now commit something to feature.

The master branch is still referencing 7ddac6c, while feature has advanced by two commits. The feature branch can now be considered ahead of master.
It’s now quite easy to see what’ll happen when Git does a fast-forward. It simply updates the master branch to reference the same commit that feature does. No changes are made to the repository itself, as the commits from feature already contain all the necessary changes.
Your repository history would now look like this:

When doesn’t a fast-forward happen?
Fast-forwards don’t happen in situations where changes have been made in the original branch and the new branch.

If you were to merge or rebase feature onto master, Git would be unable to do a fast-forward because the trees have both diverged. Considering Git commits are immutable, there’s no way for Git to get the commits from feature into master without changing their parent references.
For more info on all this object malarky, I’d recommend reading the Git community book.
If there’s anything that you’re not sure about ask in the comments and I’ll try get it into my next post.
Fluent NHibernate 1.0 RTM
It’s here.
For those of you that don’t know, Fluent NHibernate is for helping you map entities with NHibernate. It’s based firmly on the practice of convention-over-configuration, and can be used in a mapping-per-class style using our fluent interface, or let our automapper map your entities itself.
This release introduces a few significant changes, and a lot of insignificant ones. You should refer to the 1.0 release notes for an overview of what’s changed.
The wiki has also been upgraded to use different software which should hopefully stop people being blocked, and make it a bit more stable; the upgrade included completely rewriting all of the pages, so don’t anyone say that it’s out of date.
You can get the binaries from the our downloads page, or get the source from the github site.
Special thanks go out to the Fluent NHibernate team, Paul Batum, Hudson Akridge, Andrew Stewart, and Stuart Childs. Each of them has put in time and effort above what was asked of them, and they’ve all felt guilty when not contributing, which is great. Thanks also to all the testers and contributors we’ve had over the months. Specifically Darko Conrad, for finding about 30 separate issues with the release candidiate; Everett Muniz and his subclasses, who now has a test of his own; and Kevin Dente, for deciding to moan about our method names only after months of work and a release candidate. I owe everyone beers if ever I’m in your area.
Fabio Maulo, Ayende, and the rest of the NHibernate team: Thanks for a great tool. NHibernate is a shining example of all that is good in open source in the .Net world.
…and with that, I’m going on holiday.
Preventing debugger property evaluation for side-effect laden properties
Property getters with side-effects, now there’s a controversial subject if ever I saw one. Don’t do it is the rule; as with any rule though, there’s generally an exception that proves it. If you’re in this situation and you genuinely do have a scenario that requires a property getter to have side-effects, then there’s a side-effect (ha!) that you should be aware of.
The debugger evaluates property getters when showing it’s locals and autos windows. While this feature is indispensable in most cases, it plays havoc with our property-with-side-effects. What the debugger does is call the getter to present it’s value in the autos window, at the same time firing our code that has a side-effect. From there you have pretty confusing behavior with code seemingly running itself.
My exception to the rule is mutator properties in a fluent interface. You can often find properties in fluent interfaces that when touched alter the behavior of the next method called.
For example:
string value = null;

Is.Null(value)      // returns true
Is.Not.Null(value)  // returns false
The Is class would contain a value tracking whether the next call would be inverted or not, and the Not property would flip that value when called.
Now assume this, you’re using Is.Null(value) and you set a breakpoint on it. Your autos window has expanded Is and shows the Not property, what’s just happened? The debugger has now called Not and altered your state! Undesirable.
DebuggerBrowsable attribute to the rescue; this attribute when used with the DebuggerBrowsableState.Never parameter instructs Visual Studio to never inspect the property you apply it to. Your property won’t appear in the autos or locals window, and if you expand the tree of an instance containing the property it will show up with a Browsing Disabled message; you can then force it to evaluate the property, but at least it doesn’t do it automatically.
private bool inverted = true;

[DebuggerBrowsable(DebuggerBrowsableState.Never)]
public Is Not
{
  get
  {
    inverted = !inverted;
    return this;
  }
}
Sticking the DebuggerBrowsable attribute on your Not property prevents the debugger from hitting it and inverting the switch.
So there you go, if your property-with-side-effects is being invoked by the debugger, you can use the DebuggerBrowsableAttribute to prevent it.
By the way, I’m not advocating properties with side-effects…
subscribe via RSS