- I have a helper method, getTweets, which returns the return value of a call to $.get. This will be a Deferred object representing that call to the twitter server.
- I call $.when, passing it the three Deferred objects from the three ajax calls.
- The done() function is chained off of $.when to declare the code to run when all three ajax calls have completed successfully.
- The done() function receives an argument for each of the ajax calls. Each argument holds an array of the arguments that would be passed to that ajax call’s success callback. The $.get success callback gets three arguments: data, textStatus, and jqXHR. Therefore, the data argument from the call for @greenling_com tweets is available in greenlingArgs[0]. Similarly, the textStatus argument for the call for @austintexasgov tweets would be in atxArgs[1].
- The fifth line creates the allTweets array combining the tweets (the first, or data, argument) from all three calls to twitter.</ul> It it that last point that is interesting to me. I’m able to work with a single collection containing data from three separate ajax requests, without writing any awkward synchronization code.
Play with the example on jsFiddle
- The done() function receives an argument for each of the ajax calls. Each argument holds an array of the arguments that would be passed to that ajax call’s success callback. The $.get success callback gets three arguments: data, textStatus, and jqXHR. Therefore, the data argument from the call for @greenling_com tweets is available in greenlingArgs[0]. Similarly, the textStatus argument for the call for @austintexasgov tweets would be in atxArgs[1].
- The done() function is chained off of $.when to declare the code to run when all three ajax calls have completed successfully.
- I call $.when, passing it the three Deferred objects from the three ajax calls.
- Include .pdb files for the files in the package’s lib folder (see line 22)
- Include all of the corresponding source files in the package’s src folder. Using the filespec wildcard support, this can be one line (see line 23).
- Pass the -Symbols flag to the nuget.exe pack command when building your package. It will create two files: yourpackage.nupkg and yourpackage.symbols.nupkg.
- (optional, but recommended) Register at symbolsource.org and associate your Nuget.org API key with your account.
- A single call to nuget.exe push yourpackage.nupkg will upload yourpackage.nupkg to nuget.org and yourpackage.symbols.nupkg to symbolsource.org. </ol> SymbolSource has good instructions on how package consumers can configure Visual Studio to use the symbol packages.
Provide multiple packages that target different usage scenarios
A single source code repository may produce many build artifacts, but if they aren’t always used together, they shouldn’t be distributed via Nuget together. Instead, create a single Nuget package that targets each scenario. A perfect example of what not to do is the NUnit.2.5.10.11092 package (I don’t mean to pick on NUnit, it was probably created quickly by a volunteer just to get it out there. That’s cool, I get it. If anyone from the NUnit team wants my help fixing the packages, just contact me). When you install NUnit via Nuget, you get nunit.framework.dll, nunit.mocks.dll and pnunit.framework.dll added to your project. I would guess that 90% of users just want nunit.framework.dll. Similarly, the tools folder contains a number of executables, but I bet most people just want nunit-console.exe. I would break this up into an NUnit package (nunit.framework.dll in lib and all files needed to run nunit-console.exe in tools), an NUnit.Mocks package (nunit.mocks.dll in lib and has the NUnit package as a dependency), and an NUnit.Parallel package (all of the pnunit files with a dependency on NUnit if needed). The bottles.nuspec in my example is just one of many packages produced by the bottles source code repository.
Create core packages that work outside of Visual Studio
The powershell scripts and web.config modifications are cool, but if they are not absolutely necessary to use your library, provide a “core” package that does not include them. You can always provide a “quickstart” package with these extras, and have it depend on your core package to bring in the meat.
Automate building and publishing your packages
If you follow my previous two tips, you’ll have multiple .nuspec files to deal with. Fortunately, it is easy to add a single step to your build process to create all of your packages. I have a gist with a couple examples to get you started (feel free to fork to improve or add more examples). It should be fairly straightforward to make new scripts to publish your packages based on those examples.
I feel pretty strongly about only pushing “public CI builds” to the official Nuget feed, for traceability. This makes the publishing step a little more complex, but nothing that can’t be handled in a rake script. I’ve got an example that downloads the .nupkg files built on http://teamcity.codebetter.com and then publishes them.
Create an icon for your package
The icon will show up on nuget.org and in the Visual Studio Nuget dialog. Not many people do it (right now), so your packages will stand out. Let GitHub serve your icon file – just browse to the icon in your repo on GitHub, and then copy the link for the “raw” url and include it as your
metadata. Might as well do the same for your . Install Nuget Package Explorer
This probably should have been the first tip, its that useful. Makes it much easier to view the contents and metadata in your local .nupkg files, and download packages from nuget.org. Invaluable when designing your packages. It even lets you edit your packages, though I’ve never tried that.
- (optional, but recommended) Register at symbolsource.org and associate your Nuget.org API key with your account.
- Pass the -Symbols flag to the nuget.exe pack command when building your package. It will create two files: yourpackage.nupkg and yourpackage.symbols.nupkg.
- Include all of the corresponding source files in the package’s src folder. Using the filespec wildcard support, this can be one line (see line 23).
Build your own single function keyboard
I mentioned in my last post that it took
months between the time I ordered my Infinity Ergodox keyboard and the time it arrived. In the meantime, I started reading up on it, and learned that the firmware could also run on a Teensy. I didn’t know what a Teensy was, so started researching. Its a low-cost development board that is (mostly) Arduino compatible, and excels at building USB input devices. Using the Teensyduino software, you can easily configure the type of device it will appear as to your computer (USB mouse, USB keyboard, etc).
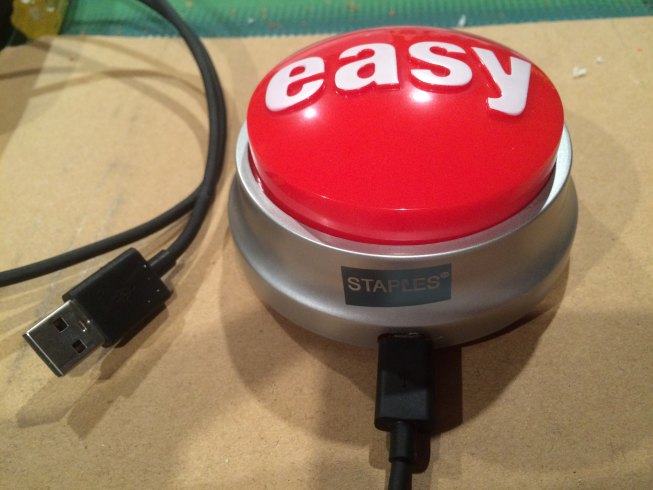
I decided I’d try my hand at building my own keyboard. But this one would be very special. It would have one key, with one function: approve GitHub pull requests! At ShippingEasy, all of our code goes through a Pull Request. Before you can merge the Pull Request, someone else has to approve it. By convention, we indicate approval with the :+1: emoji (also :thumbsup:). So I wanted a big, red button that I could slap to approve a pull request.
Turns out, its pretty easy to do. My search for a big red button led me to the Staples Easy Button, which has a good reputation for these types of crafty projects. The button is very sturdy, so it can handle your emphatic code review approvals.
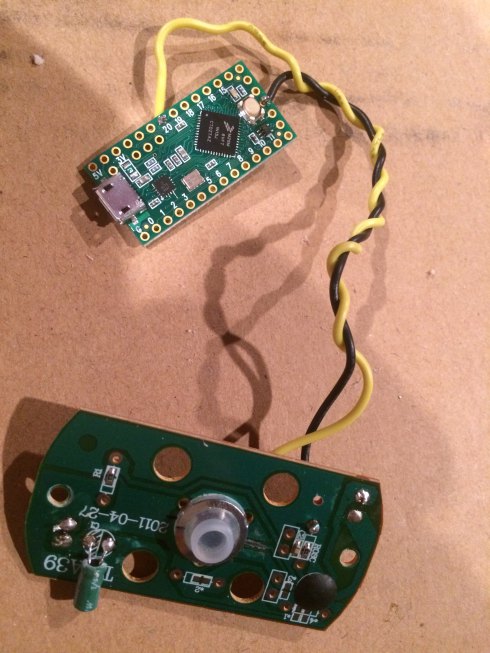
The electronics part of the project was very straightforward. I disassembled the Easy button (good instructions) and got rid of the speaker. I used some hookup wire to connect the Easy button’s existing button circuitry to one of the input pins (20) and Ground on the Teensy LC. To verify the button was connected properly, I wrote a simple program for the Teensy that lit up the onboard LED when there was input on pin 20.
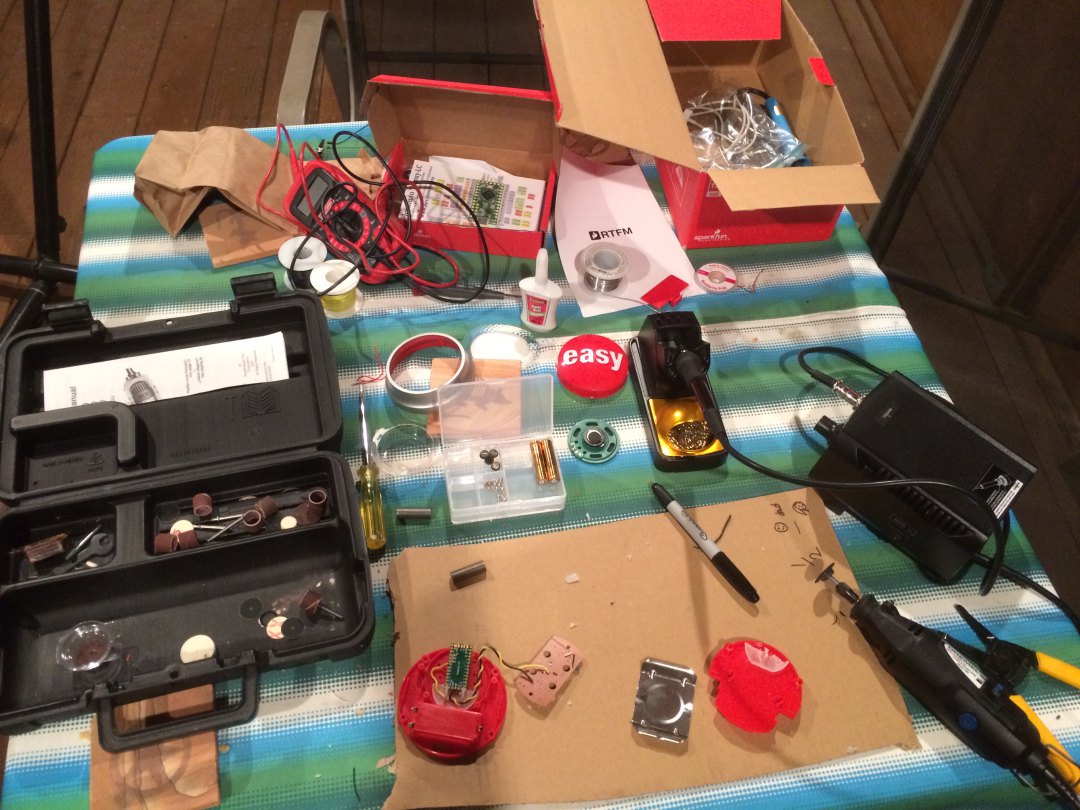
The hardest part, by far, of the entire project was trying to fit and secure the new board inside, and be able to close it back up. I also needed a hole in the case so the USB cable could go from the Teensy to the computer. Luckily I have a Dremel tool, which is perfect for this type of job. I used it to carve out a lot of the internal plastic, and drilling a hole in the side for the cable. I got a little creative and glued in a carved-up a plug protector I found in the junk drawer. This serves as a mount for the Teensy, so it won’t rattle around inside.

The final, and easiest, step was to write the software for my new “keyboard”. I used the Teensyduino add-on for the Arduino IDE, and set the USB Type to Keyboard. All Arduino programs (“sketches”) consist of a setup and a loop function. The setup is run once, and is where I configure the hardware pins. The Teensy LC’s onboard LED is available on pin 13 – I configure that as an output (to aid debugging). Then I need to configure pin 20 as an input (you’ll recall I soldered a wire from the button to pin 20). The loop function runs repeatedly, forever, while the device has power. I use the Button library which nicely encapsulates the logic for detecting button presses on an input pin. When the button is pressed, I turn on the LED and then send the sequence of characters :+1:, followed by Command+Enter to submit the PR comment form (probably needs to be changed to ALT+Enter on Windows). The Keyboard library handles all the details of sending the proper USB HID codes to the computer. Full source code:
/* Add +1 comment to Github Pull Request

   You must select Keyboard from the "Tools > USB Type" menu
*/

#include <Bounce.h>

const int ledPin = 13;
const int buttonPin = 20;
const int debounceTime = 10; //ms

Bounce button20 = Bounce(buttonPin, debounceTime);


void setup() {
  pinMode(ledPin, OUTPUT);
  pinMode(buttonPin, INPUT_PULLUP);
}

void loop() {
  button20.update();

  if (button20.fallingEdge()) {
    digitalWrite(ledPin, HIGH);
    Keyboard.println(":+1:");

    // submit form (Command+Return)
    Keyboard.press(KEY_LEFT_GUI);
    Keyboard.press(KEY_RETURN);
    delay(100);
    Keyboard.releaseAll();

  } else if (button20.risingEdge()){
    digitalWrite(ledPin, LOW);
  }
}
I had a blast with this project, and its a great introduction to building a simple device that can talk to a computer. Using the Teensy and a big button, you can send anything that a USB mouse or keyboard can send. Think of the possibilities! Special shout-out to Sharon Cichelli for her enthusiasm in showing how accessible and fun these hardware projects can be – hi Sharon!
Originally posted at http://www.joshuaflanagan.com/blog/2015/11/07/build-your-own-single-function-keyboard.html
Infinity ErgoDox
I’ve always been picky about my keyboard, but recently discovered an entirely new world of keyboard enthusiasts. Aaron Patterson was on the Ruby Rogues podcast talking about mechanical keyboard kits. As in, keyboards you build yourself. You pick out the key switches (get just the right clicky feel), you pick out the keycaps, you pick a layout, etc. And then you solder all the parts together. That sounded pretty extreme to me! But I was just getting back into hardware hacking (arduino, etc) and figured it would make for a fun project.
Intrigued, I did some research, and discovered that Massdrop was just starting an effort to build the Infinity ErgoDox – an update to the popular ErgoDox. Perfect, I placed an order (I went with Cherry MX Blue switches and blank DCS
keycaps, in case that means anything to you). And waited. That was back in April. I pretty much forgot about it until a box arrived from Massdrop a couple weeks ago.
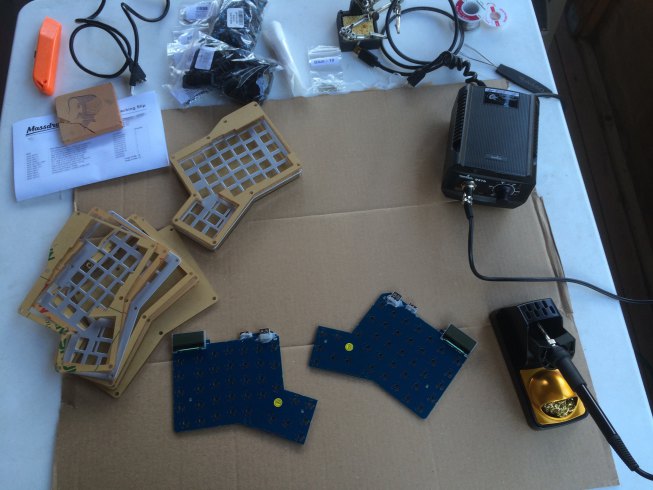
I finally got a rainy weekend to dedicate some time to it. Reading the forums, people were saying that this was a much easier build than the ErgoDox, with one mentioning a 20 minute build time. I think it took me 20 minutes to get all my tools out and unwrap everything. This was not a cheap keyboard, the parts are currently scarce, and most of the documentation seems to assume more knowledge of the process than I had. But taking my time, soldering the key switches to the PCB, installing the stabilizers, assembling the case, I had a working keyboard about four hours later!

Well, kinda. The hardware is only half of the story. The cool thing about the Infinity ErgoDox is that it has a completely customizable (open source) firmware. Now that I have a device with a bunch of keys on it, I can decide exactly
what all of the keys do. It has an online configurator to build your customized firmware for you, if all you want to do is re-map keys. But if you really want to get fancy, you can build the firmware from source. This exposes all of the capabilities of the device. Specifically, this keyboard kit includes a 128×32 LCD panel, as well as a controller to individually address each key’s backlight LED (not included in the kit – bring your own fun colors).
The best part is that there is a lot of unexplored territory. The existing firmware code has some very crude support for the LCD and LEDs – just enough to prove that they work. So there is a lot of room to flesh them out further, to try and support all the silly things people might want to light up while they type. That’s the part I am most excited about. Eventually, I’ll probably enjoy typing on it, too.
Originally posted at http://www.joshuaflanagan.com/blog/2015/11/03/infinity-ergodox.html
A smarter Rails url_for helper
Problem
In my Rails application, I want to be able to determine a URL for any given model, without the calling code having to know the type of the model. Instead of calling post_path(@post) or comment_path(@comment), I want to just say url_for(@post) or url_for(@comment). This already works in many cases, when Rails can infer the correct route helper method to call. However, Rails cannot always infer the correct helper, and even if it does, it might not be the one you want.
For example, suppose you have comments as a nested resource under posts (config/routes.rb):
resources :posts do
  resources :comments
end
I have a @post with id 8, which has a @comment with id 4. If I call url_for(@post), it will correctly resolve to /posts/8. However, if I call url_for(@comment), I get an exception:
undefined method `comment_path' for #<#<Class:0x007fb58e4dbde0>:0x007fb58d0453e0>
Rails incorrectly guessed the the route helper method would be comment_path (unfortunately, it knows nothing of your route configuration). The correct call would be post_comment_path(@comment.post, @comment), which returns /posts/8/comments/4. However, that requires the calling code to know too much about comments.
My solution
I wanted a way to “teach” my application how to resolve my various models into URLs. The idea is inspired by FubuMVC’s UrlRegistry (which was originally inspired by Rails’ url_for functionality…). I came up with SmartUrlHelper. It provides a single method: smart_url_for, which is a wrapper around url_for. The difference is that you can register “handlers” which know how to resolve your edge cases.
To solve my example problem above, I’d add the following code to config/initializers/smart_urls.rb:
SmartUrlHelper.configure do |url|
  url.for ->model{ model.is_a?(Comment) } do |helpers, model|
    helpers.post_comment_path(model.post, model)
  end
end
Now I can call smart_url_for(@post) or smart_url_for(@comment) and get the expected URL. The comment is resolved by the special case handler, and the post just falls through to the default url_for call. Note that in this example, I use instance variables named @post and @comment, which implies I know the type of object stored in the variable. In that case, smart_url_for is just a convenience. However, consider a scenario where you have generic code that needs to build a URL for any model passed to it (like the form_for helper). In that case, something like smart_url_for is a necessity.
Feedback
First, does Rails already have this functionality built-in, or is there an accepted solution in the community? If not, what do you think of this approach? I’d welcome suggestions for improvement. Particularly, I’m not wild about storing the handlers in the Rails.config object, but didn’t know a better way to separate the configuration step (config/initializer) from the consuming step (calls to smart_url_for). So far, it is working out well on my project.
Powerfully simple persistence: MongoDB
In my post “Great time to be a developer“, I listed MongoDB as one of the tools that made my task (track travel times for a given route) easy. This post will show you how.
What do I need to store?
My travel time data collection job needs the URL for the traffic data endpoint for each route that I’ll be tracking. I could have just hardcoded the URL in the script, but I knew that my co-workers would be interested in tracking their routes too, so it made sense to store the list of routes in the database.
I need to store the list of ‘trips’. I define a trip as the reported travel details for a given route and departure time (Josh’s route at 9am, Josh’s route at 9:10am, Tim’s route at 9:10am, etc.). I want to capture the date of each trip so that I can chart the trips for a given day, and compare day to day variation. Even though I really only need to the total travel time for each trip, I want to capture the entire response from the traffic service (travel times, directions, traffic delay, etc.) so that I could add new visualizations in the future.
Setup
First, I had to install mongo on my laptop. I used the homebrew package manager, but binary releases are readily available.
brew install mongodb
I need to add the route for my commute. I fire up the mongo console by typing mongo. I’m automatically connected to the default ‘test’ database in my local mongodb server. I add my route:
> db.routes.save({
  name: 'josh',
  url: 'http://theurlformyroute...'
})
I verify the route was saved:
> db.routes.find()
{"_id" : ObjectId("4f22434d47dd721cf842bdf6"),
 "name" : "josh",
 "url" : "http://theurlformyroute..." }
It is worth noting that I haven’t skipped any steps. I fired up the mongo console, ran the save command, and now I have the route in my database. I didn’t need to create a database, since the ‘test’ database works for my needs. I didn’t need to define the routes collection – it was created as soon as I stored something in it. I didn’t need to define a schema for the data I’m storing, because there is no schema. I am now ready to run my data collection script.
Save some data
I’ll use the ruby MongoDB driver (gem install mongo) directly (you can also use something like mongoid or mongomapper for a higher-level abstraction). My update script needs to work with the URL for each route:
db = Mongo::Connection.new.db("test")
db["routes"].find({}, :fields => {"url" => 1}).each do |route|
  url = route["url"]
  # collect trip data for this route's url
end
I want to group related trips for a commute, so I create a ‘date_key’ based on the current date/time. A date_key looks like: 2012-01-25_AM, 2012-01-25_PM, or 2012-01-26_AM. Now to store the details returned from the traffic service:
trip_details = TrafficSource.get(url)
db["routes"].update({"_id" => route["_id"]}, {
  "$addToSet" => {"trip_keys" => date_key},
  "$push" => {"trips.#{date_key}" => trip_details}
})
After running for a couple days, this will result in a route document that looks something like:
{
  _id: 1234,
  name: 'josh',
  url: 'http://mytravelurl...',
  trip_keys: ['2012-01-25_AM', '2012-01-25_PM', '2012-01-26_AM',...],
  trips: {
    2012-01-25_AM: [{departure: '9:00', travelTime: 24, ...}, {departure: '9:10', travelTime: 26}, ...],
    2012-01-25_PM: [{departure: '9:00', travelTime: 28, ...}, {departure: '9:10', travelTime: 29}, ...],
    2012-01-26_AM: [{departure: '9:00', travelTime: 25, ...}, {departure: '9:10', travelTime: 25}, ...],
    ...
  }
}
That is *all* of the MongoDB-related code in the data collection script. I haven’t left out any steps – programmatic, or administratrive. None of the structue was defined ahead of time. I just ‘$push’ed some trip details into ‘trips.2012-01-25_AM’ on the route. It automatically added an object to the ‘trips’ field, with a ‘2012-01-25_AM’ field, which holds an array of trip details. I also store a list of unique keys in the trip_keys field using $addToSet in the same `update` statement.
Show the data
The web page that charts the travel times makes a single call to MongoDB:
route = db["routes"].find_one(
  {:name => 'josh'},
  :fields => {"trips" => 1}
)
The entire trips field, containing all of the trips grouped by date_key, is now available in the ruby hash route. With a little help from ruby’s Enumerable#map, I transform the data into a format consumable by Highcharts JS.
Production
Just to be thorough, I’ll mention that I had to modify the script for production use. I replaced the `db` local variable with a method that uses the mongolab connection when available, or falls back to the local test connection:
def db
  @db ||=
  begin
    mongolab_uri = ENV['MONGOLAB_URI']
    return Mongo::Connection.new.db("test") unless mongolab_uri
    uri = URI.parse(mongolab_uri)
    Mongo::Connection.from_uri(mongolab_uri).db(uri.path.gsub(/^\//, ''))
  end
end
Conclusion
A couple queries, a single, powerful update statement, and no administration or schema preparation. Paired with the ruby driver‘s seemless mapping to native Hash objects, it is hard to imagine a simpler, equally powerful, persistence strategy for this type of project.
Great time to be a developer
I am in awe of the free tools available to software developers today. It is amazing how fast, and cheaply, you can turn an idea into productive code. I was so pumped by a recent experience, I decided to share.
The Problem
My employer is moving to a new location in a part of the city that I’m not very familiar with. I have no idea what the traffic patterns are like, and I’m wondering when to leave for work in the morning. I tried looking at various web mapping services. Some factor in current traffic, but I couldn’t find any that could tell me historical traffic information, making it impossible to make a decision about departure time in advance.
Idea
Tracking historical travel times for the world would be a huge task, but what if I could create a small history of my specific route? The TomTom Live Traffic Route Planner site can give me directions to work, and estimate travel time based on current traffic conditions. I discovered that it returns a lot of the trip information from a single AJAX call. A quick copy/paste of the URL to curl confirmed that I could repeat the call and get the same data. I just need to hit that endpoint at various times in the morning and store the results. Later, I’ll be able to analyze the results and determine the best time to leave for work.
Keep it Minimal
Now I have an idea, but I don’t know if it is worth pursuing. I don’t know if the data I’m getting is accurate (it worked once or twice from curl now, but maybe the long URL contains some session id that will expire?). I don’t want to invest a lot of time or money in building it out. Also, it’s 6pm Tuesday night, I only have 3 more days left this week before I make the commute to the new office. I need to start collecting data as soon as possible; hopefully Wednesday morning. It’s time to write some code. Fast.
This is where the quality of available tools really make an impact. To name a few:
Ruby – low ceremony scripting with a vast ecosystem of libraries to accomplish common tasks.
HTTParty – crazy simple library to call a URL and get a Ruby hash of the response data – no parsing, no Net:HTTP.
Heroku – There is no better option for hosting applications in the early proving stage. Create and deploy a new app in seconds, for free. The free Heroku Scheduler add-on lets me run a script every 10 minutes in my hosted environment — exactly what I need for my data collection.
MongoDB – natural fit for persisting an array (the trips calculated every 10 minutes) of ruby hashes (responses from traffic service). No schema, no mapping, no fuss.
MongoLabs – free MongoDB hosting on Heroku. One click to add, and I have a connection string for my own 240MB in the cloud. Sweet.
By 11pm Tuesday night, my script is running in the cloud, ready to start collecting data Wednesday morning. I’m not going to spend any time on building a UI until I know if the data collection works.
Checkpoint
On Wednesday night, I use the mongo console to review the trip data that was collected in the morning. I see that the trip duration changes for each request, which gives me hope that I’ll have meaningful data to answer my question. However, I also notice that the reported “traffic delay” time is always zero. I’m a little concerned that my data source isn’t reliable. I’m glad I haven’t invested too much yet. At this point, I can just write off the time as a well-spent refresher of MongoDB.
Further exploration
I’m still curious to see a visualization of the data. I decide to spend a couple hours to see if I can build a minimal UI to chart the departure vs. duration times. Again, the available tools gave me fantastic results with minimal effort:
sinatra – an incredibly simple DSL for exposing your ruby code to the web. All I needed was a single endpoint that would pull data from mongo and dump it to the client to render a chart. Anything more than sinatra would be overkill, and anything less would be tedious.
Highcharts JS – amazing javascript library for generating slick client-side charts. A ton of options (including the very helpful datetime x-axis), well-documented, and free for non-commercial use. I didn’t have a “go-to” option for client-side charting, so I had to do a quick survey of what was available. This is the first one I tried, and it left me with absolutely no reason to look at others.
After a couple hours (mostly to learn Highcharts), I have my chart and a potential answer (leave before 7:45, or after 9):

Conclusion
I essentially spent one evening writing the data collection script, and another night building the web page that rendered the chart. I’ve proven to myself that the idea was sound, if not the data source. I will continue to poke around to see if I can find a more reliable API for travel times, but otherwise consider this project “done.” In years past, getting to this point would have meant a lot more effort on my part. It is awesome how much of the hard work was done by the people and companies that support a great developer ecosystem.
Coordinating multiple ajax requests with jquery.when
While building a rich JavaScript application, you may get in a situation where you need to make multiple ajax requests, and it doesn’t make sense to work with the results until after all of them have returned. For example, suppose you wanted to collect the tweets from three different users, and display the entire set sorted alphabetically (yes, its contrived). To get the tweets for a user via jQuery, you write code like:
$.get("http://twitter.com/status/user_timeline/SCREEN_NAME.json",
  function(tweets){
    // work with tweets
   },
  "jsonp");
(For the purposes of this example, I’m going to assume there is no way to get the tweets for multiple users in a single call)
To get the tweets for three users, you would need to make three separate $.get calls to the user_timeline endpoint. Since each call is executed asynchronously, with no guarantee which would return first, the code to coordinate the response for all three users would likely be a mess of shared state and/or nested callbacks.
As of jQuery 1.5, the solution is much simpler. Each of the ajax functions were changed to return a Deferred object which manages the callbacks for a call. (The Deferred object is beyond the scope of this post, but I encourage you to read the documentation for a more thorough explanation.) The power of Deferred objects become apparent when used with the new jquery.when utility function. jquery.when accepts any number of Deferred objects, and allows you to assign callbacks that will be invoked when all of the Deferred objects have completed. The Deferred objects returned by the ajax functions are complete when the responses are received. This may sound confusing, but it should be much clearer when you see it applied to the example scenario:
Run QUnit tests under Continuous Integration with NQUnit
Almost three years ago, I wrote about Running jQuery QUnit tests under Continuous Integration. As you can imagine, a lot has changed in three years. You would now have a lot of trouble following my post if you use the latest versions of WatiN and NUnit.
Fortunately, Robert Moore and Miguel Madero have already taken the code, fixed it to work with the latest libraries, and released it as NQUnit. They’ve even packaged it up for easy consumption via Nuget:
PM> Install-Package NQUnit
My team recently dumped our implementation in favor of NQUnit. Thanks, and great job guys!
How to use a tool installed by Nuget in your build scripts
My last post covered tips for people creating Nuget packages. This one is important for people consuming Nuget packages.
Some Nuget packages include executables in their tools folder. It is very easy to use these tools within Visual Studio because Nuget makes them available in the path of the Package Manager Console. However, they are very difficult to use outside of Visual Studio, especially in a build script. The problem is the name of the folder containing the installed package includes the version number of the package. If you install NUnit 2.5.1, the nunit-console.exe will be in packages\NUnit.2.5.1\tools. However, if you later upgrade to NUnit.2.5.2, the path to nunit-console.exe will change to packages\NUnit.2.5.2\tools. You will need to change your build scripts every time you upgrade your version of NUnit. That is unacceptable.
The solution is to create a helper that can figure out where the tool lives. If you are using rake for build automation, it is fairly straightforward:
If not, you may want to create a batch file in the root of your project that calls your tool. You can create a tool specific batch file:
Or, if you have lots of tools from different packages, you might just want a generic batch file that allows you to specify the executable name:
Tips for building Nuget packages
I’ve spent a lot of time over the past couple weeks building and consuming Nuget packages on real projects. I’ve picked up a few tips that, while not mind-blowing, should help you get beyond the simple scenarios you see in most demos. I’ll refer to an example .nuspec from one of my projects, so you may want to keep it open in your browser.
Do not store the version number in your nuspec file
I assume you already had a build script before Nuget came. You already have a way to generate and store the version of your build output. For example, I tend to store the first three components of the version in a VERSION.txt file in my code repository. It gets manually incremented when appropriate (see semver). The fourth component is the build number generated by my continuous integration server. This information is already used to generate my AssemblyInfo.cs file, artifacts package name, etc. It doesn’t make any sense for me to repeat that information in my .nuspec file, so set the version tag to 0.0.0 (see line 5) to remind yourself that it is not used. Use the -Version option of the nuget.exe pack command to provide the actual version.
Prefer the element approach to adding files to your package
Again, you already have a build script, and it likely copies all of your build output to a known location. It doesn’t make sense to copy the files around even more to build the structure required by Nuget’s “conventional folders” approach. Instead, use the
Publish symbols packages for your Nugets
Nuget has integrated support for building and publishing symbol packages to symbolsource.org. These symbol packages will greatly enhance the debugging experience for anyone that uses your library, and since its so easy, there is no reason for you to not publish them (assuming your library is open source).
An opportunity for a viable .NET open source ecosystem
I recently started getting to know Microsoft’s Nuget package management tool. I’ll admit I was going into it expecting to be disappointed, still annoyed that it had effectively killed the nu project and marginalized OpenWrap – two projects in the same problem space, but from the community, that I thought had promise. However, after an hour or so of playing with it – pulling packages into a project, authoring my own package – I came away impressed. It worked and it was easy.
Of course, it wasn’t too long before I ran into a pain point. I wanted to create a nuget package as part of my continuous integration build. A nuget package needs a version number that increases with every release. So it stands to reason that every time you build the package, you are going to give it a new version number. The problem was that the version number could only be specified in the .nuspec file. The .nuspec file describes how to build the package, mostly static information that should be checked into source control. The idea that I would have to modify this file every time I built seemed absurd (because it was). I had found it! A reason to complain about nuget! Microsoft just doesn’t get it! Wait until twitter hears about this!
A New Hope
And then I remembered there was something very different about the nuget project: while it is primarily maintained by Microsoft employees, it accepts contributions from the community. Suddenly, the barbs I was about to throw wouldn’t apply just to the big bully Microsoft, but my own .NET developer community. As a core member of many open source projects over the years, I know how limited resources are, and that feature prioritization is usually based on the needs of the people willing to do the work. If I thought it was important, it was time to step up. So I logged an issue. It got a few nods of approval, so I submitted a pull request. And then the strangest, most wonderful, the big-ship-is-turning thing happened: they accepted it. Within two days of discovering this twitter-rant worthy, how-could-they-not-think-of-this-scenario, nuget-is-doomed problem, it was fixed. Huh.
Fast forward a few weeks. Old prejudices die hard. I’m trying to take advantage of the very cool symbolsource.org integration (I think the lack of an approachable public symbol server until now has been as big a hole as not having a package manager). It becomes painfully clear that the nuget support for symbol package creation is only viable for the most simplest scenarios. I was annoyed and exhausted from a long night of fighting the tool, so was a little quicker on the twitter trigger (although still much tamer than I felt):

Then, remembering my last experience, I figured I would at least start a discussion before giving up for the night. To my surprise, the next day it was turned into an issue – this isn’t just another Microsoft Connect black hole. After hashing out a few details, I went to work on a solution and submitted a pull request. It was accepted within a few days. Aha! This is open source. This is how its supposed to work. This works.
The Nuget project is the most exciting thing to come out of Microsoft DevDiv since the .NET Framework was released. I think it is very important to the .NET open source community that it succeeds. Not just for the obvious benefit of simplifying distribution for all of the non-Microsoft open source solutions. But for the potential it has to change minds internally at Microsoft about how community collaboration can work. And for the potential it has to change minds in the community, about how collaboration with Microsoft can work.
Epilogue: The alternative
Ever read the What If…? comic books? From wikipedia:
What If stories usually began with [the narrator] briefly recapping a notable event in the mainstream Marvel Universe, then indicating a particular point of divergence in that event. He would then demonstrate, by way of looking into a parallel reality, what could have happened if events had taken a different course from that point.
I’ve been thinking a lot lately about “What if… Microsoft had launched ASP.NET MVC as a collaborative project that accepted community contributions the same way that Nuget does?”
Would FubuMVC exist? I’m not sure it would, and I’m not sure that would be a bad thing. We, the FubuMVC team, started out building a new product on ASP.NET MVC, adopting Microsoft’s framework before it even went 1.0. We inevitably ran into some pain points that we had to work around. Of course, the workarounds had to be implemented in our application codebase because Microsoft did not want them and/or could not take them. As we built up more and more workarounds, we relied less and less on the out-of-box functionality. It starts with a custom action invoker. Which leads to custom model binding. Then custom HTML helpers. Route creation and URL resolution. After a year and a half of this, it became clear we were building our own framework. During a few days of a long Christmas vacation, Chad Myers went the last mile and extracted our changes into a google code project that eventually became FubuMVC.
Now consider what might have happened if Microsoft accepted contributions to MVC. Remember, we didn’t decide from day 1 to write a new framework – we had a product to build. As each issue came up, we could have submitted it as a patch. Each patch on its own wouldn’t have been a revolutionary change. But the motivations behind them may have started to sneak into the consciousness of everyone working on the codebase. You see, we, and anyone else that may have contributed, had a major advantage over the Microsoft contributors: we were building real applications with this framework.
Now, I don’t think the end result would have been a framework with all of FubuMVC’s traits (requiring an inversion of control container would have been DOA). But certainly some of the core ideals (composition over inheritance, leveraging the strengths of the type system) could have snuck in. And instead of going our own way, we could have benefited from all of Microsoft’s work: Visual Studio tooling, razor view engine support, documentation, and an overall thoroughness you get from paid employees working on it full time. And of course its not just us – ideas and code from projects like OpenRasta, NancyFX, and OWIN could have snuck in too.
I think that was a major missed opportunity. The Nuget project is proving there is a better way.
subscribe via RSS